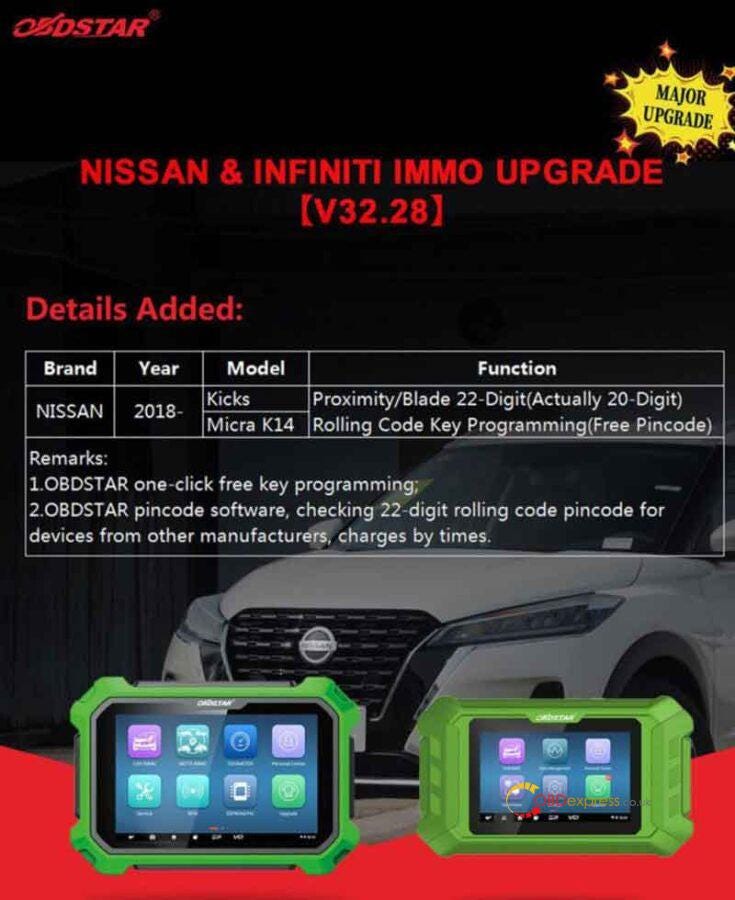
Autel adds Active Test, Special Function, battery test and
active test on Autel 808 series tablet on June 1st, 2022. You can obtain all new
software packages by tapping 'Update' icon on the Autel scan tool. Make sure the
device's system version is updated to V2.62 or above. If there is not enough
storage for downloading update, just insert a micro SD card to the Autel
device.
Part One: Active Test and Special Function
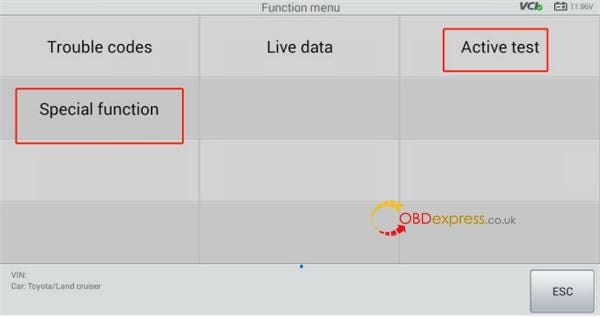
Definition:
- Active Test function is used for outputting signal to vehicle control unit
using the device to control actuator for test, so that it can test whether the
actuator works normally, such as Fuel Pumps test, EGR test, etc.
- Special Function generally refers to the initial adaptation, self-learning
or some auto detection function with many procedures that the vehicle is
performed after maintenance or reset is done or some related component in
electronic control system is replaced, such as Crankshaft Position Sensor
Learn.
Compatible device:
Autel MX808, MX808TS, MK808, MK808BT, MK808TS, TS608, IM508
(Applies to Autel devices above in all regions except mainland China)
Vehicle coverage:
All vehicle brands that the device can support
Step-by-step guide:
- Perform Active test Function
Read vehicle by auto detect, manual input or manual selection;
Select Auto scan or Control Unit — — — (Powertrain/Body/Chassis) — —
relevant module — -Active test;
Take steps by following the on-screen instructions.
- Perform Special Function:
Read vehicle by Auto detect or manual input or manual selection;
Select Auto scan or Control Unit — — — (Powertrain/Body/Chassis) — —
(relevant module) — -Special function;
Take steps by following the on-screen instructions.
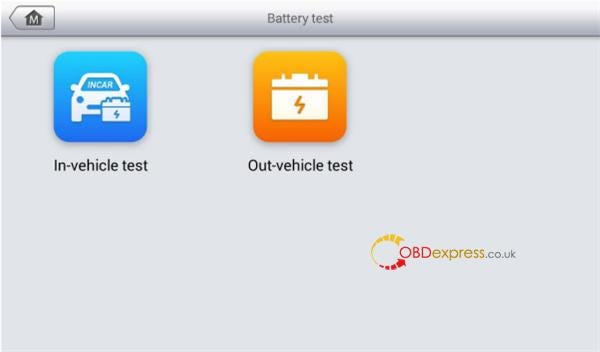
Part Two: Battery Test
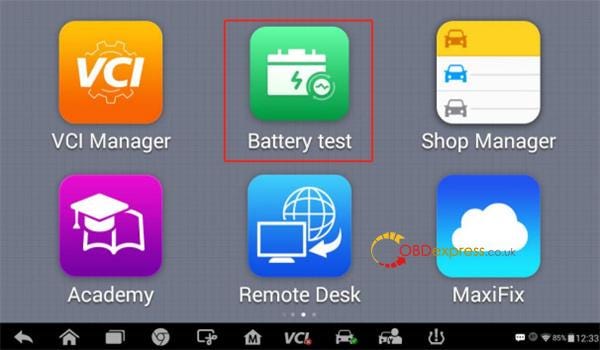
Definition:
Battery Test function includes In Vehicle test and Out of Vehicle test
function.
- In-vehicle Test is used for testing batteries that are installed in a
vehicle. An in-vehicle test includes battery test, starter test, and generator
test. These tests help determine the health status of the battery, the starter,
and the generator, respectively.
- Out-vehicle test is used to test the condition of batteries that are not
connected to a vehicle. This function aims to check the health status of the
battery only
Compatible device:
MK808BT, MX808TS, DS808BT, DS808TS, MP808BT and MP808TS
(Applies to Autel devices above in all regions except mainland China)
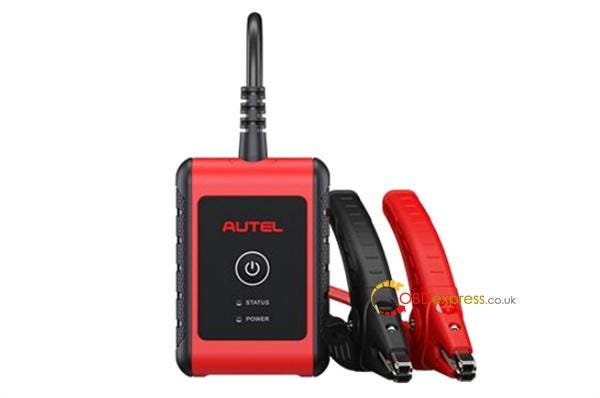
Additional equipment is required:
Autel MaxiBAS BT506
Step-by-step guide:
- Perform the In-vehicle battery test
Note: The complete in-vehicle test includes battery test, starter test and
generator test, in sequence.
Battery Test
a) Connect MaxiBas BT506 with tablet device
b) Tap the Battery Test application on the Autel tablet menu
c) Tap In-vehicle test
d) (Optional) Establish communications between the VCI and vehicle by
following the on-screen instructions on the OBD connect screen.
NOTE: OBD connect is recommended and is used for automatically obtain battery
type and location.
e) Confirm the vehicle information. The vehicle information screen
automatically displays when vehicle communication is established. A Battery
location button will pop up from the bottom of the screen.
f) Tap Next and access the Battery tab. Perform required operation before
the battery test based on the on-screen instructions. And tap the Start Testing
button
g) Wait for the battery test to complete and view the test results
Starter Test
a) Tap Continue. Perform required operations before the battery test based
on the on-screen instructions. And tap the Start Testing button
b) Turn on the vehicle ignition to ON when the following screen appears
c) Wait for the test to complete and view the test results
Generator Test
a) Tap Continue. Perform required operations based on the on-screen
instruction
b) Tap Continue and view the test results
- Perform the out-vehicle battery test
a) Connect MaxiBas BT506 with tablet device
b) Turn on MaxiBas BT506 and connect it to the battery
c) Tap the Battery Test application on the Autel tablet Job Menu
d) Tap Out-vehicle test
e) Check the battery information and tap Start Testing
f) Wait for the battery test to complete and view the test results
Check battery test report:
Path 1: Tap 'Report' button at the end of each test to check the test
report
Path 2: Go to Data Manager>>Vehicle Information>> Battery Test to
check the test report after a test is completed
Part Three: Digital Inspection
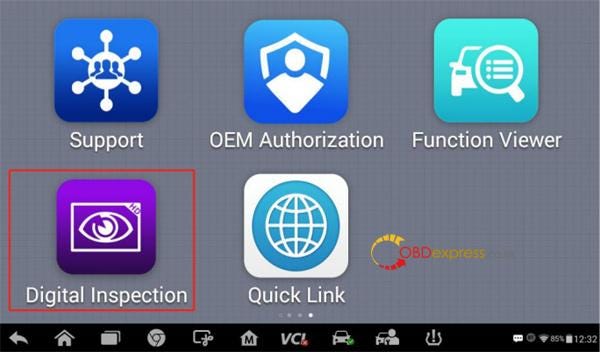
Definition:
The Digital Inspection application configures the Autel 808 series
Diagnostics Device to operate as a digital video scope by simply connecting the
tablet to a Digital Inspection Camera. This function allows you to examine
difficult-to-reach areas normally hidden from sight, with the ability to record
digital still images and videos, which offers you an economical solution to
inspect machinery, facilities, and infrastructure in a safe and quick way.
Compatible device:
Autel MK808, MK808BT, MK808TS, MX808, MX808TS, MP808, MP808BT, MP808TS, DS808, DS808BT, DS808K, DS808TS
(Applies to Autel devices above in all regions except mainland China)
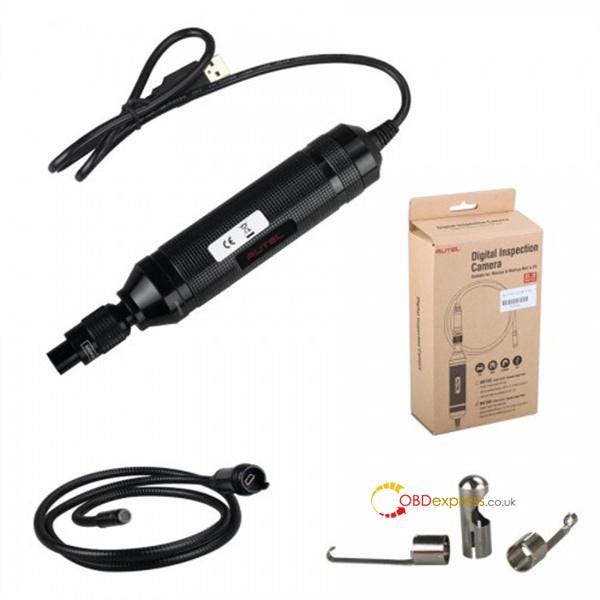
Additional equipment is required:
Digital Inspection Camera MV105/MV108 and its fittings
Step-by-step guide:
1.Take images using the Digital Inspection application
- Connect the imager head cable to the USB port on the top of the tablet.
- If not already done, power up the tablet.
- Tap the Digital Inspection application on the Autel scanner menu.
- The Digital Inspection interface displays, showing a camera operating
screen. The imager head camera is used by default.
- Select the Camera icon at the lower-right corner to take images.
- Focus the image to be captured in the view finder by adjusting and properly
locating the imager head cable.
- Tap the blue ring on the screen. The view finder now displays the captured
picture and auto-saves the taken photo.
- Tap the thumbnail image on the top-right corner of the screen to view the
stored image. Slide the screen left and right to view the images.
- Tap on the selected image and the edit toolbar instantly displays.
- Tap the corresponding button to share or delete an image.
- Tap the Back or Home button on the Navigation Bar at the bottom of the
screen
- Exit the Digital Inspection application
2.Record a video using the Digital Inspection application
- Connect the imager head cable to the USB port on the top side of the
tablet.
- If not already done, power up the tablet.
- Tap the Digital Inspection application on the Autel
scan tool. The Digital Inspection interface displays, showing a camera
operating screen. The Imager head camera is used by default.
- Select the Video icon at the lower-right corner to record a video.
- Properly locate the imager head cable to focus the inspection scene for
recording.
- Tap the red ring on the operating screen to start recording.
- Tap the red circle again to stop recording. The recorded video is
automatically saved.
- Tap the gallery icon at the bottom-right corner to review all recorded
videos.
- Select the corresponding button on the upper-right corner to search or
delete a video.
www.obdexpress.co.uk