Tuesday, 7 November 2023

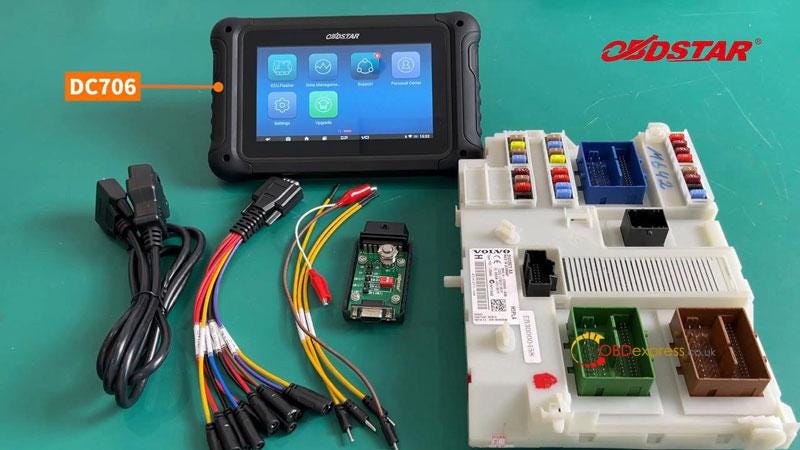
OBDSTAR DC706 Clone VOLVO DELPHI 2015-R5F64525 CEM

 OBDSTAR DC706 ECU Tool is able to clone VOLVO DELPHI 2015-R5F64525 CEM on bench. Besides, it also supports to clone other VOLVO CEM such as DELPHI 2015-R5F64524, M30855F+93C86, M30882F+95320(25320), LEAR SPC560B60+95320, SPC560B64+95320, etc.

Accessories

OBDSTAR DC706

Main cable

P004 ECU Clone Jumper & Adapter

Volvo CEM

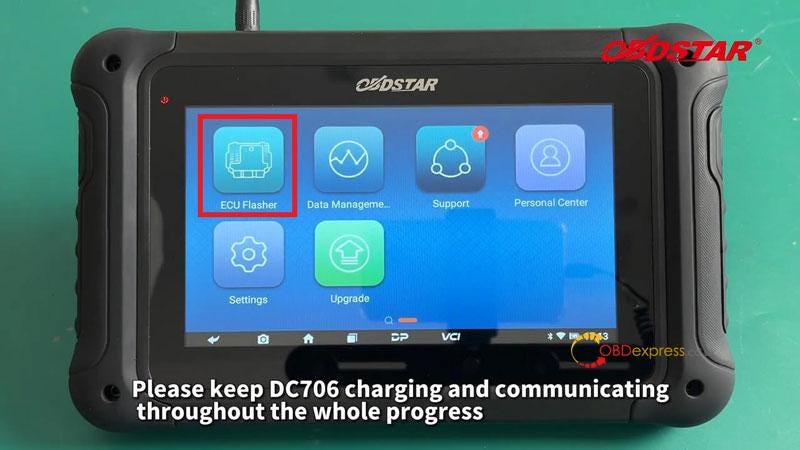
Make sure DC706 is charging and communicating during the whole progress.

OBDSTAR DC706 Clone VOLVO DELPHI 2015-R5F64525 CEM

Operation

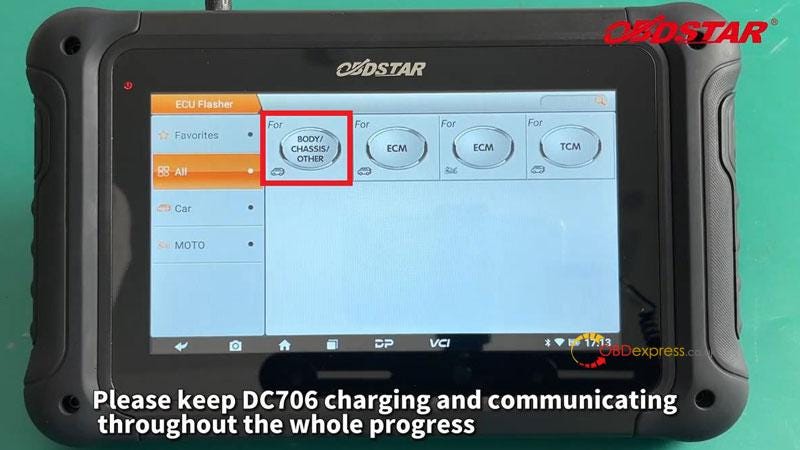
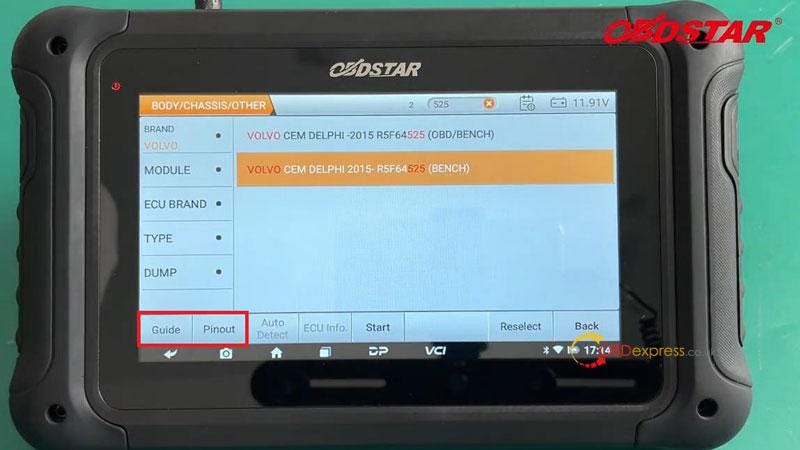
ECU Flasher >> BODY/CHASSIS/OTHER >> Latest version >> BRAND >> VOLVO >> VOLVO CEM DELPHI 2015- R5F64525(BENCH)

Click "Guide" to check the best detection method.

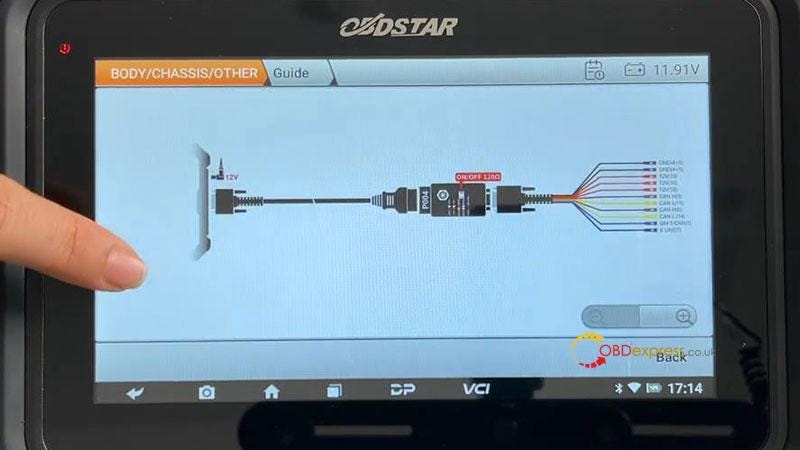
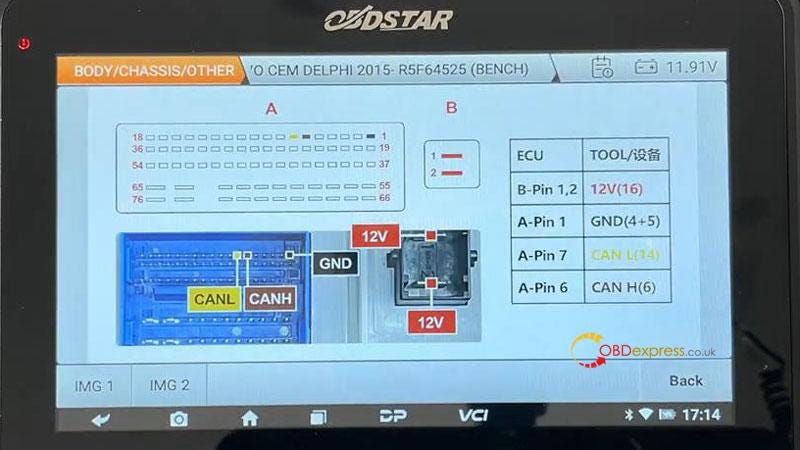
Connect the harness according to the wiring diagram in "Pinout".

OBDSTAR DC706 Clone VOLVO DELPHI 2015-R5F64525 CEM

OBDSTAR DC706 Clone VOLVO DELPHI 2015-R5F64525 CEM

OBDSTAR DC706 Clone VOLVO DELPHI 2015-R5F64525 CEM

OBDSTAR DC706 Clone VOLVO DELPHI 2015-R5F64525 CEM

OBDSTAR DC706 Clone VOLVO DELPHI 2015-R5F64525 CEM

Turn on the power of P004 and connect to ECU.

Start >> OK >> Connect

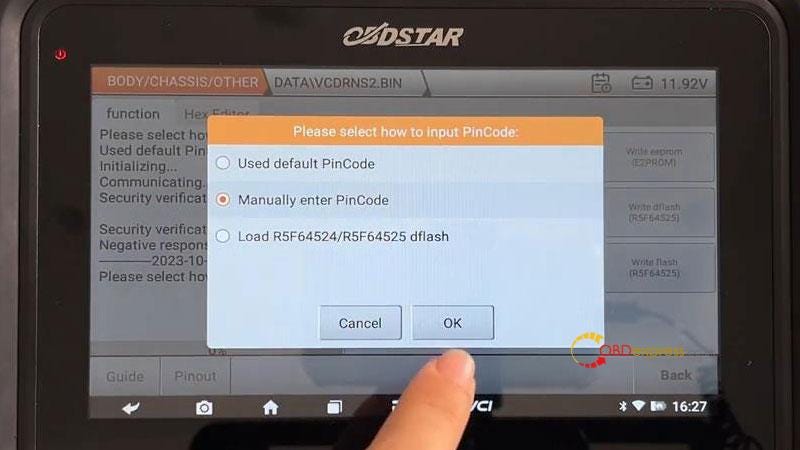
Used default Pincode: Some CEM models may use the same set of Pincode. We can try to use the default Pincode to connect. After selecting, the device will automatically try the default Pincode.

Load R5F64524/R5F64525 dflash: if the connection fails due to incorrect Pincode, we need to obtain the DFLASH data of the CEM module through other methods, and then put the data into the device to parse the Pincode. Generally, we can obtain this data by using a third-party programmer.

Manually enter Pincode >> Enter a 10 bit Pincode >> OK

Entered the system successfully.

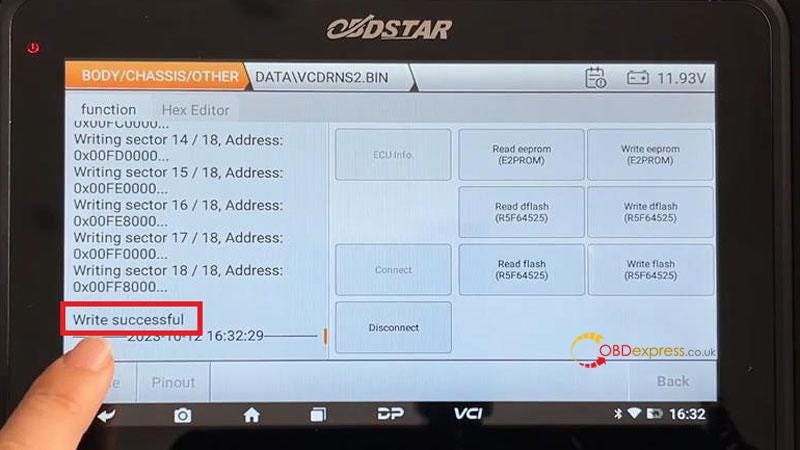
Now we can read & write E2PROM eeprom, R5F64525 dflash and R5F64525 flash.

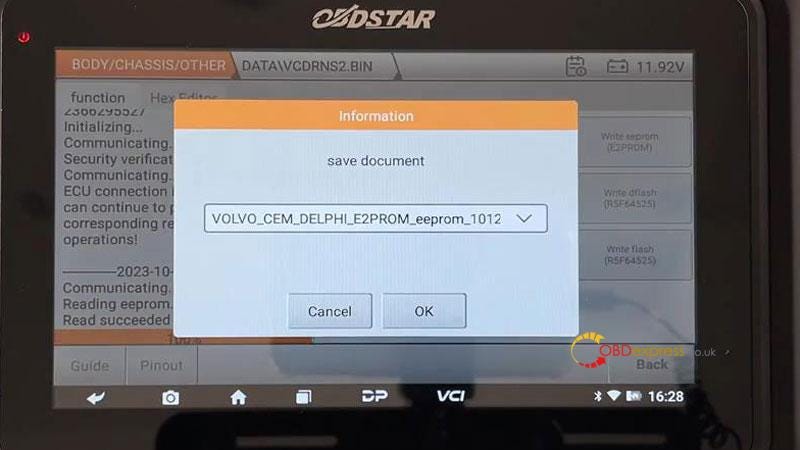
After the file is read, we can modify the file name.

And check the log on left side of screen to see the saved path.

After the ECU clone is completed, press "Disconnect".

OBDSTAR DC706 Clone VOLVO DELPHI 2015-R5F64525 CEM

OBDSTAR DC706 Clone VOLVO DELPHI 2015-R5F64525 CEM

OBDSTAR DC706 Clone VOLVO DELPHI 2015-R5F64525 CEM

www.obdexpress.co.uk

Sunday, 5 November 2023

How to Export Yanhua ACDP-1/ ACDP-2 Data on Android Smartphone?

 Here is the guide to exporting Yanhua Mini ACDP 2/ACDP 1 data on Android Smartphone.

https://youtu.be/DpX4D6J_koc

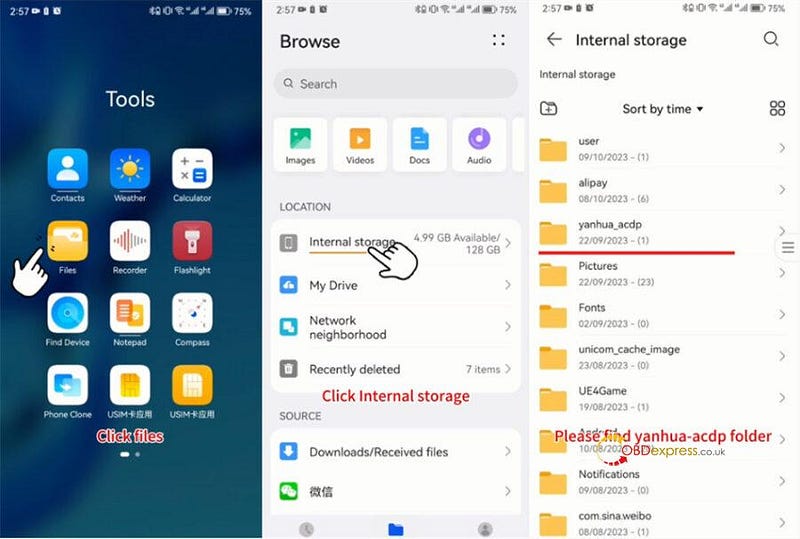
Click Tap "Files" in the "Tools" option

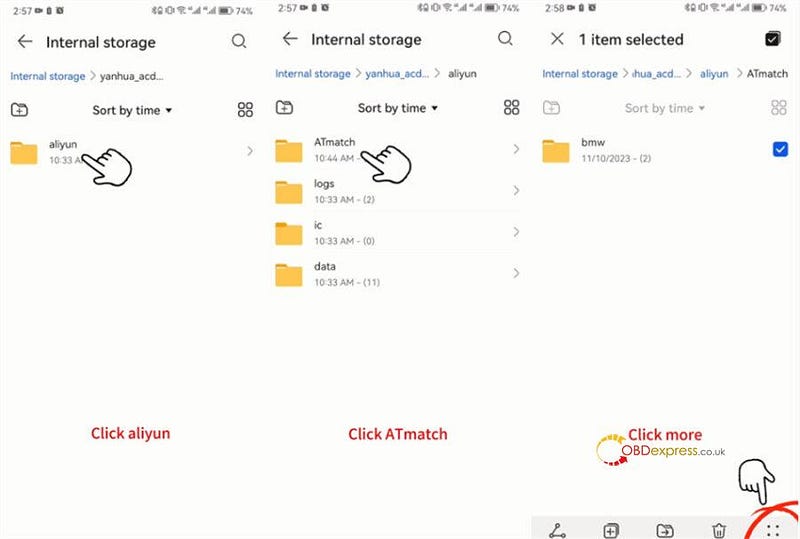
Select Internal storage>> yanhua_acdp folder>> aliyun>> ATmatch

Find the file that you want to export

Here take bmw as an example

Long press bmw, and it will be ticked

Click the "more" icon at the right bottom corner

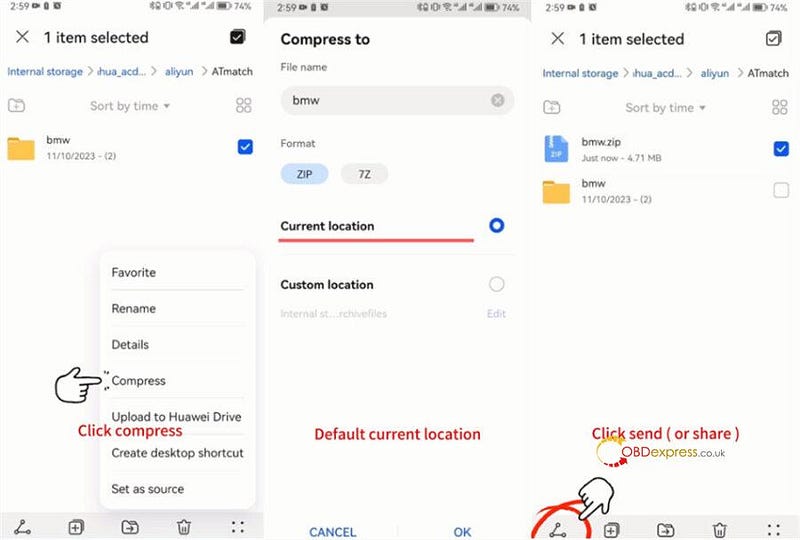
Click "Compress"

Click the default current location and click "OK"

Long press the zip file you want to export (i.e. bmw.zip)

Click the send or share icon at the left bottom corner

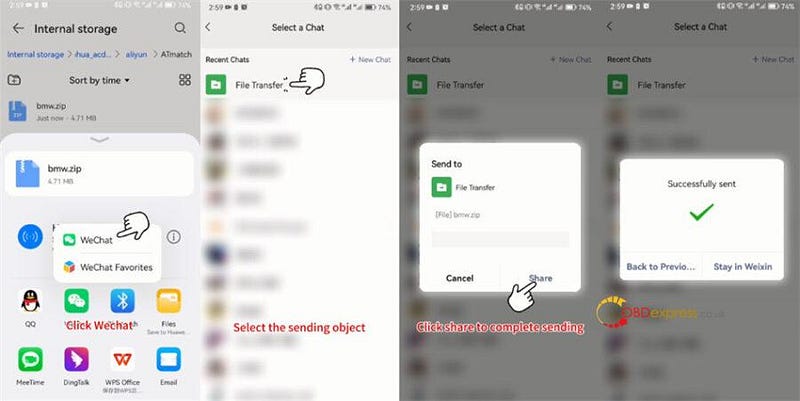
Here use WeChat as an example

Click WeChat icon>> WeChat

Select the sending object (i.e. File Transfer)

Click "Share" to complete sending

Successfully sent!

How to Export Yanhua ACDP Data on Android Smartphone

How to Export Yanhua ACDP Data on Android Smartphone

How to Export Yanhua ACDP Data on Android Smartphone

How to Export Yanhua ACDP Data on Android Smartphone

Mini ACDP data also can be exported on IOS System:

http://blog.obdexpress.co.uk/2022/05/03/yanhua-mini-acdp-ios-system-data-export-pc-bind-guide/

www.obdexpress.co.uk

How to Modify Yanhua Module 18/19/25/30 for Mini ACDP 2?

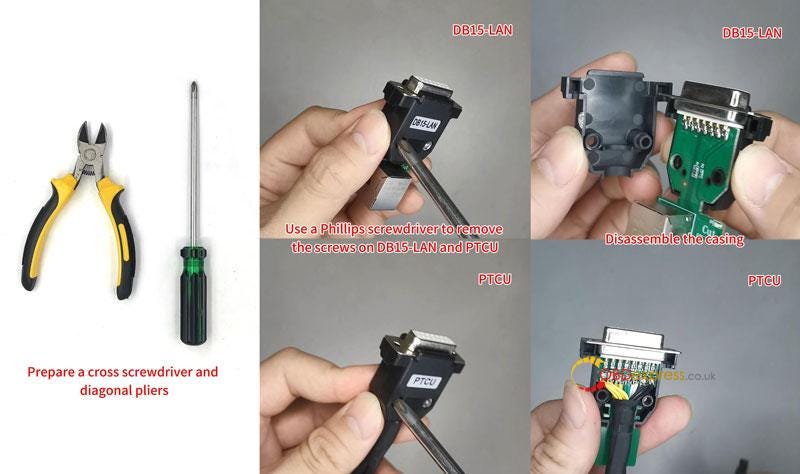
 By modifying DB15-LAN and PTCU in Yanhua Module 18, Module 19, Module 25, Module 30, it can be compatible with the Mini ACDP 2. Read this article carefully to learn how to do.

  • Prepare a cross screwdriver and diagonal pliers.
  • Use a phillips screwdriver to remove the screws on DB15-LAN and PTCU, disassemble the casing.
    1. How to Modify Yanhua Module for Mini ACDP 2

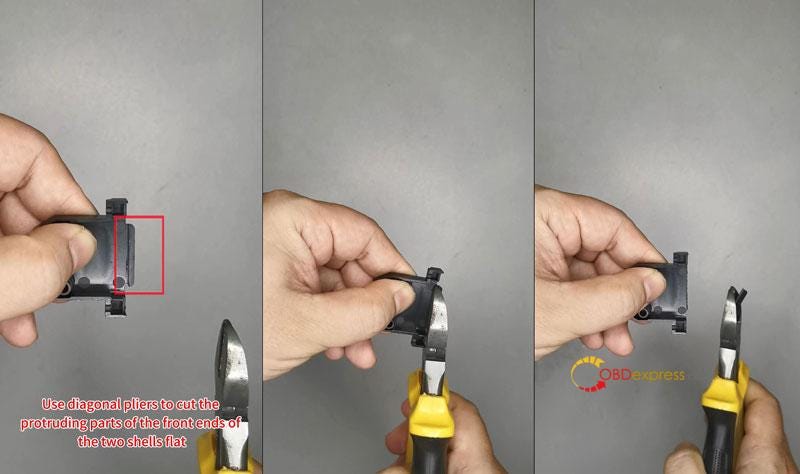
    2. Use diagonal pliers to cut the protruding parts on front ends of the two shells flat.
      1. How to Modify Yanhua Module for Mini ACDP 2

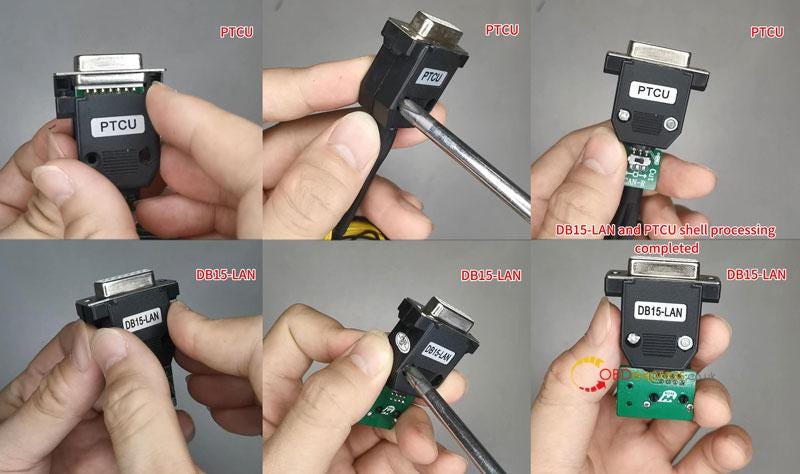
      2. Install the processed housing back, then tighten the screws.
        1. How to Modify Yanhua Module for Mini ACDP 2

          DB15-LAN and PTCU modification have completed!

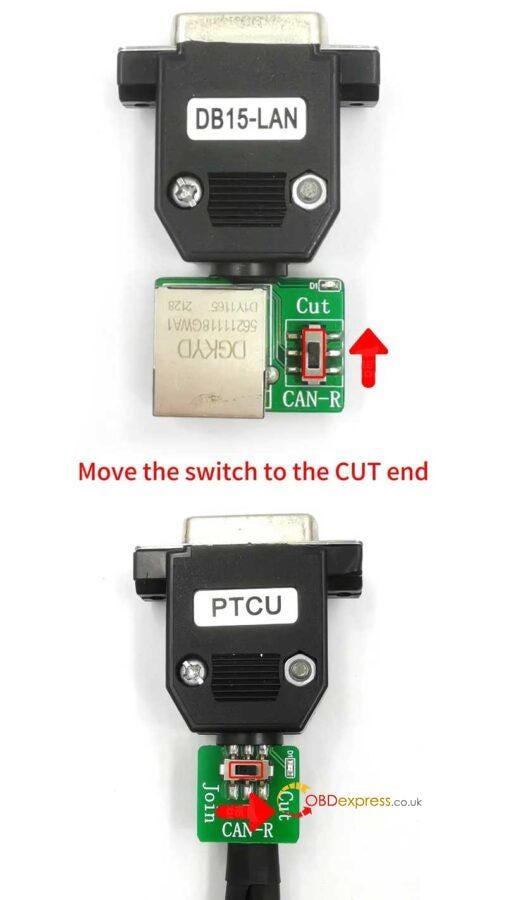
          Move the switch to CUT end, now it can be used for Mini ACDP 2 directly.

          How to Modify Yanhua Module for Mini ACDP 2

          www.obdexpress.co.uk


          Launch X431 IMMO Plus Programmed Peugeot 308 Anti-Theft All Keys Lost

           Launch X431 IMMO Plus/IMMO Elite with IMMO function matched anti-theft smart key for Peugeot 308 all keys lost no issues. Only takes about 2~3 Mins!
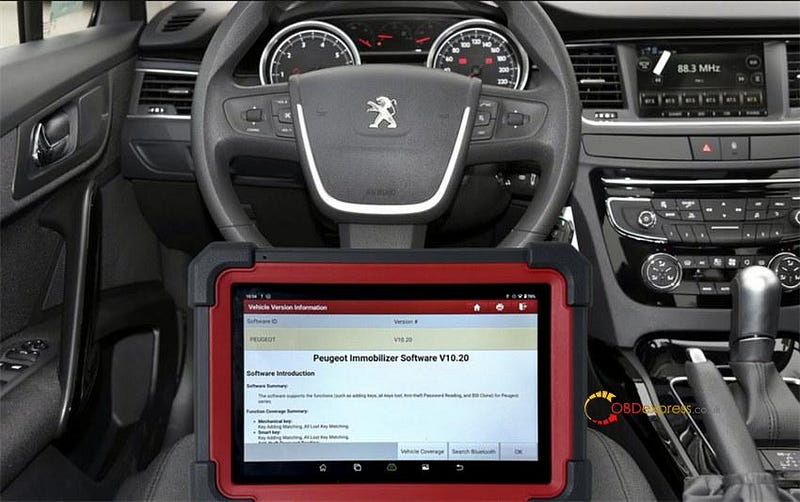
          Launch X431 IMMO Plus Programmed Peugeot 308 All Keys Lost

          Main steps:

          Step 1: Read anti-theft key password

          Step 2: Match anti-theft key
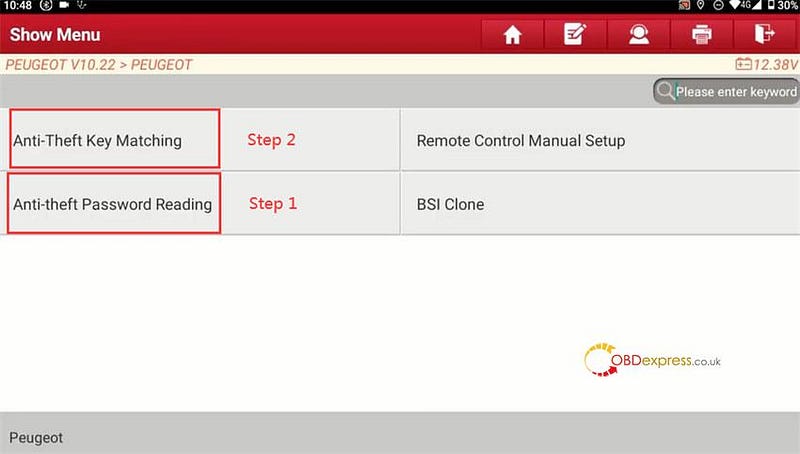
          Launch X431 IMMO Plus Programmed Peugeot 308 All Keys Lost

          Make sure the connection between the X431 IMMO device and vehicle is correct.

          Connect the internet and ensure the network connection is normal during the operation process.

          Step 1: Read anti-theft key password

          Select IMMO>> Peugeot V10.22> Peugeot>> Anti-theft Key Password Reading>> All Lost Anti-theft Password Reading>> BSI>> Automatic scan

          Note:

          1.BSI Control unit voltage too low is likely to cause function failure. Make sure the battery is fully charged.

          2.lnternet is needed to perform this function. Make sure the device has normal access on WIFI connection.
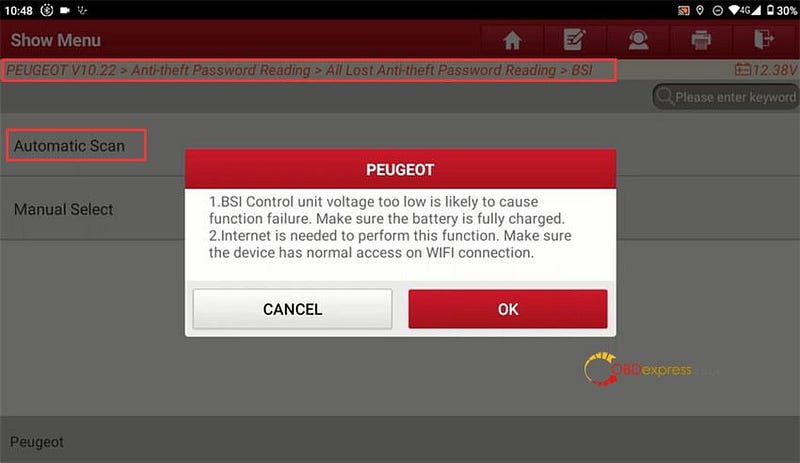
          Launch X431 IMMO Plus Programmed Peugeot 308 All Keys Lost

          Press the double-flash switch

          [Wiper start], [headlamp ON] are normal when performing this function. If you mind it, plugging out fuse at relative position will prevent it from starting.

          Read out the anti-theft key password successfully

          Write it download to use later
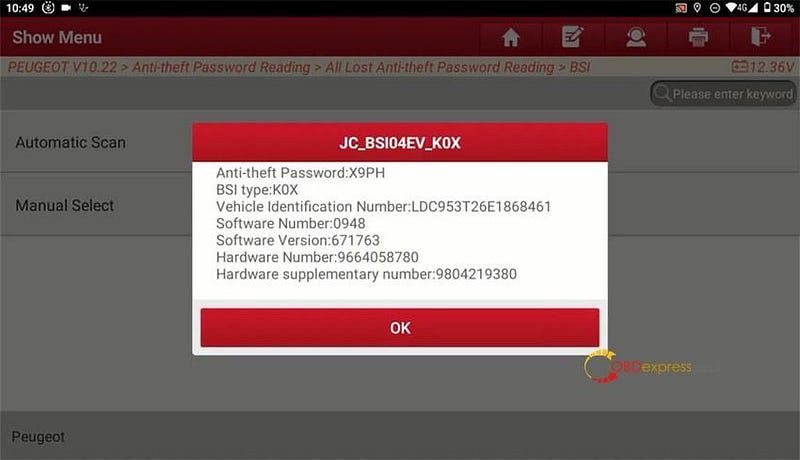
          Launch X431 IMMO Plus Programmed Peugeot 308 All Keys Lost

          Step 2: Match anti-theft key

          Select "Anti-Theft Key Matching"

          Read out the VIN and car model
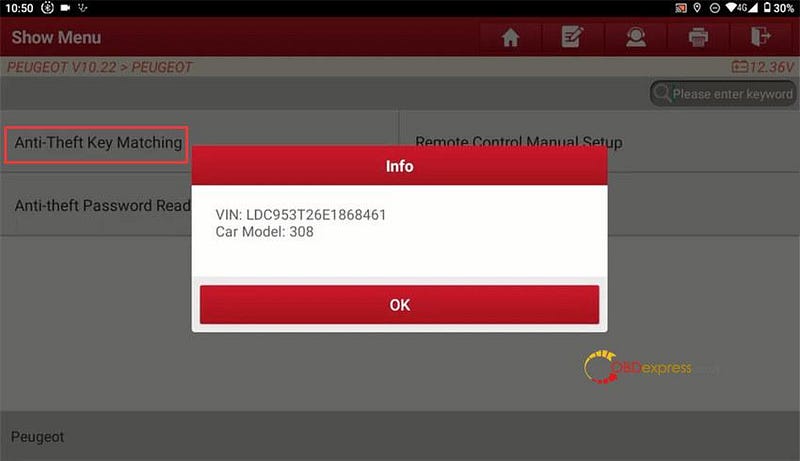
          Launch X431 IMMO Plus Programmed Peugeot 308 All Keys Lost

          Select "Automatic scan"

          Identify the VIN, mode, car model and system
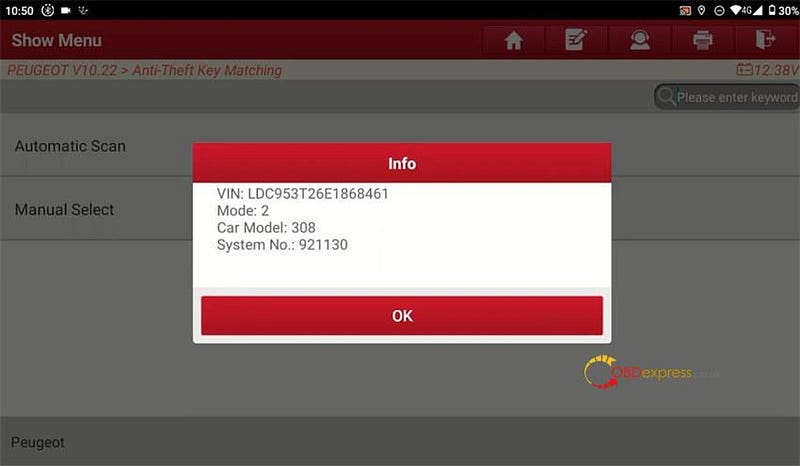
          Launch X431 IMMO Plus Programmed Peugeot 308 All Keys Lost

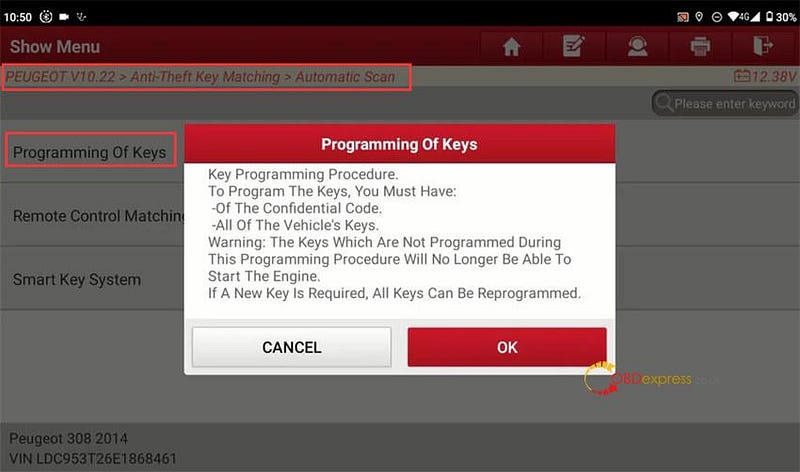
          Select "Programming Of Keys"

          To program the keys, you must have:

          -Of the confidential code.

          -All of the vehicle's keys.

          Warning:

          The keys which are not programmed during this programming procedure will no longer be able to start the engine.

          If a new key is required, all keys can be reprogrammed.
          Launch X431 IMMO Plus Programmed Peugeot 308 All Keys Lost

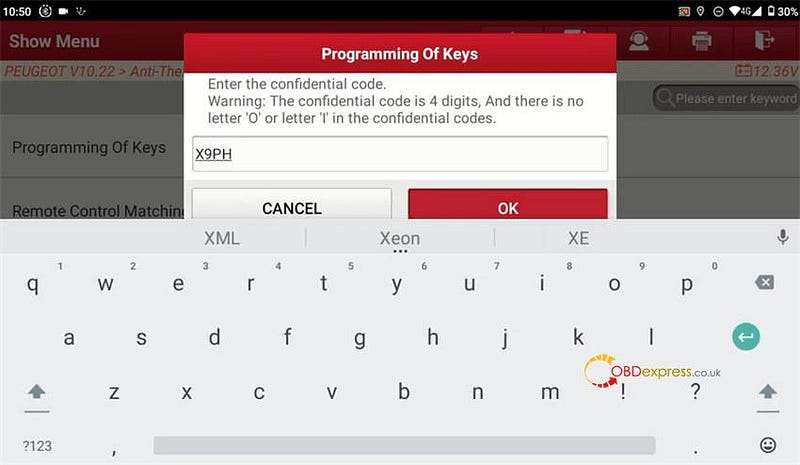
          To carry out programming of the keys, electronic keys or hands-free remote controls, enter the confidential code.

          Warning:

          If an error is made when entering the confidential code, programming will be forbidden.

          You can confirm the confidential code using the specific procedure for your country.

          Whether you are in the process of downloading, replacing, or initialising the BSI, the diagnostic tool will automatically use the code already entered at the time of the initialising of the confidential code.

          Enter the 4-digit confidential code, enter it again to confirm
          Launch X431 IMMO Plus Programmed Peugeot 308 All Keys Lost

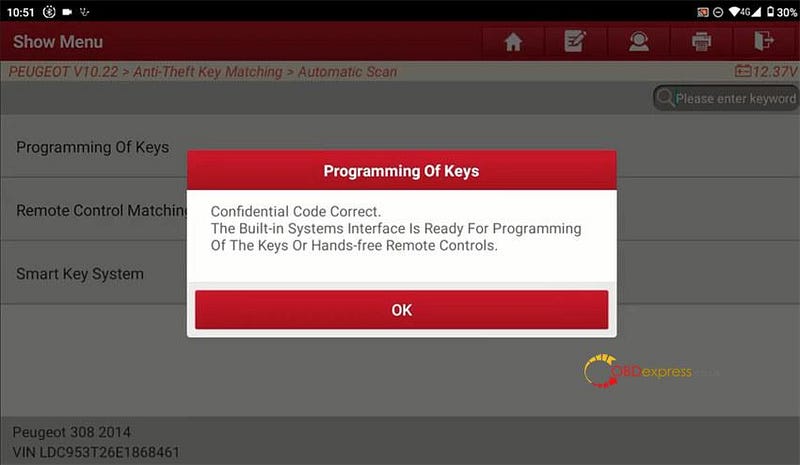
          Confidential code is correct. The built-in systems interface is ready for programming of the keys or hands-free remote controls.
          Launch X431 IMMO Plus Programmed Peugeot 308 All Keys Lost

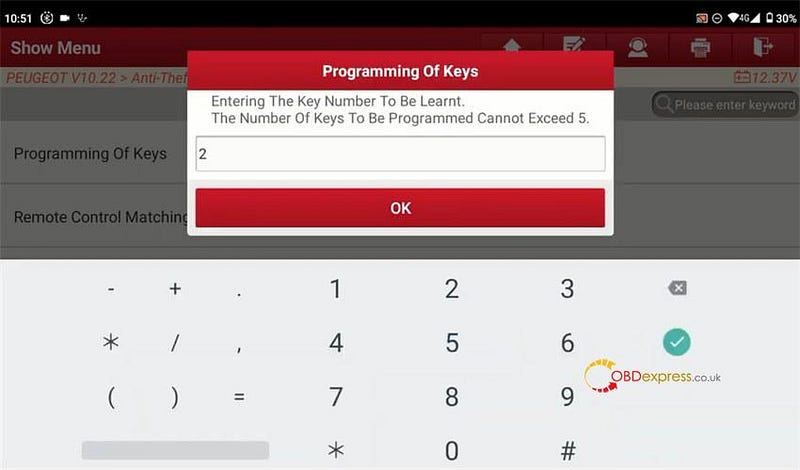
          Enter the key number to be learnt (i.e.2)
          Launch X431 IMMO Plus Programmed Peugeot 308 All Keys Lost

          Switch off the ignition

          You have 15 seconds within which to switch on the ignition positive (+APC) using the key to be programmed.

          Program the first key successfully with X-431 IMMO Plus

          Switch off ignition and remove key
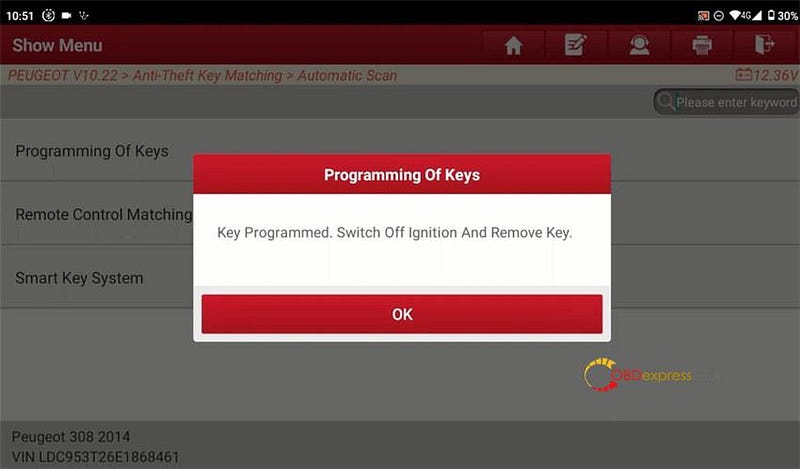
          Launch X431 IMMO Plus Programmed Peugeot 308 All Keys Lost

          Insert the next key in the ignition, and repeat the above same steps to program

          Key programming is completed, now the numbers of key programmed is 2.
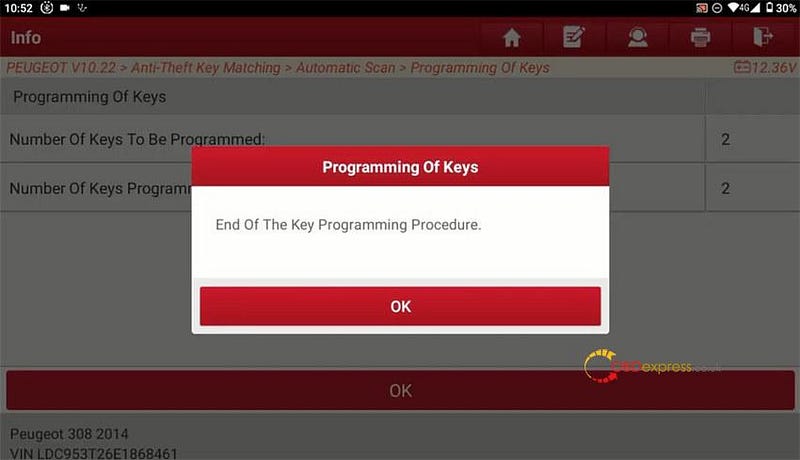
          Launch X431 IMMO Plus Programmed Peugeot 308 All Keys Lost

          IMPERATIVE:

          Before making any attempt to start the engine:

          Check that the handbrake is on.

          For an automatic gearbox, check that the gear lever is in position 'p' (park).

          For a manual gearbox, check that the gear lever is in neutral.

          Done!

          Launch X-431 IMMO Plus/X-431 IMMO Elite key programmer also performed anti-theft smart key matching on Peugeot 408 all keys lost successfully.

          http://blog.obdexpress.co.uk/2023/10/23/peugeut-408-all-keys-lost-programming-with-launch-x431-immo-plus-elite/

          www.obdexpress.co.uk

          Wednesday, 1 November 2023

          Solved: Yanhua Mini ACDP 2 Fails to Connect PC via USB Cable

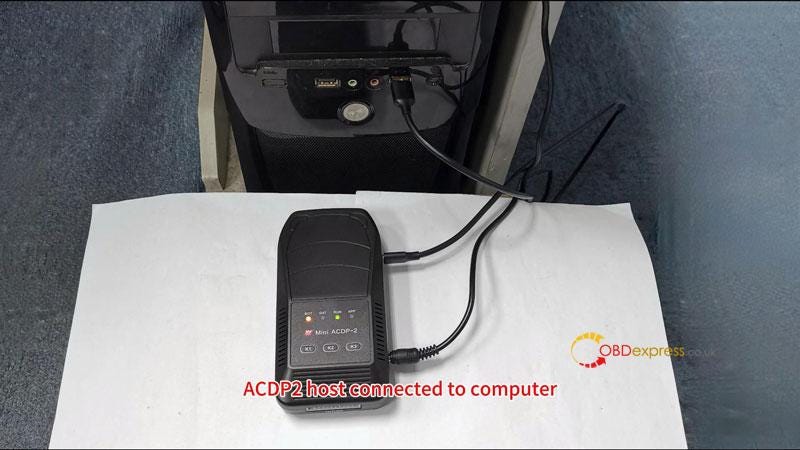
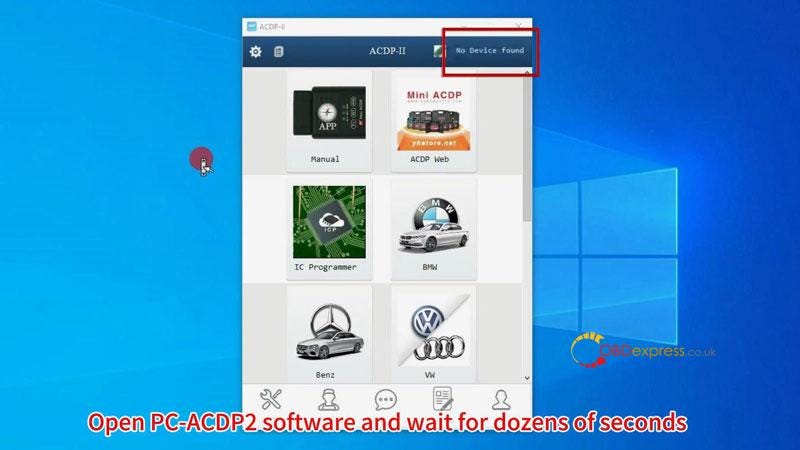
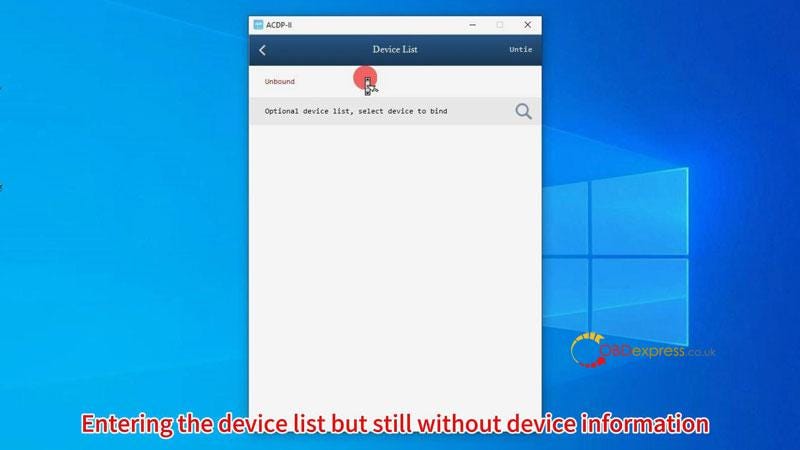
           Problem: After connecting YanhuaMini ACDP 2 to computer and open PC-ACDP2 software for seconds, the device is still not connected. Entering "Setting >> PC bound to ACDP-II device", but the device list is still without any information.

          This problem can be solved by modifying the device IP. Below we provide a solution to help fix the issue.

          Yanhua Mini ACDP 2 Fails to Connect PC via USB Cable

          Yanhua Mini ACDP 2 Fails to Connect PC via USB Cable

          Yanhua Mini ACDP 2 Fails to Connect PC via USB Cable

          Solution

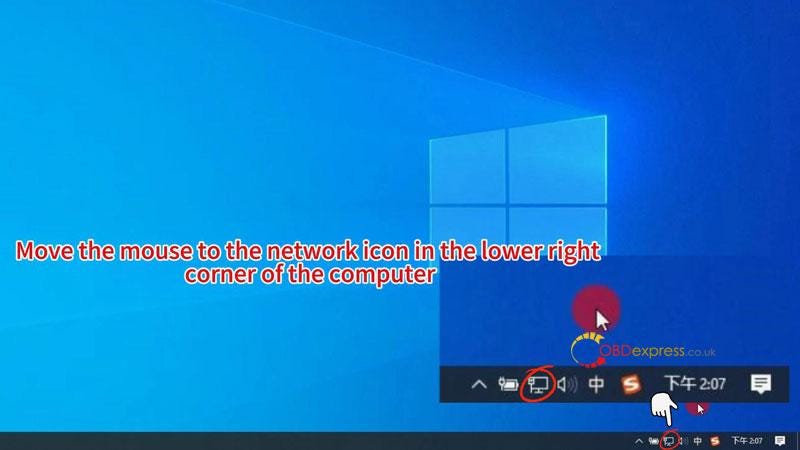
        2. Move the mouse to the Network icon in the lower right corner of computer.
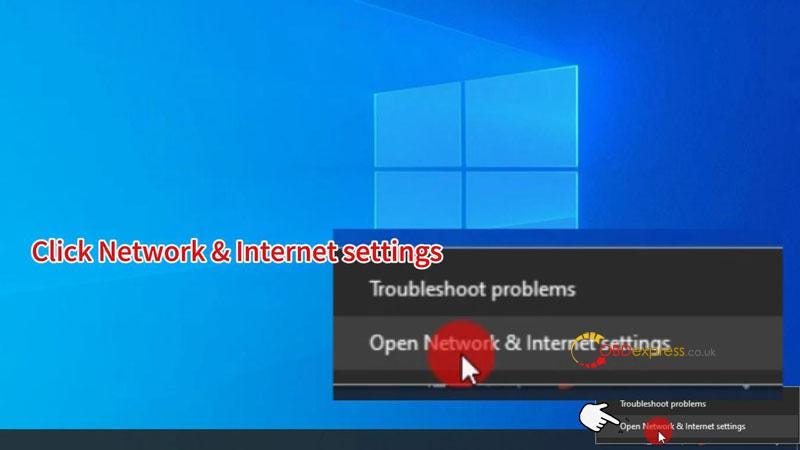
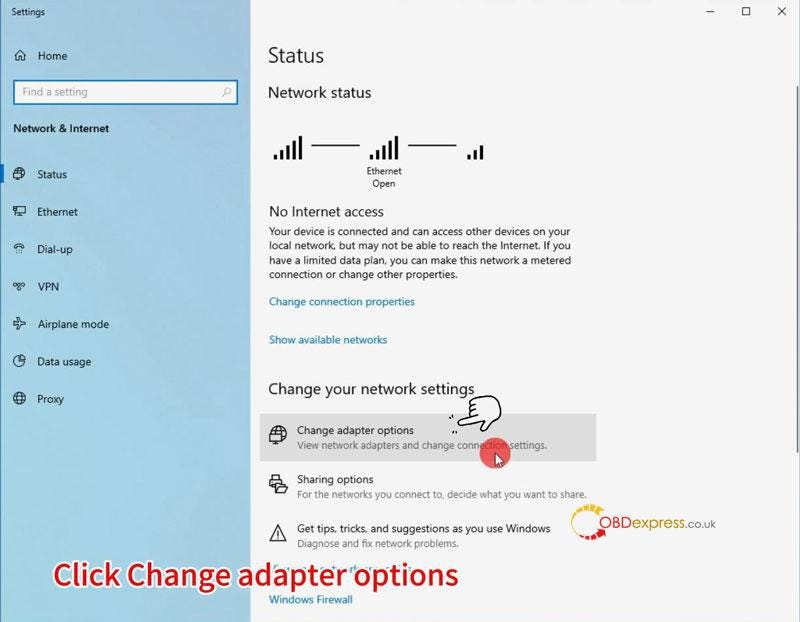
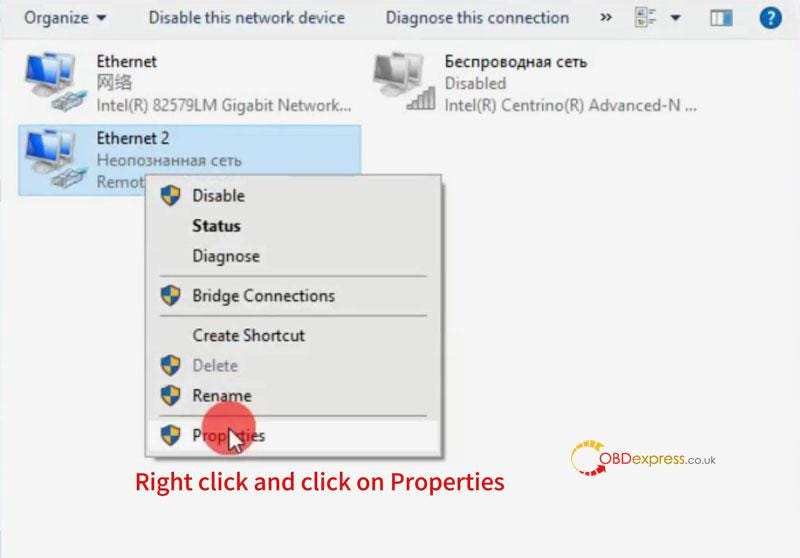
          1. Right click "Network icon -> Open Network & Internet settings -> Change adapter options".

            Yanhua Mini ACDP 2 Fails to Connect PC via USB Cable

            Yanhua Mini ACDP 2 Fails to Connect PC via USB Cable

            Yanhua Mini ACDP 2 Fails to Connect PC via USB Cable

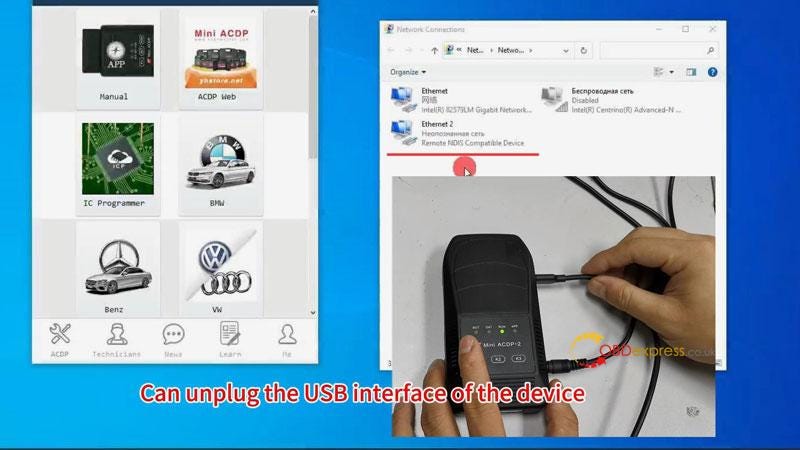
          2. If you don't know which Network is Mini ACDP 2, try to unplug and plug the USB cable of device once. You'll know for sure when inserting it.
            1. Yanhua Mini ACDP 2 Fails to Connect PC via USB Cable

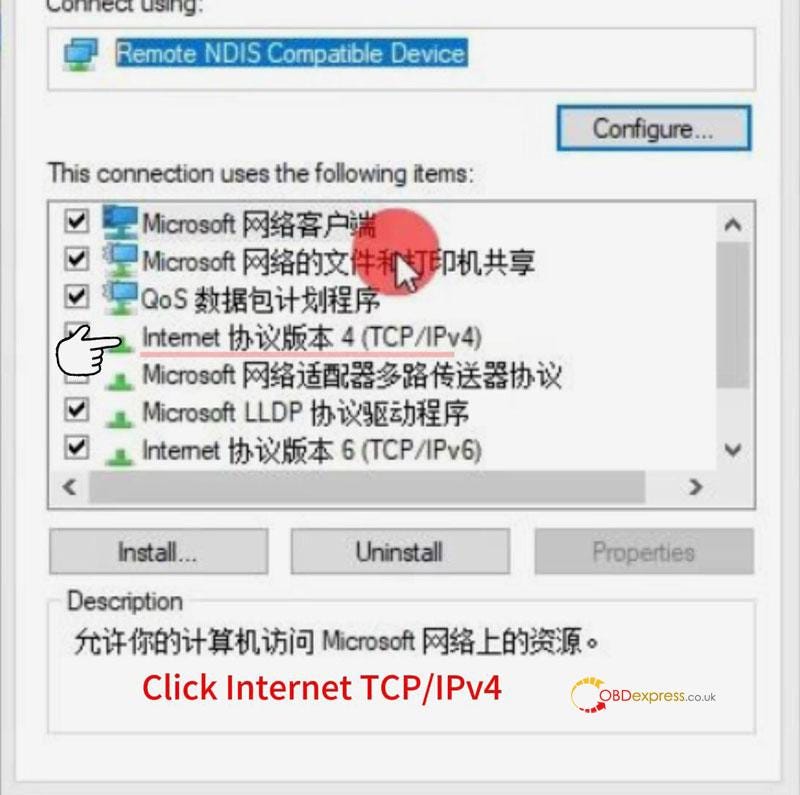
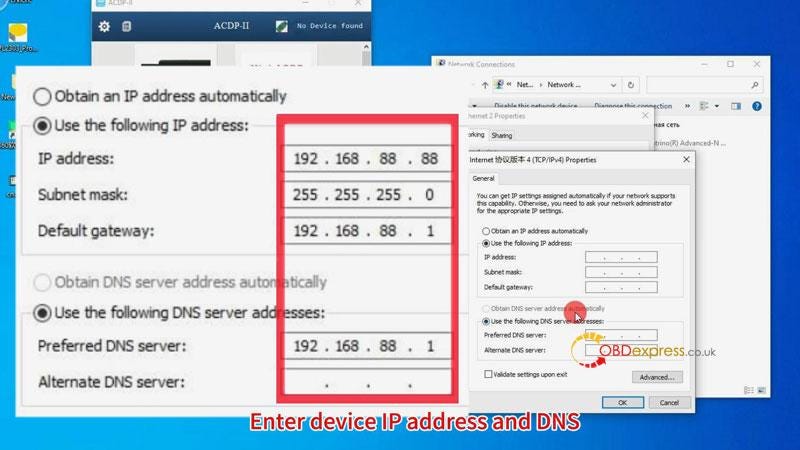
            2. Right click "ACDP 2 Network -> Properties -> Internet TCP/IPv4 -> Use the following IP address:
              1. IP address: 192.168.88.88

                Subnet mask: 255.255.255.0

                Default gateway: 192.168.88.1

                Use the following DNS server addresses:

                Preferred DNS server: 192.168.88.1

                Enter device IP address and DNS, click OK.

                Yanhua Mini ACDP 2 Fails to Connect PC via USB Cable

                Yanhua Mini ACDP 2 Fails to Connect PC via USB Cable

                Yanhua Mini ACDP 2 Fails to Connect PC via USB Cable

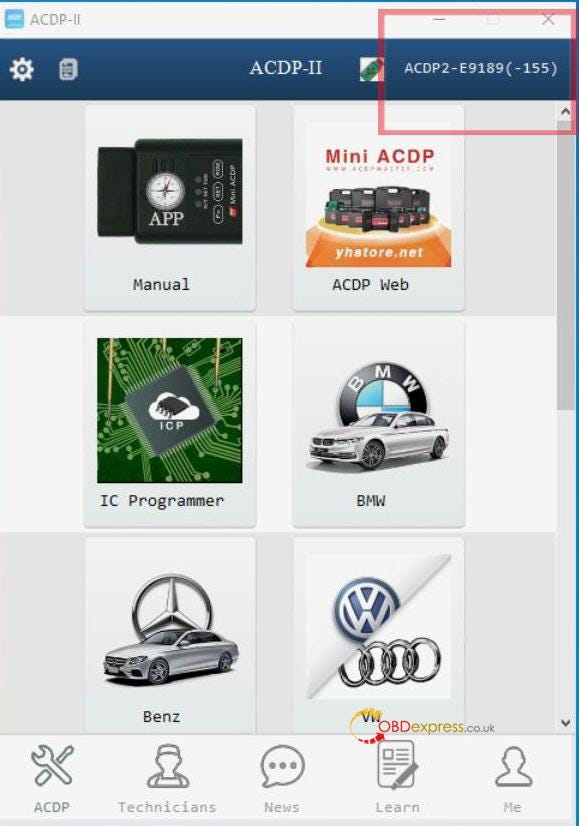
                Wait for a few seconds before the device automatically connects.

                Successfully connected!

                The problem was solved.

                Yanhua Mini ACDP 2 Fails to Connect PC via USB Cable

                www.obdexpress.co.uk
                How to Get GODIAG ECU GPT Boot Adapter PINOUT?

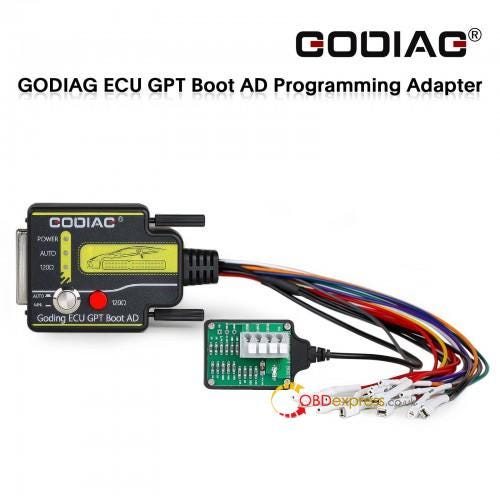
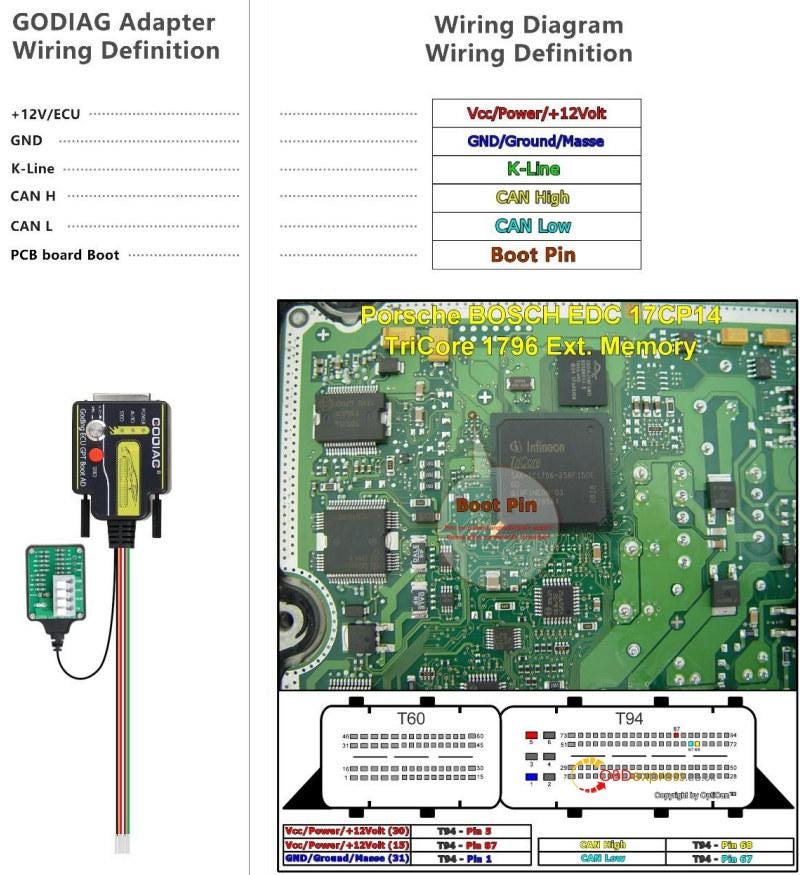
                 Currently, it is not possible to read and write all ECUs through the OBD2 diagnostic interface or without opening the ECU, there are still many ECUs that need to open the cover to read and write data. The GODIAG ECU GPT Boot Adapter ECU Connector can be used for ECU PINOUTs of different manufacturers and brands according to the wiring definition. It can not only be simulated as a standard OBD2 diagnostic interface, but also supports ECU connection via GPT Bench without disassembling the ECU or Boot mode with disassembling the ECU.

                With the Pinout connection diagram, it's easy and fast to connect GODIAG Adapter, J2534 device/ECU programmer (SM2 Pro, OpenPort 2.0, Foxflash, PCMtuner…) and ECU for ECU data reading and writing. Here obdexpress.co.uk offers the methods to get ECU Pinout diagram below.

                How to Get GODIAG ECU GPT Boot Adapter PINOUT

                Way 1:

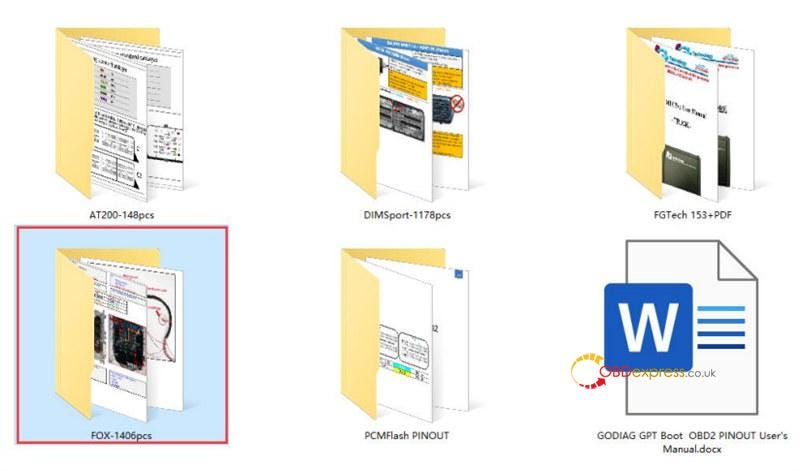
                Free download ECU OBD2 GPT Boot Pinout.zip directly (Size: 3.15GB)

                Way 2:

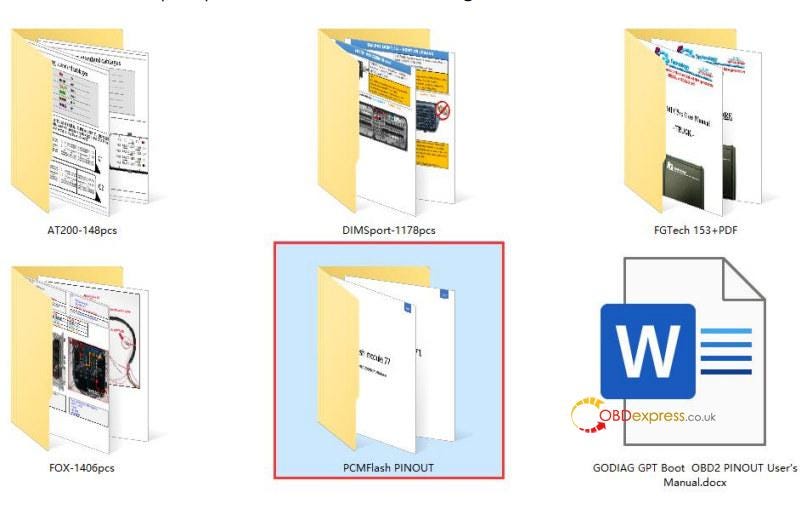
                Visit the corresponding website to check the different ECU tools Pinout.

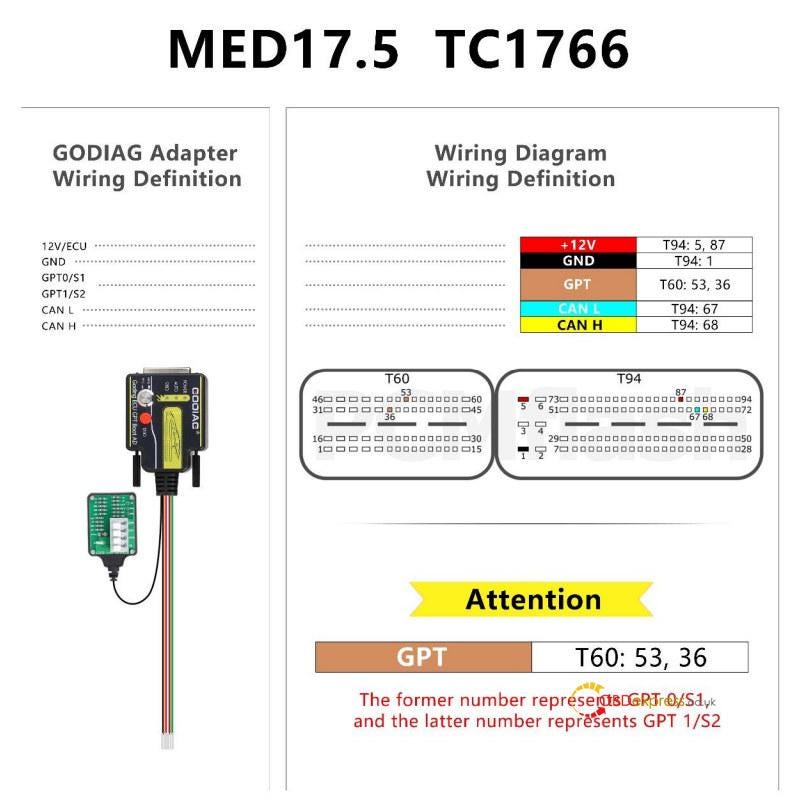
                1.For the wiring diagram using PCMFLASH PINOUT, please refer to https://pcmflash.ru/downloads/english.html

                How to Get GODIAG ECU GPT Boot Adapter PINOUT

                i.e.MED17.5 TC1766

                How to Get GODIAG ECU GPT Boot Adapter PINOUT

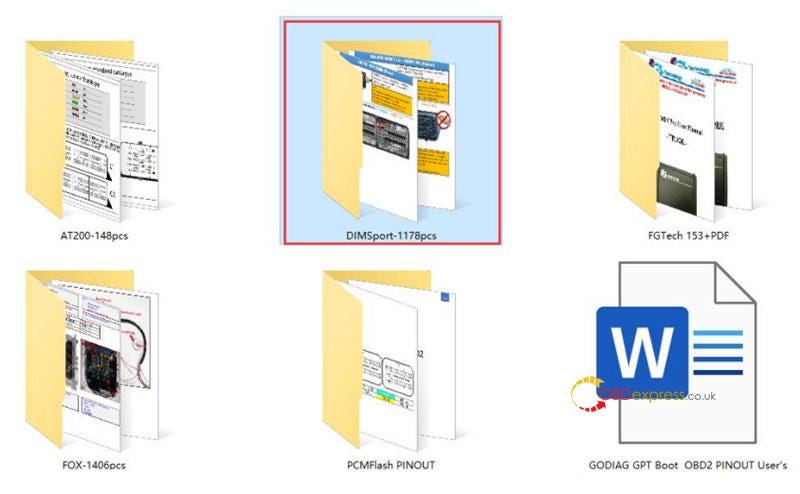
              2. The PINOUT connection diagram of DIMsport KESSV2 KTAG products
                1. How to Get GODIAG ECU GPT Boot Adapter PINOUT

                  How to Get GODIAG ECU GPT Boot Adapter PINOUT

                  3.For the PINOUT connection diagram of EVC products, please refer to https://www.evc.de/en/product/bsl/ecu.asp

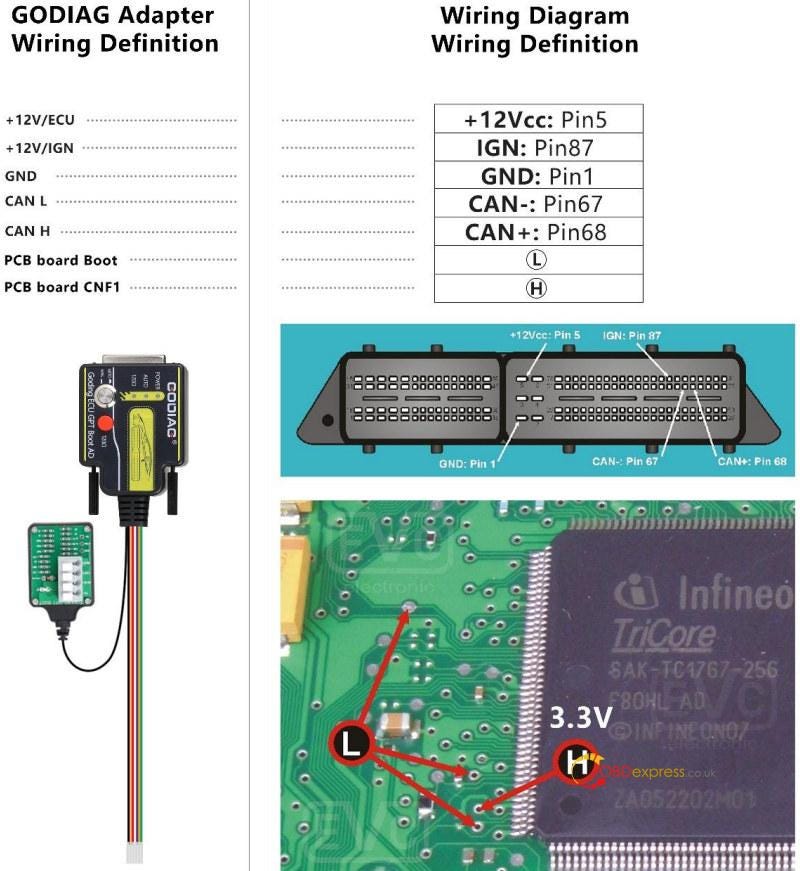
                  The L connection point is connected to the Boot connection port on the GODIAG ECU GPT Boot AD, and the H point is connected to CNF1.

                  How to Get GODIAG ECU GPT Boot Adapter PINOUT

                  4.For the PINOUT connection diagram of kt-prog or FOX FGtech products, please refer to https://wiring.fg-technology.uk/index.php?m=Home&c=wiring&a=index

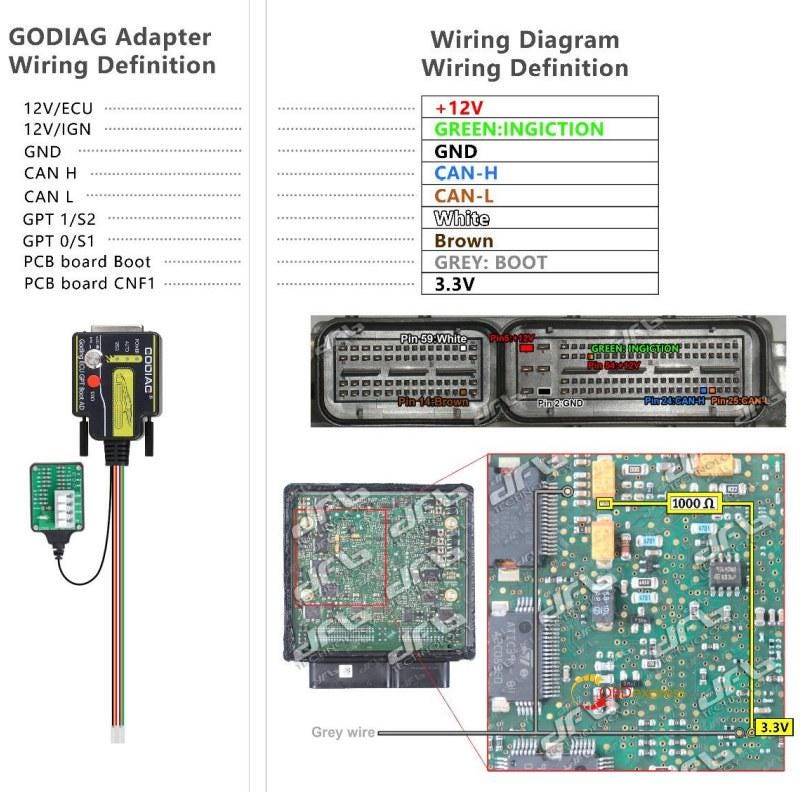
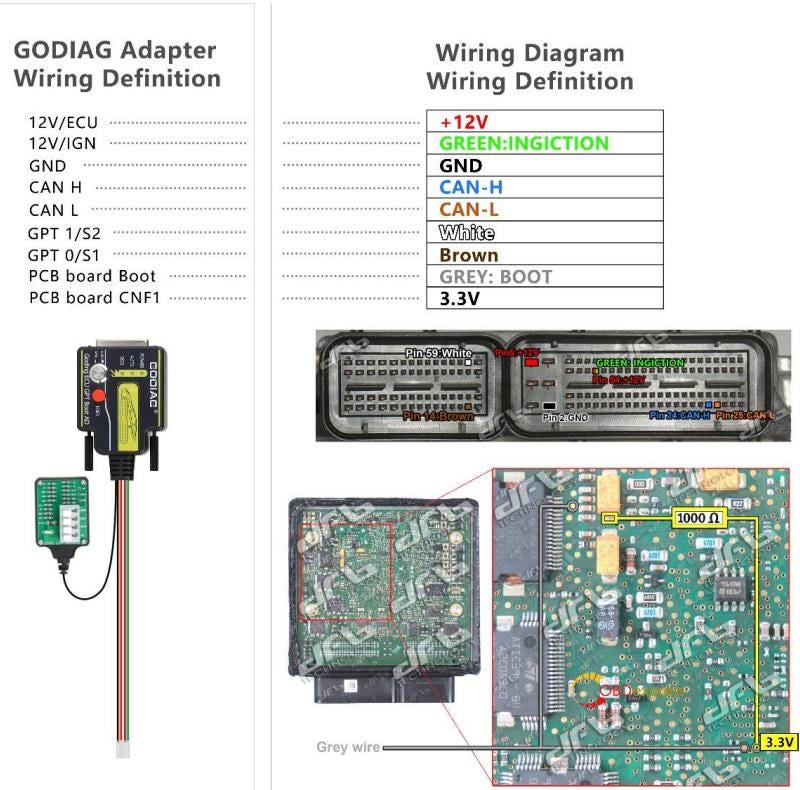
                  The Gray line connection point in the picture is Boot. The CNF1 or 3.3V in the picture is connected to the 1KΩ resistor point, or the resistor is connected as shown in the picture. The brown wiring in the picture is connected to GPT0, and the white wiring in the picture is connected to GPT1.

                  How to Get GODIAG ECU GPT Boot Adapter PINOUT

                  How to Get GODIAG ECU GPT Boot Adapter PINOUT

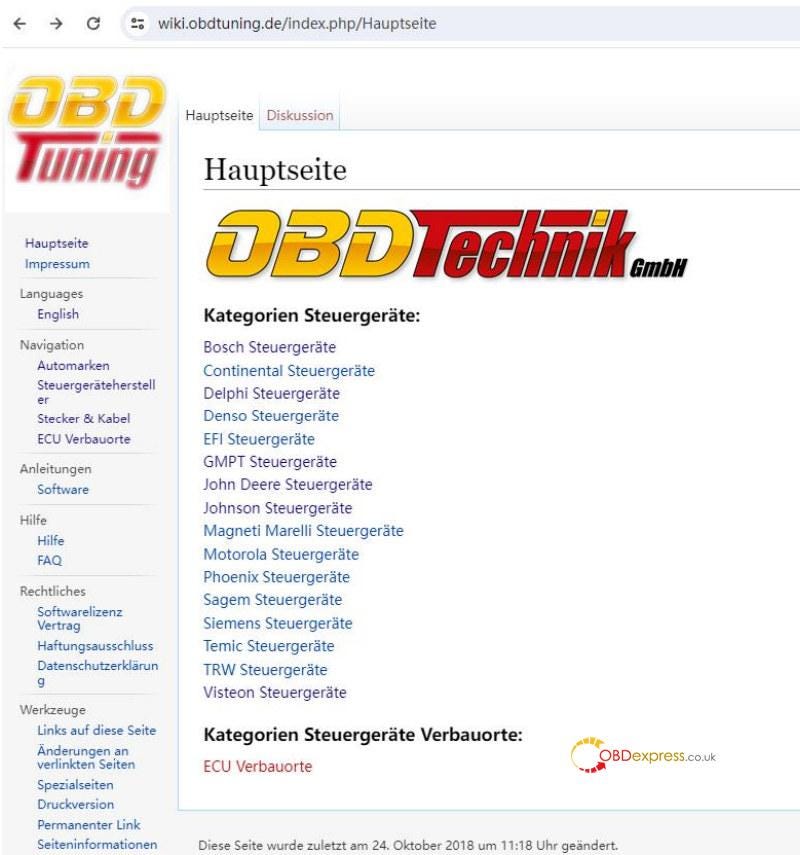
                  5.For the PINOUT connection diagram of obdtuning products, please refer to https://wiki.obdtuning.de/index.php/Hauptseite

                  OBD2 Bench, GPT Bench, Boot

                  How to Get GODIAG ECU GPT Boot Adapter PINOUT

                  How to Get GODIAG ECU GPT Boot Adapter PINOUT


                  www.obdexpress.co.uk

                  GODIAG ECU GPT Boot Adapter: Plug and Play J2534 Tool

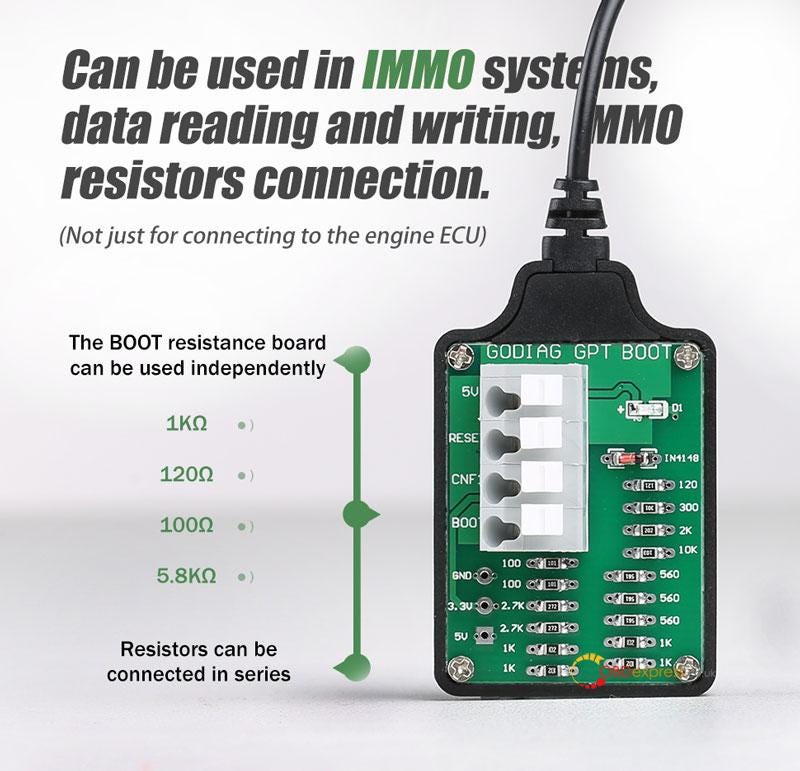
                   GODIAG ECU GPT Boot Adapter is designed to read and write ECU data without disassembling the ECU by OBD2 bench, GTP bench or boot method. It's coming with a short-circuit-proof boot resistance board to protect ECU. Customers can use existing J2534 devices with PCMFlash software directly.

                  GODIAG ECU GPT Boot Adapter-Plug and Play J2534 Tool

                  Features

                2. Support GPT method to read & write ECU data without disassembling.
                3. Support BOOT method to read & write ECU data.
                4. Support read & write ECU data by OBD2.
                5. BOOT resistance board and connection cable have insulation protection of high temperature and environmental protection silicone wire.
                6. Support RESET, BOOT, CNF1, GPT1, GPT2, 5V, 3.3V, VPP, GND.
                7. Support PCMFlash automatic control ignition power supply.
                8. Support manual ignition power control.
                9. Free switching with CANbus 120Ω
                10. Equipped with ECU dedicated connection terminal.
                11. The ECU port cable is labeled.
                  1. GODIAG ECU GPT Boot Adapter-Plug and Play J2534 Tool

                    Compatibility

                  2. Diagnosis support standard OBD2 protocol.
                  3. Support to read and write ECU data with J2534 device.
                  4. Only Scanmatik 2 PRO for PCMflash allows to form GPT1, GPT2 signals. Necessary to work with Module 71.
                  5. Support other devices like Scanmatik, OpenPort 2.0, Mongoose JLR, MongoosePro JLR, Teradyne GNA600(VCM 1), Mazda VCM2… to read and write ECU data by OBD2 or BOOT 53 mode.
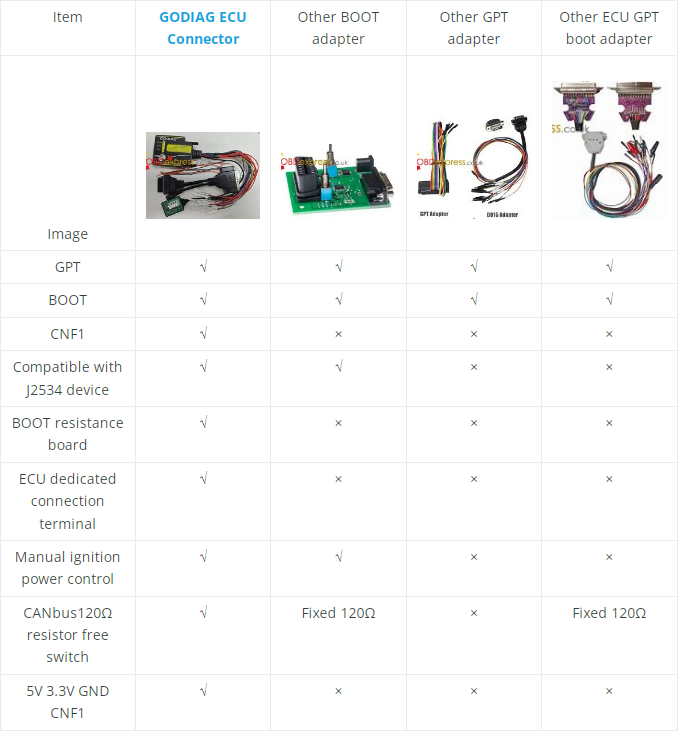
                    1. Comparison

                      GODIAG ECU GPT Boot Adapter-Plug and Play J2534 Tool

                      Connection

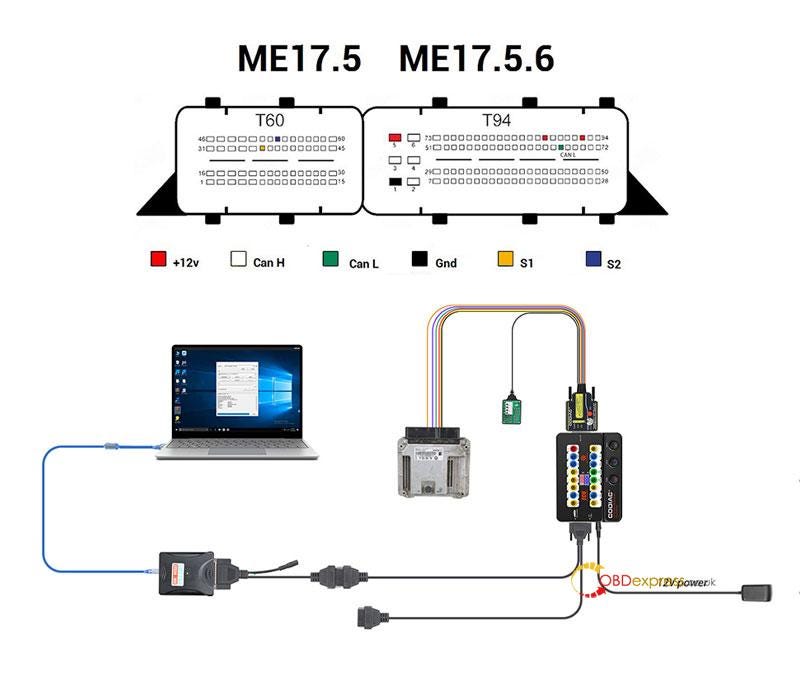
                      ME17.5 ME17.5.6 Connection Diagram

                      GODIAG ECU GPT Boot Adapter-Plug and Play J2534 Tool

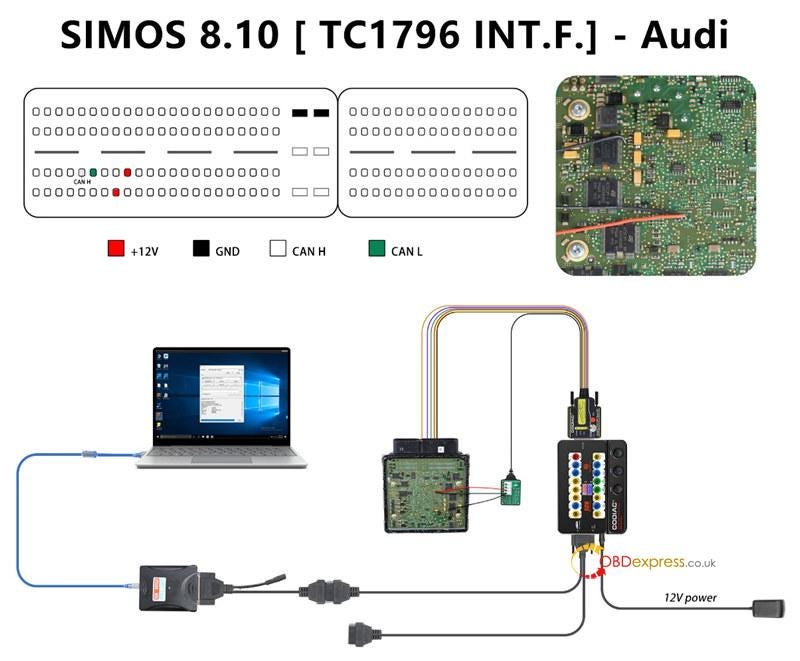
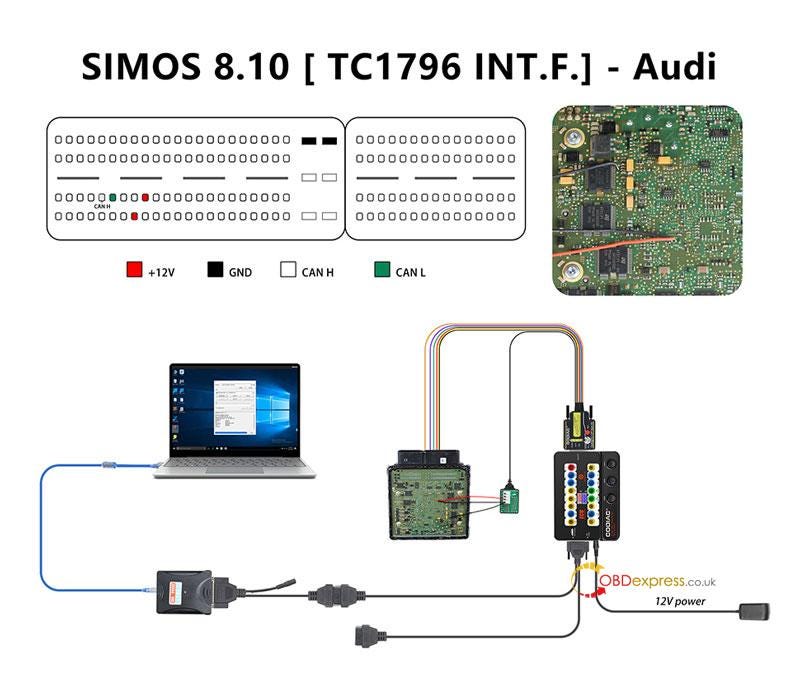
                      SIMOS 8.10 [TC1796 INT.F.] — Audi Connection Diagram

                      GODIAG ECU GPT Boot Adapter-Plug and Play J2534 Tool

                      Why to buy GODIAG ECU Adapter?

                    2. The fixed resistance board can be used for longtime.
                    3. Equipped with 15cm silicone wire for extending.
                    4. The fixed resistance can prevent from losing.
                    5. The resistance board is separated to support multiple-series connection.
                    6. Except for ECU, it also supports to read and write immo, airbag…module for diagnosing, matching, programming or coding by OBD2.
                    7. Easy to plug, save time and effort.
                    8. Compatible with most available J2534 devices.
                    9. The adapter has already done the standard OBD2 pwm+ pwm- CAN+ CAN- 120Ω K-line communication protocol.
                      1. www.obdexpress.co.uk
                        EoneBoss HK003: 6A Full Unlock Support for Hyundai/Kia Keys
                         The EoneBoss HK003 has been upgraded with 6A full unlock support for Hyundai/Kia smart keys , giving locksmiths a simpler way to handle ...