Wednesday, 31 July 2024

How to Register Lonsdor KH100+ Blue Version

 2024 Lonsdor KH100+ Blue Version has newly added Indian vehicles like Tata & Mahindra. This is a guide on how to register KM100+ device for the first time.

How to register Lonsdor KH100+ Blue Version?

  1. Set WiFi Connection

Power on Lonsdor KH100+ device.

The device is not registered, required to register online before use, press OK.

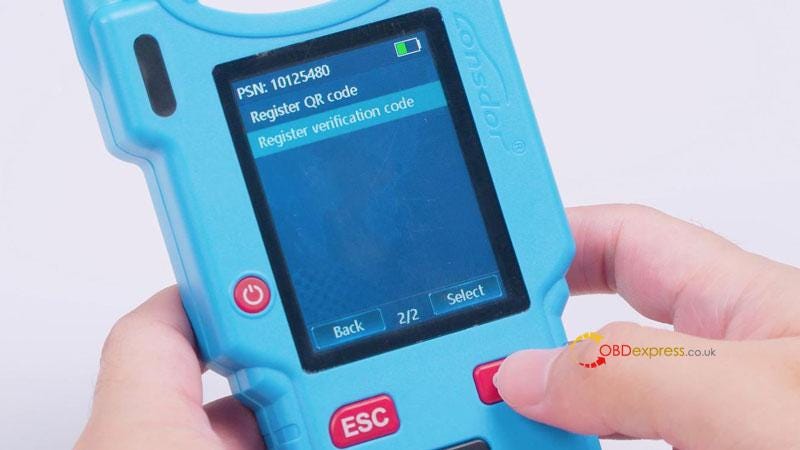
Register/Activate >> Register verification code

WiFi connection failed.

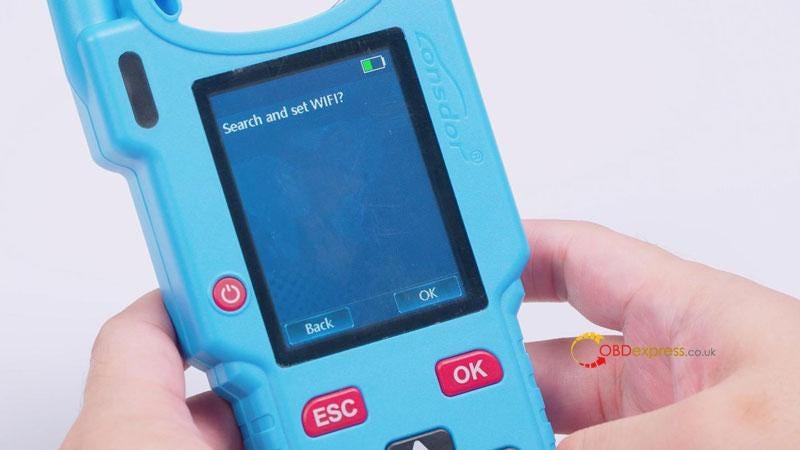
Search and set WIFI? OK

Connect to WIFI.

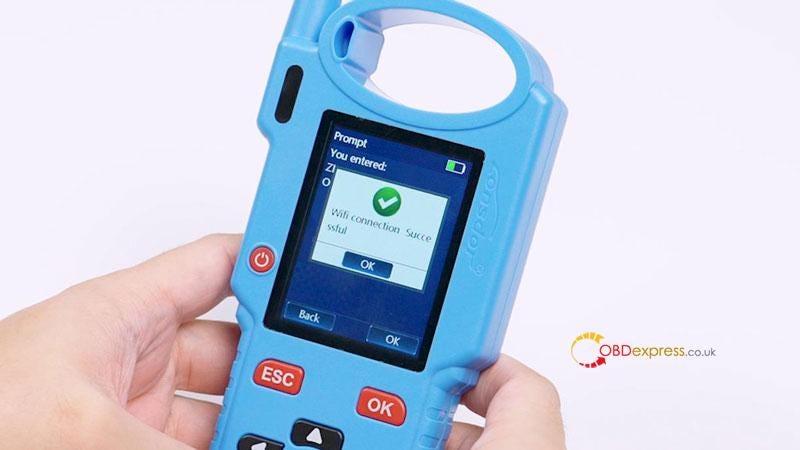
Wifi connection successful.


Lonsdor KH100+ Blue Version Registration Guide

  1. Register Account

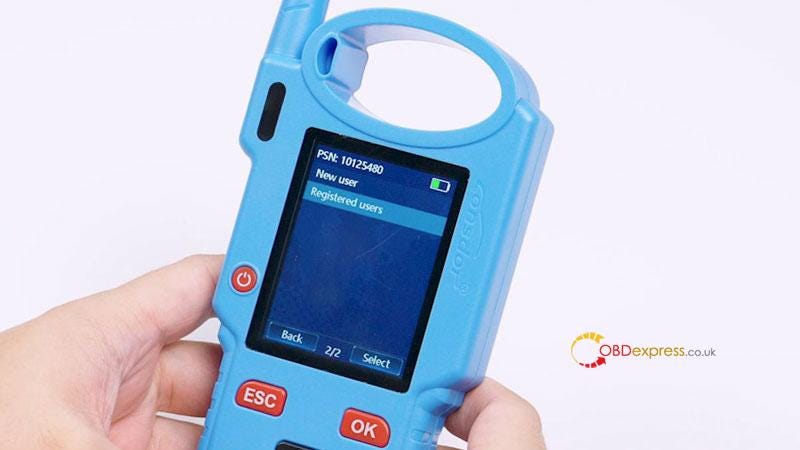
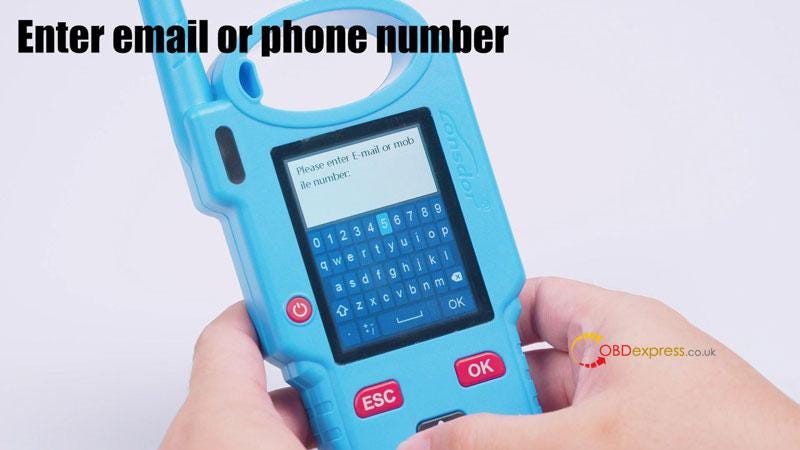
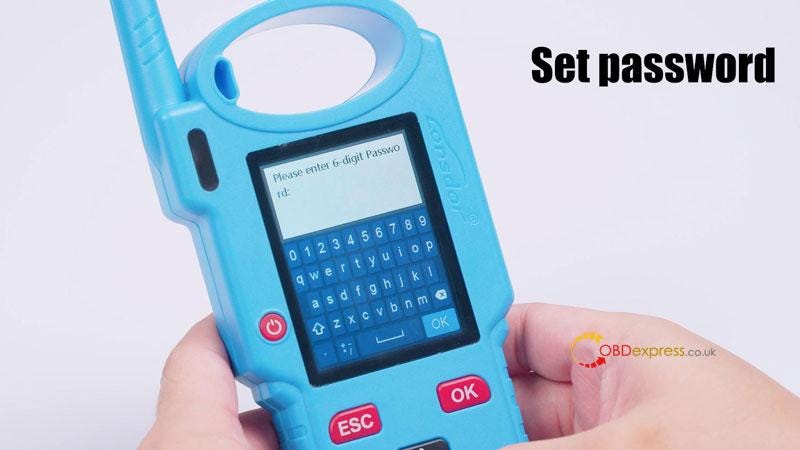
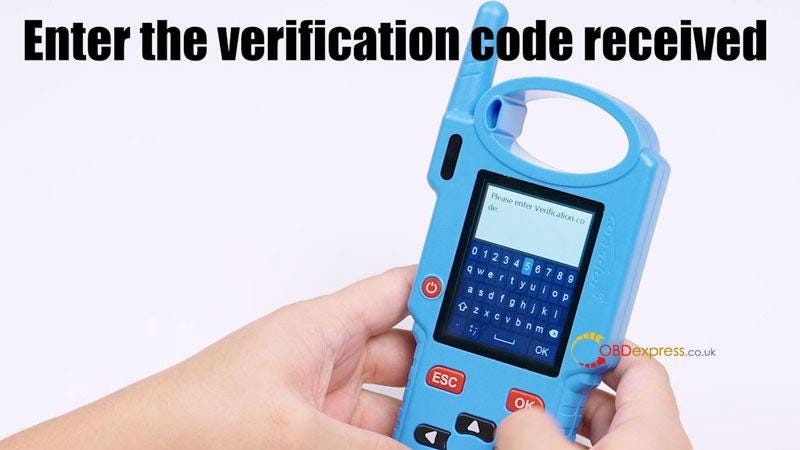
Registered users >> Please enter E-mail or mobile number >> Please enter 6-digit password >> Please enter verification code

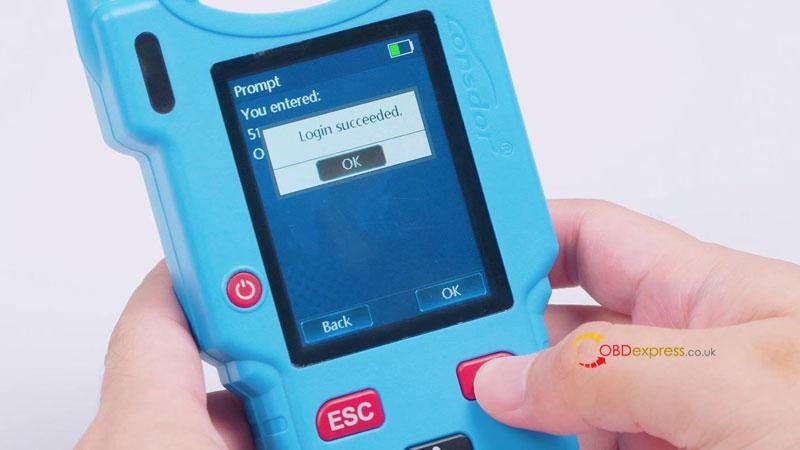
Login succeeded.


Lonsdor KH100+ Blue Version Registration Guide

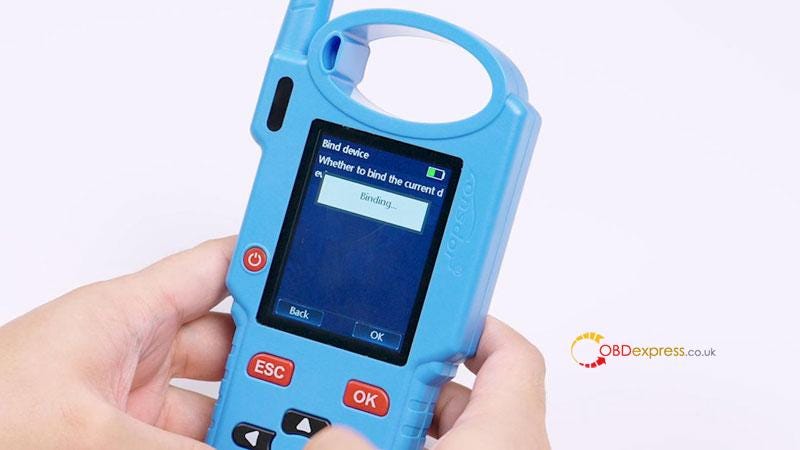
Whether to bind the current device? OK

This username has not been registered, please register first, press OK.

Lonsdor KH100+ will auto reboot.

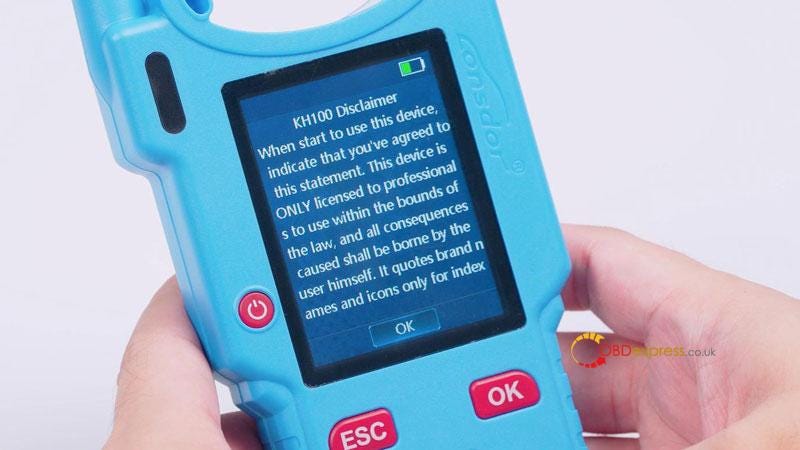
Press OK to agree disclaimer.

Registration has done.

Now you can start to use KH100+ Remote Key Programmer.


Lonsdor KH100+ Blue Version Registration Guide

www.obdexpress.co.uk

LAUNCH-X431 PRO3S+: SCANIA Windscreen Wiper Test Guide

 LAUNCH-X431 PRO3S+ SmartLink HD is the upgraded version of X431 PRO3S+HDIII. It’s the LAUNCH TOP Scanner, ranks №1 in vehicle coverage which supports 12V & 24V Vehicles ALL IN ONE. It can work for cars/trucks/buses/trailers/excavators/diesel engine/construction machinery/ pick-up, etc. Use it to test SCANIA windscreen wipers, works like a charm!

Operation steps:

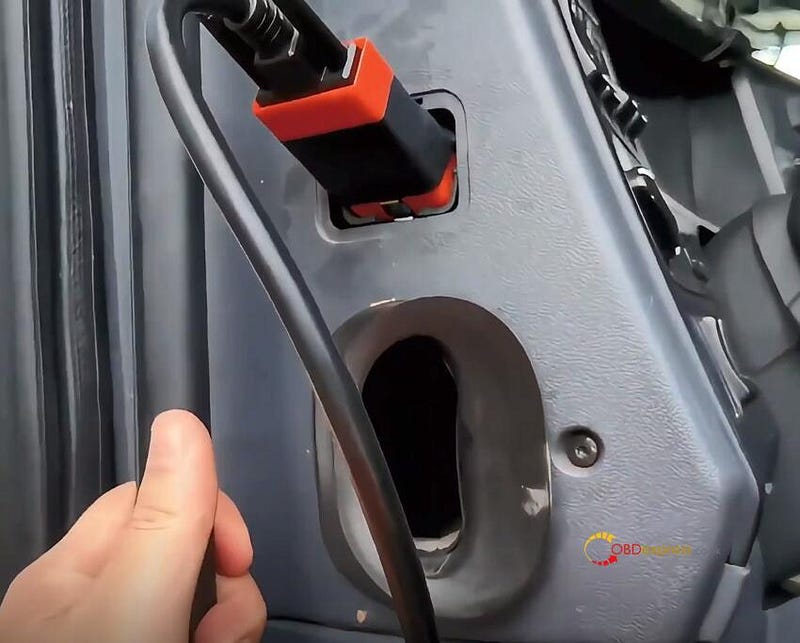
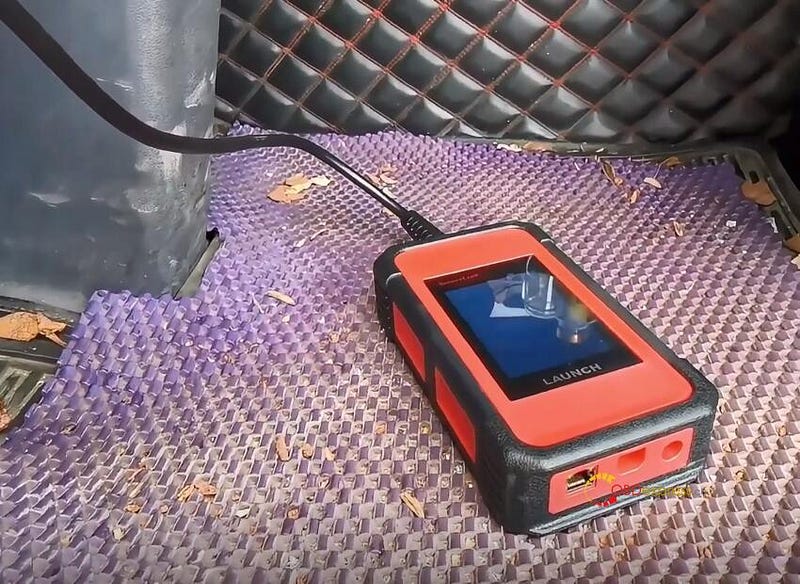
Connect X431 SmartLink HD to the vehicle diagnostic OBD port, and connect to X431 PRO3S+ scanner via WiFi


How to Test SCANIA Windscreen Wipers by LAUNCH-X431 PRO3S+ SmartLink HD

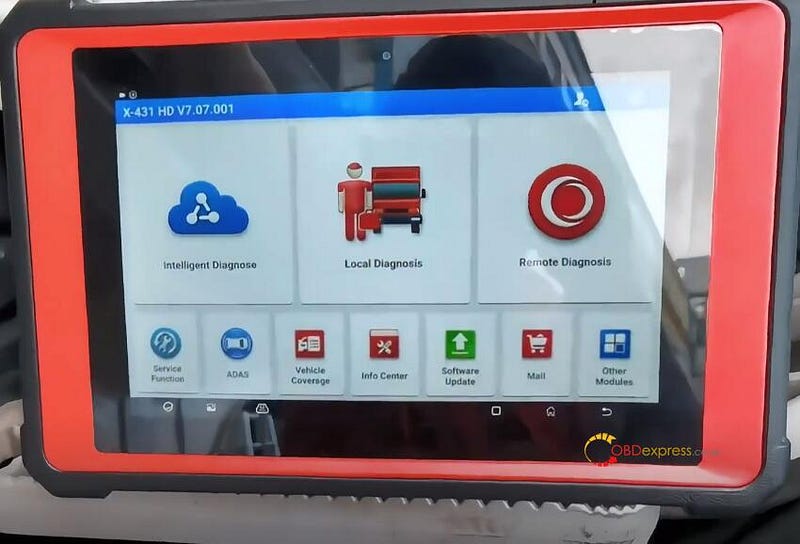
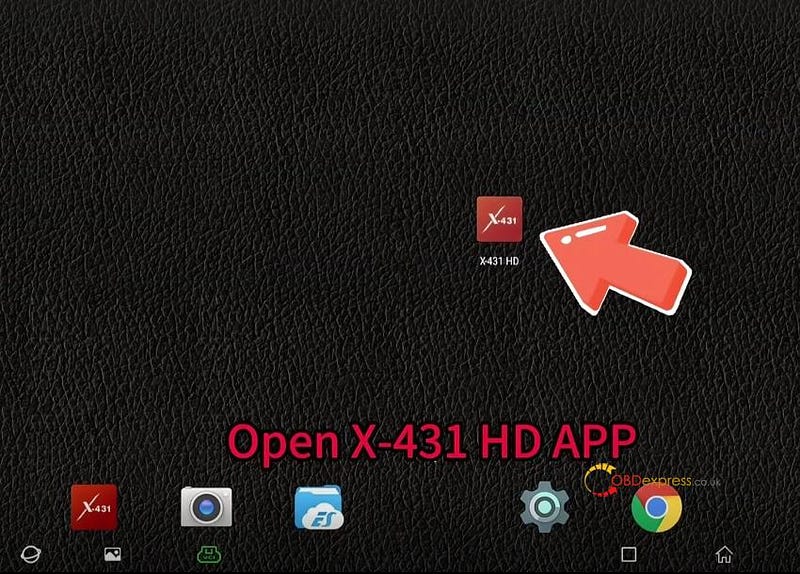
Open X-431 HD APP


How to Test SCANIA Windscreen Wipers by LAUNCH-X431 PRO3S+ SmartLink HD

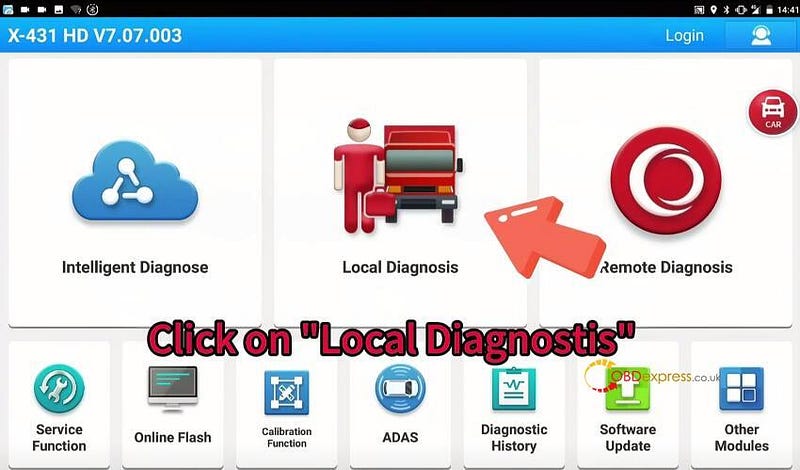
Click on "Local Diagnosis"


How to Test SCANIA Windscreen Wipers by LAUNCH-X431 PRO3S+ SmartLink HD

Click on "Scania"

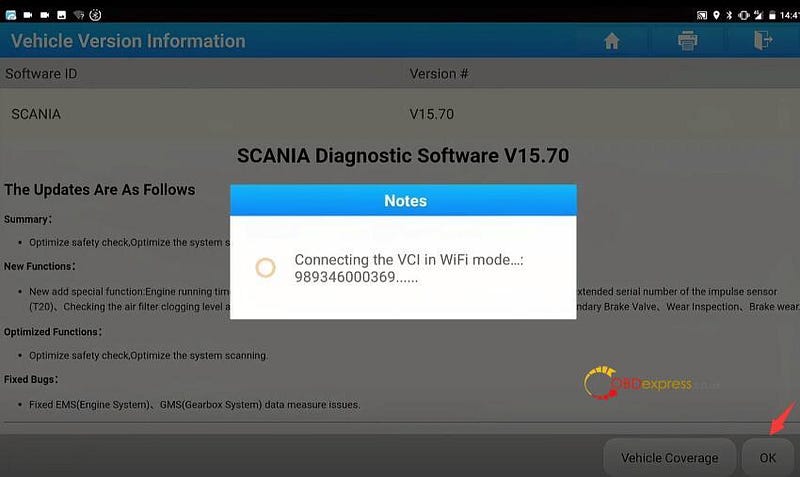
Confirm the Scania diagnostic software (i.e V15.70), and click "OK"

Connect the VCI in WiFi mode


How to Test SCANIA Windscreen Wipers by LAUNCH-X431 PRO3S+ SmartLink HD

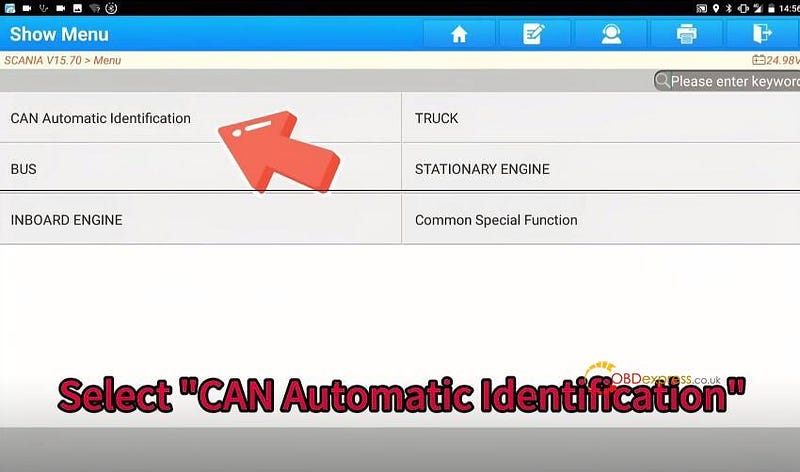
Click on "CAN Automatic Identification"


How to Test SCANIA Windscreen Wipers by LAUNCH-X431 PRO3S+ SmartLink HD

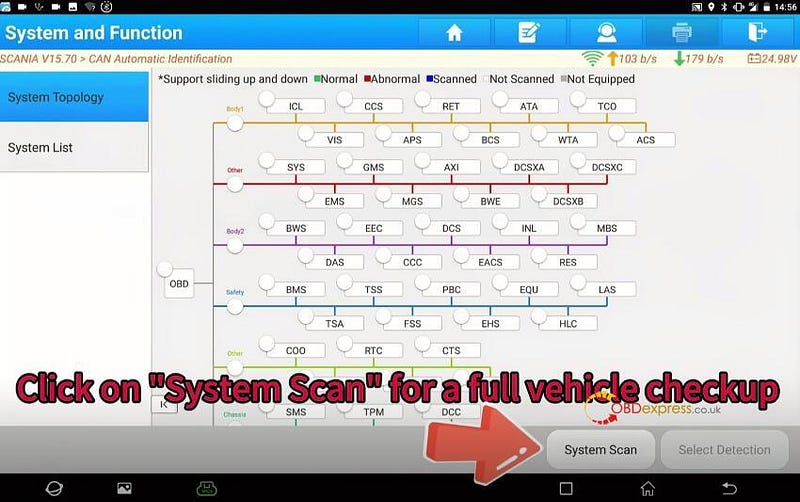
Click on "System Scan" for a full vehicle checkup


How to Test SCANIA Windscreen Wipers by LAUNCH-X431 PRO3S+ SmartLink HD

Wait a while…

Click on "VIS" and click on "ENTER"

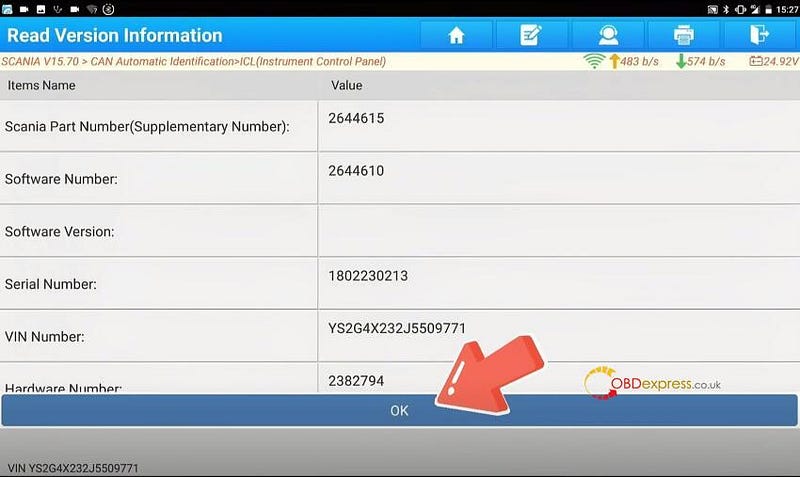
Confirm the vehicle info detected


How to Test SCANIA Windscreen Wipers by LAUNCH-X431 PRO3S+ SmartLink HD

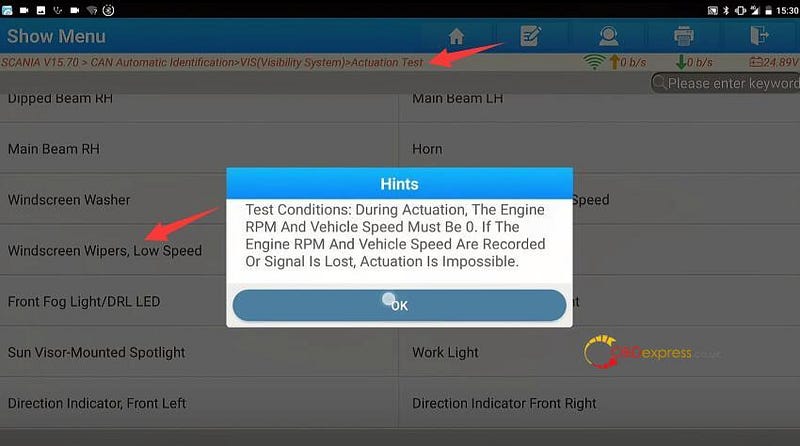
Click on "Actuation Test"

Click on "Windscreen Wipers, Low Speed"

Pay attention to the prompt

Test Conditions:

During actuation, the engine RPM and vehicle speed must be 0. If the engine RPM and vehicle speed are recorded or signal is lost, actuation is impossible.


How to Test SCANIA Windscreen Wipers by LAUNCH-X431 PRO3S+ SmartLink HD

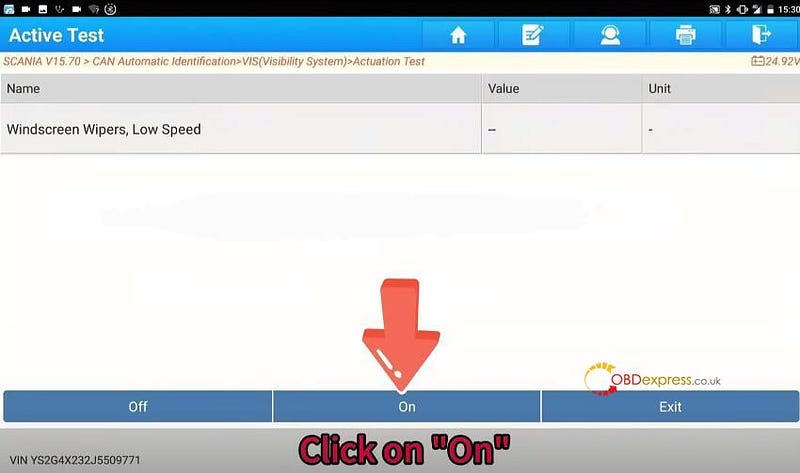
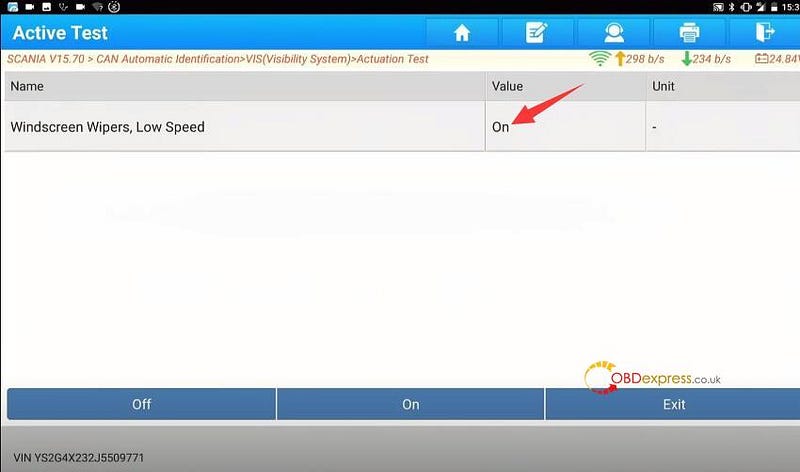
Click on "On", and the value shows "On".


How to Test SCANIA Windscreen Wipers by LAUNCH-X431 PRO3S+ SmartLink HD

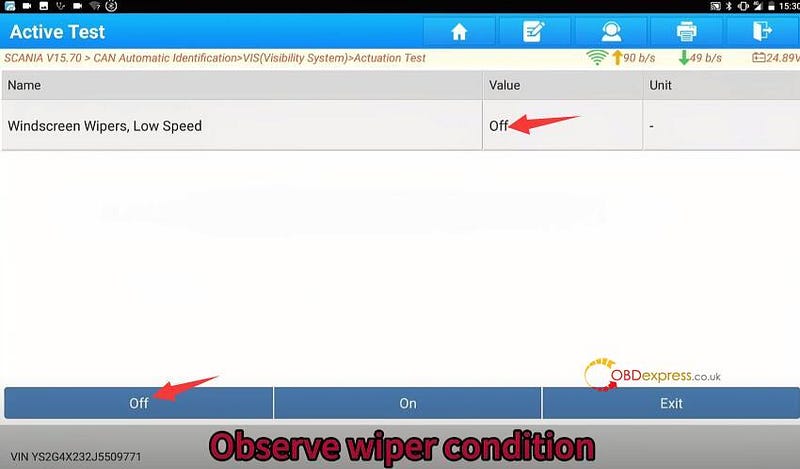
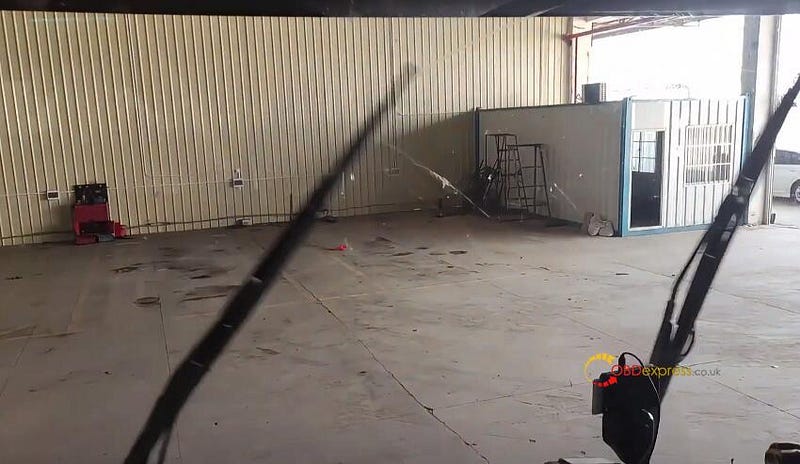
Click on "Off", observe wiper condition.


How to Test SCANIA Windscreen Wipers by LAUNCH-X431 PRO3S+ SmartLink HD

LAUNCH-X431 PRO3S+ SmartLink HD:

https://www.obdexpress.co.uk/wholesale/launch-x431-pro3s-plus-smartlink-hd.html

www.obdexpress.co.uk

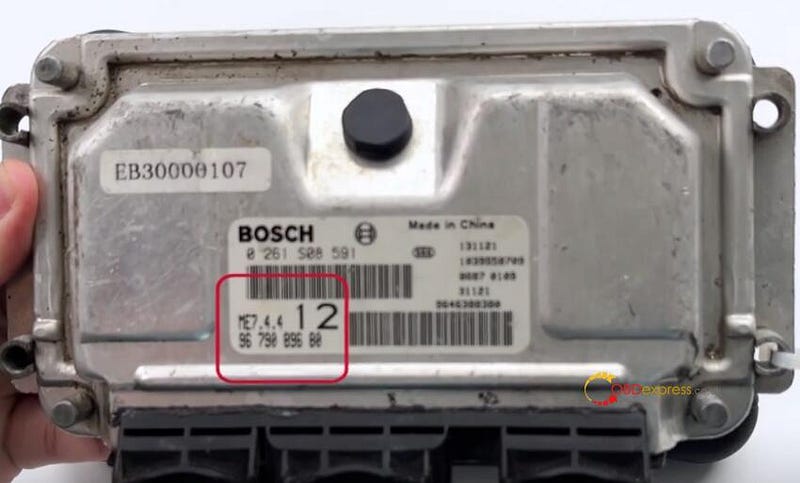
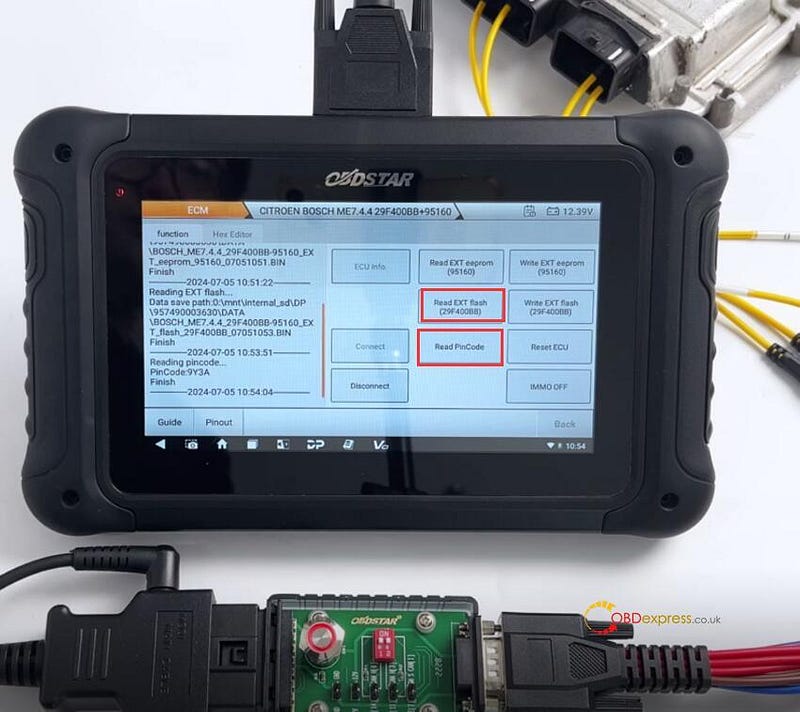
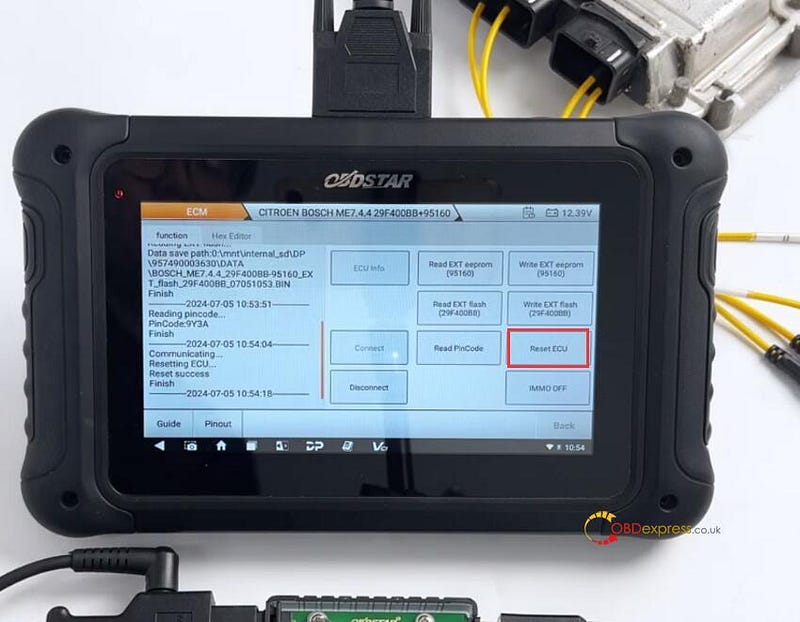
Peugeot Citroen Bosch ME7.4.4 Read PinCode and Reset ECU by OBDSTAR DC706

 Use OBDSTAR DC706 to read Pincode and reset ECU on Peugeot Citroen Bosch ME7.4.4 on Bnech perfectly.


Peugeot Citroen Bosch ME7.4.4 Read PinCode and Reset ECU by OBDSTAR DC706

Requirement:

1.Update ECM software to V30.90

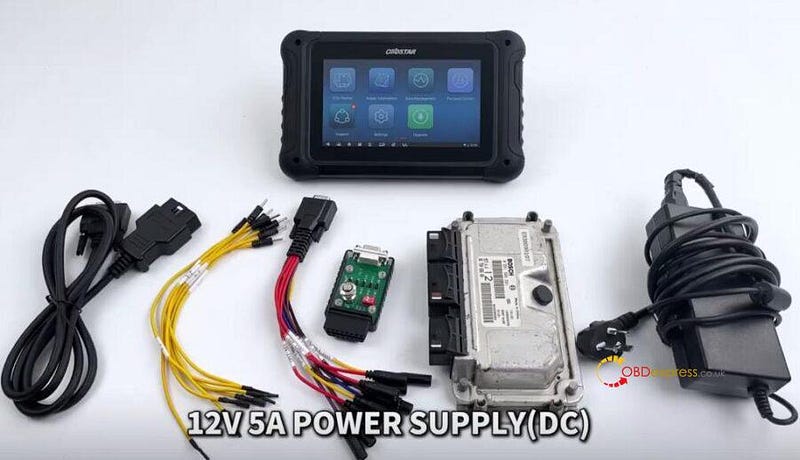
2.Need accessories incl.P004 Adapter and P004 ECU Clone Jumper, main cable and 12V power supply

3.Keep charging to OBDSTAR P004 Adapter, and make sure the network connection is normal during the operation

Operation:

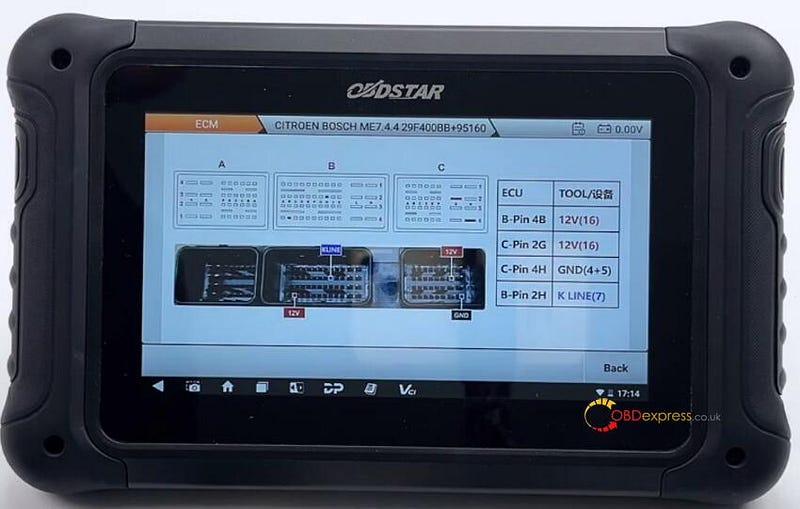
Select ECU Flasher>> ECM>> ECM V30.90>> ME7.4.4>> CITROEN BOSCH ME7.4.4 29F400BB+95160

Need to connect 12V cables (2 cables), GND (4+5) and K LINE (7)

ECUTOOLB-Pin 4B12V (16)C-Pin 2G12V (16)C-Pin 4H12V (16)B-Pin 2HK LINE (7)


Peugeot Citroen Bosch ME7.4.4 Read PinCode and Reset ECU by OBDSTAR DC706

Connect DC706 ECU Tool and Citroen ME7.4.4 ECM properly according to the wiring diagram

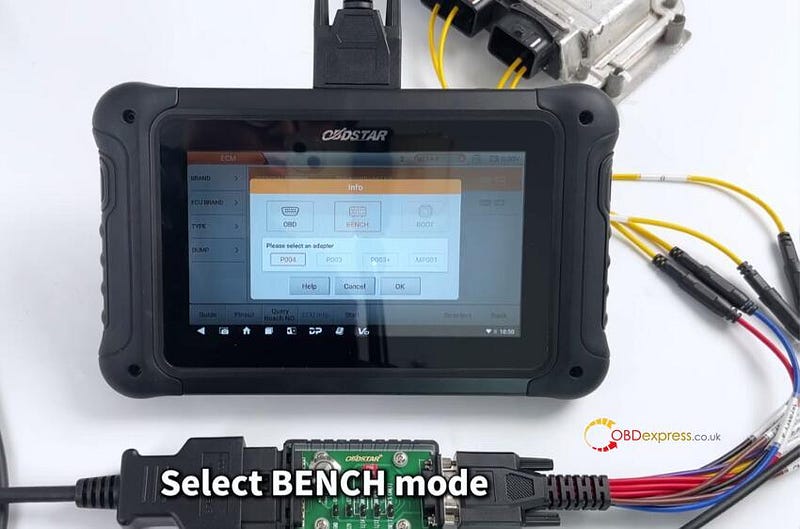
Select BENCH and P004 mode, and turn on the switch button of P004 Adapter


Peugeot Citroen Bosch ME7.4.4 Read PinCode and Reset ECU by OBDSTAR DC706

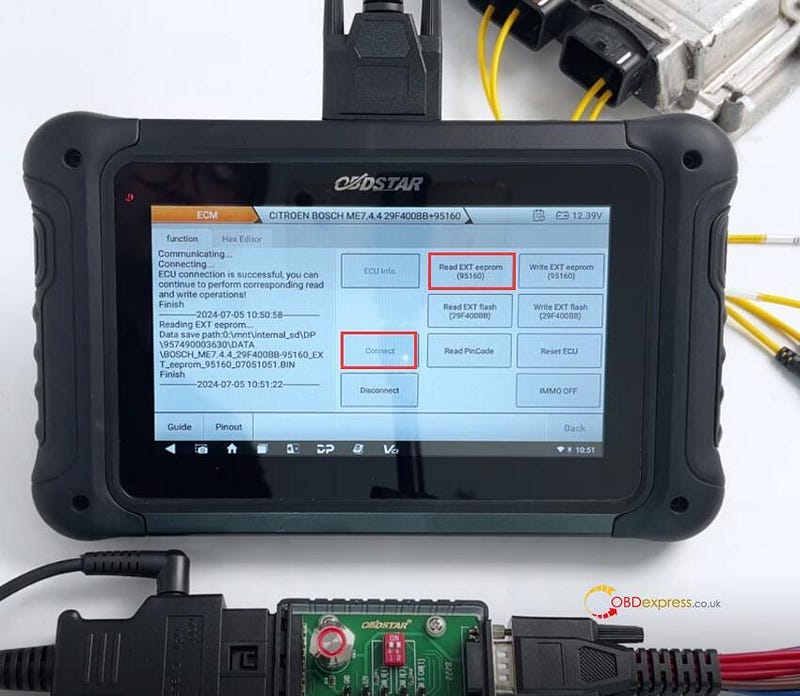
Connect ECU- OK

Read EXT EEPROM (95160)- OK


Peugeot Citroen Bosch ME7.4.4 Read PinCode and Reset ECU by OBDSTAR DC706

Read EXT flash (95160)- OK

Read Pincode OK


Peugeot Citroen Bosch ME7.4.4 Read PinCode and Reset ECU by OBDSTAR DC706

Reset ECU OK


Peugeot Citroen Bosch ME7.4.4 Read PinCode and Reset ECU by OBDSTAR DC706

Done!

www.obdexpress.co.uk

Monday, 29 July 2024

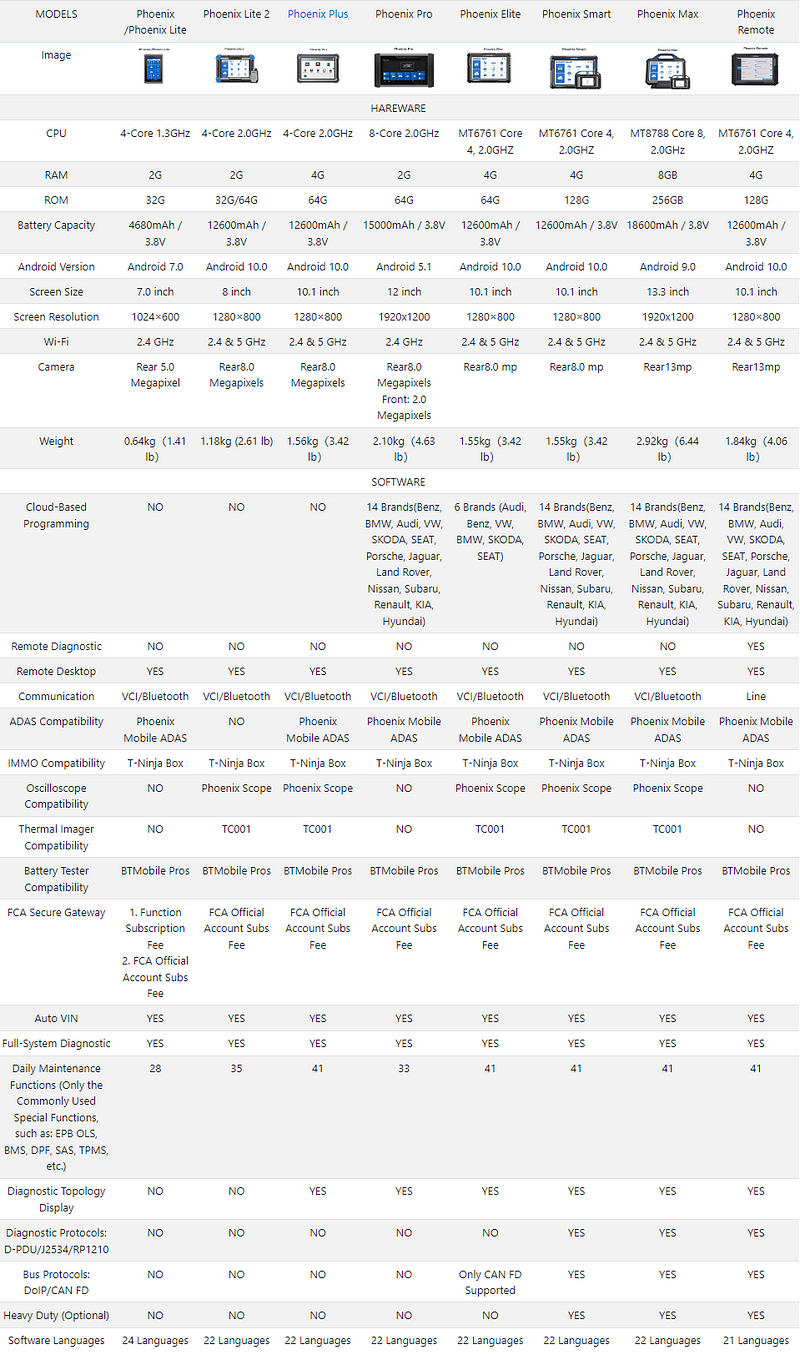
TOPDON Phoenix Series Tool Comparison Table

 TOPDON Phoenix Plus offers Topology Map, Bi-directional Control (Active Test), OE-Level Full System Diagnosis, and 41+ Service. TOPDON Phoenix has many products. What are the differences between Phoenix Plus and them? This article will introduce this.


TOPDON Phoenix Series Tool Comparison Table


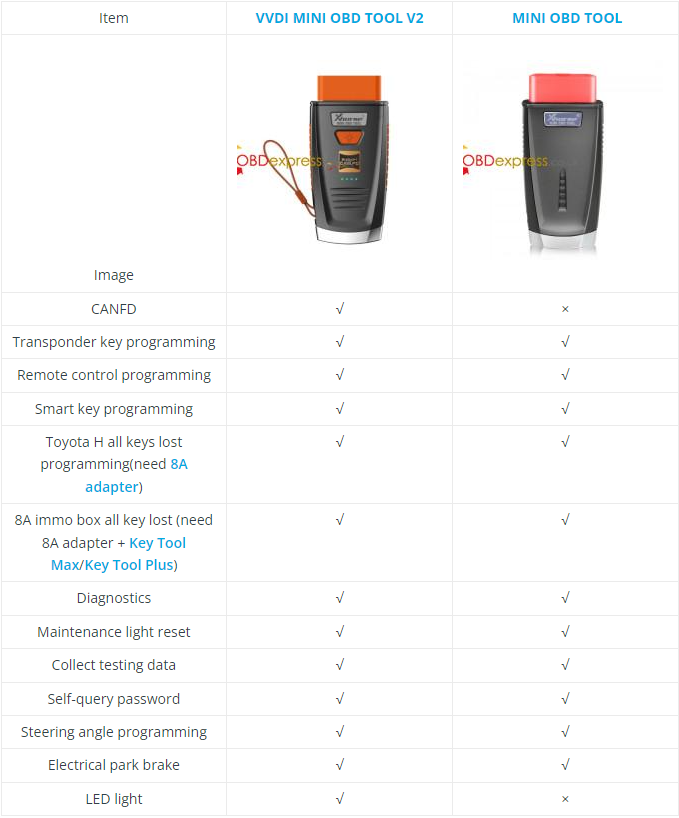
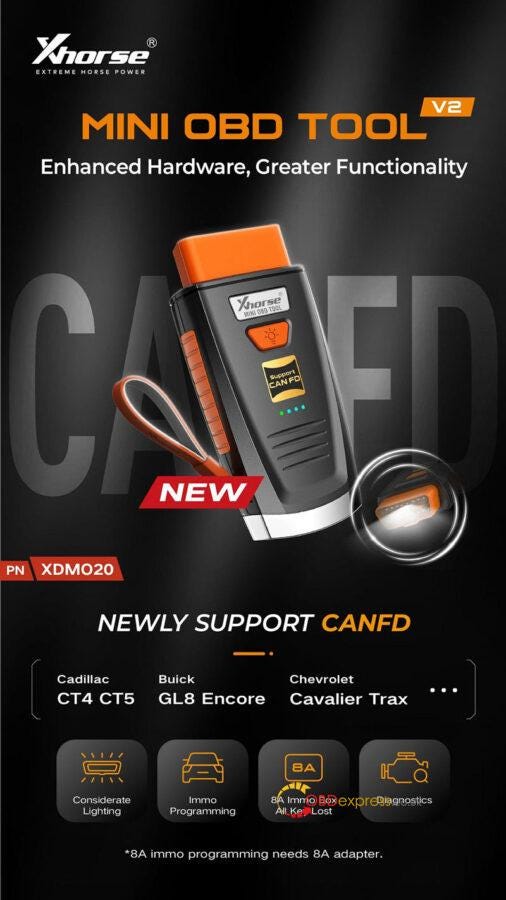
Xhorse VVDI MINI OBD TOOL V2 vs. Mini OBD Tool, What's new?

 2024 new Xhorse VVDI MINI OBD TOOL V2 has been launched and will arrive in August. With enhanced hardware and greater functionality, what’s new and different from the old version? Let’s have a look.

Comparison Table


Xhorse VVDI MINI OBD TOOL V2 vs. Mini OBD Tool

New Features

  1. MINI OBD TOOL V2 has newly supported CANFD protocol, covering Cadillac CT4/CT5, Buick GL8 Encore, Chevrolet Cavalier Trax, etc.
  2. Added considerate LED lighting.

Except for the above, other functions are basically the same.


Xhorse VVDI MINI OBD TOOL V2 vs. Mini OBD Tool

www.obdexpress.co.uk

What is Topdon Rlink X7 J2534? How to Use?

 Recently, TOPDON released two Rlink X7 J2534 diagnostic interfaces- Rlink X7 GM and Rlink X7 VAG. They support the same function as VXDIAG, and both support CAN FD and DoIP protocols. More car brands will be added in Rlink X7 in the feature (Sep. or Oct. 2024). Let’s check more details below.

PART ONE

Topdon Rlink X7 vs. VXDIAG VCX FD J2534
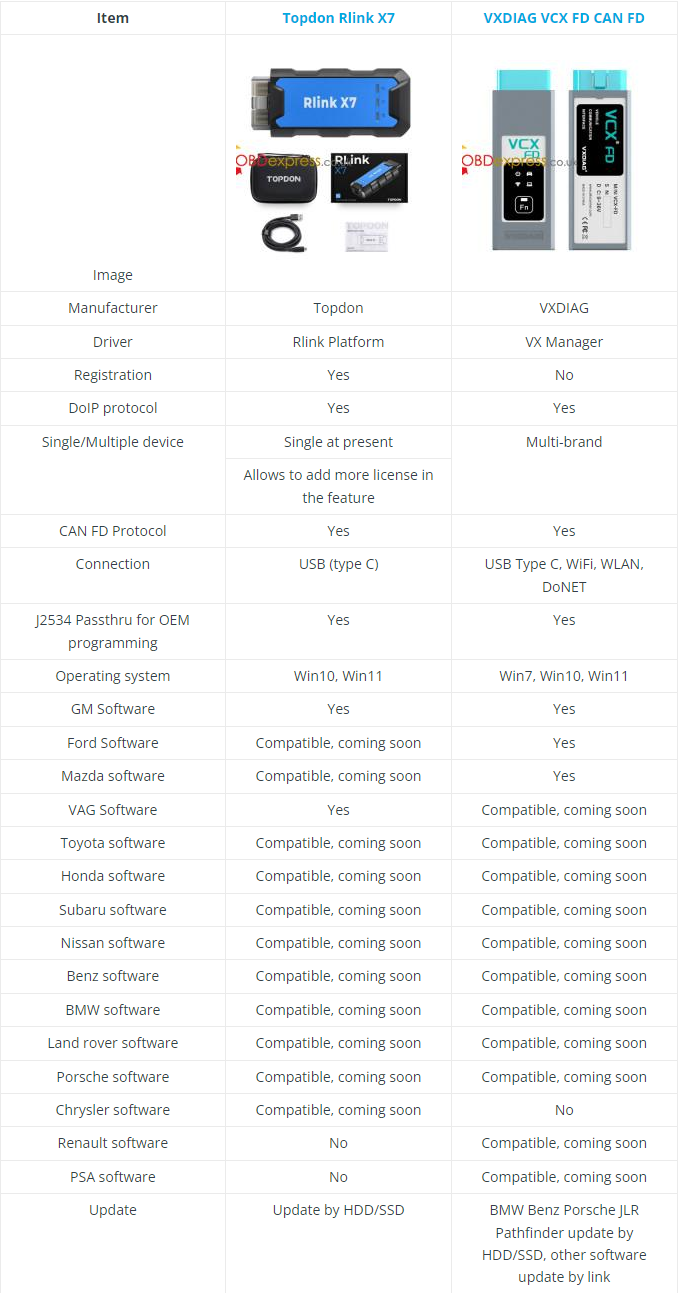

Topdon Rlink X7 vs. VXDIAG VCX FD J2534

Similarities:

1.Both diagnostic interfaces can be used as J2534 passthru interfaces for OEM programming.

2.Both are compatible with Toyota, Honda, Volvo, Subaru, Benz, BMW, Land rover, Porsche software, other license are not ready.

3.Both support Win10, Win11 operating system.

Differences:

1.Topdon uses Rlink Platform driver, while VXDIAG uses VX Manager driver.

2.Topdon Rlink X7 supports GM and VAG, while VXDIAG VCX FD supports GM and Ford/Mazda now.

3.Rlink supports Chrysler software, VXDIAG VCX FD does not, but VXDIAG can support Renault and PSA software (coming soon).

4.Rlink 7 only supports USB connection (type-C) currently, but VCX FD can supports WiFi, WLAN and DoNet connection.

What can Topdon RLink X7 VW do?

  • Online ECU programming
  • ECU coding
  • Key programming
  • Full system diagnostics
  • Component protection
  • Vehicle modification

RLink X7 for Volkswagen Highlights:

1.Complete replacement for OEM tools such as VAS 5054 and VAS 6154

2.Software version: ODI-S V23.05, Project V17.01

3.Supports Windows 10 and Windows 11

4.Supported vehicle models: Volkswagen, Audi, Skoda, Seat, Bentley, Lamborghini (2001–2024)

5.OEM-level diagnostics allows you to quickly understand the vehicle’s fault conditions and minimize your repair time

6.Uses USB Type-C connection for faster operation

7.With a large amount of diagnostic data and practical experience based on more than 10,000 real vehicle tests, the device functions are more stable.

8.RLink Platform driver management platform allows you to download the latest driver management program and enjoy lifetime free updates.

9.Three CAN channels: supports three CAN channels working simultaneously, including CAN-FD and CAN-CC, which can support more car models and achieve higher diagnostic efficiency.

Supported Vehicle Systems:

K-line (ISO9141–2)

High-speed CAN (ISO 11898–2)

Low-speed CAN (ISO 11898–3)

KWP1281

KWP2000

TP16

TP20

UDS protocol

List of Supported Vehicle Makes

VW, Audi, Skoda, Seat, Bentley and Lamborghini are the default vehicle models supported by RLink X7 6154.

What can Topdon RLink X7 GM do?

1.Supports GM Tech2Win and GDS2, can replace OEM tool of GM (MDI/Tech2).

2.Compatible with diagnostic applications such as engines, transmissions, ABS, dashboards, etc.

3.Quick access to vehicle data for maintenance or management reports.

4.Quickly connect to the vehicle’s diagnostic connector.

5.Supports GM vehicles from 2000 to 2024 (Chevrolet, Buick, Cadillac, Opel, Holden)

6.OEM-level diagnostics allows you to quickly understand the vehicle’s fault conditions and minimize your repair time.

7.Online programming (ECU programming, ECU performance upgrade)

PART TWO

How to use TOPDON RLINK X7 J2534?

For the first time use, need to download Topdon Rlink X7 J2534 Driver, bind and activate your Rlink X7 device, and then it can work with the corresponding software to diagnose VW or GM.

1.Download TOPDON Rlink X7 J2534 Driver on WIN10 or WIN11

Rlink X7 platform driver

https://mega.nz/file/tTtQ2JRT#HVEwo5fYgbo1ZSLLfH2IHMK29fIgq6HjyyZyvqNdSLM

Double-click the software to install.

Note:

Some computers have high security. When opening the driver, a prompt requiring administrator rights will appear. Click Yes. This driver will not have any adverse effects on the computer.

2.Register TOPDON account

If you don’t have a TOPDON account, you need to register one.

Click "Account & Password" and "Register"


What is Topdon Rlink X7 J2534

If you have already registered on the RLink, just login to the account.

Input the personal info to complete the registration as follows:

Available email address+ verification code (get from your email) + password

Read the User Agreement and Privacy Policy carefully and check the Accept box

Click SIGN UP


What is Topdon Rlink X7 J2534

After the registration is successful, it will jump to the login page.

3.Bind and activate Rlink X7 J2534

Log in with the account and password you registered

Connect the Rlink J2534 to a PC via the USB type C port.

Then the device information will appear on the screen.
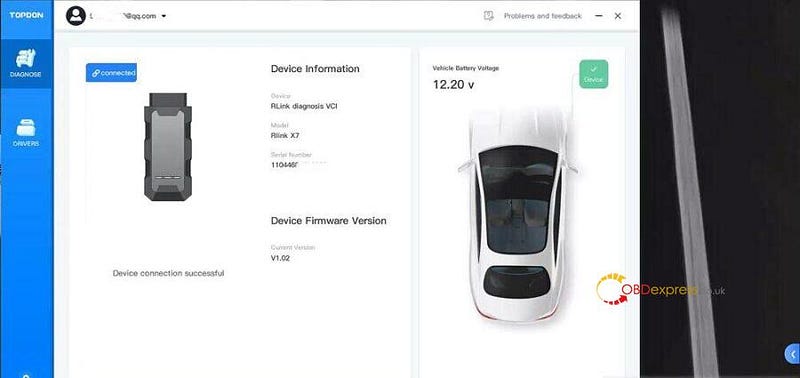

What is Topdon Rlink X7 J2534

Click User info on the top left.

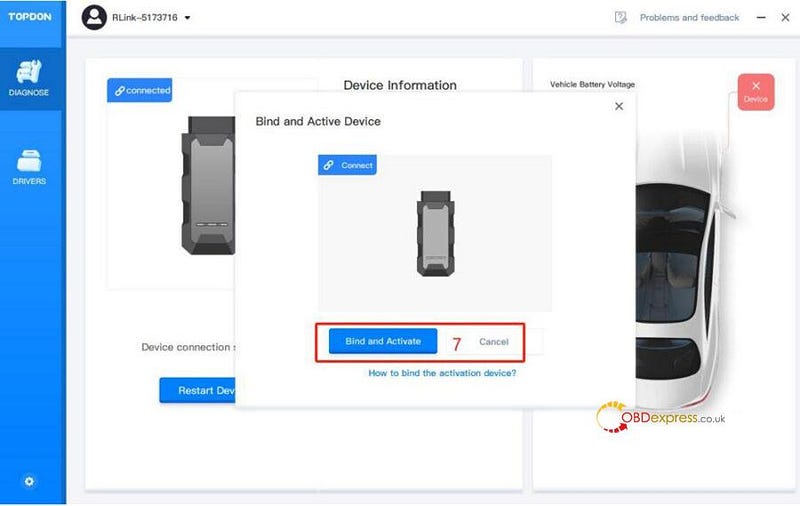
Click Register Device>> Bind and Activate
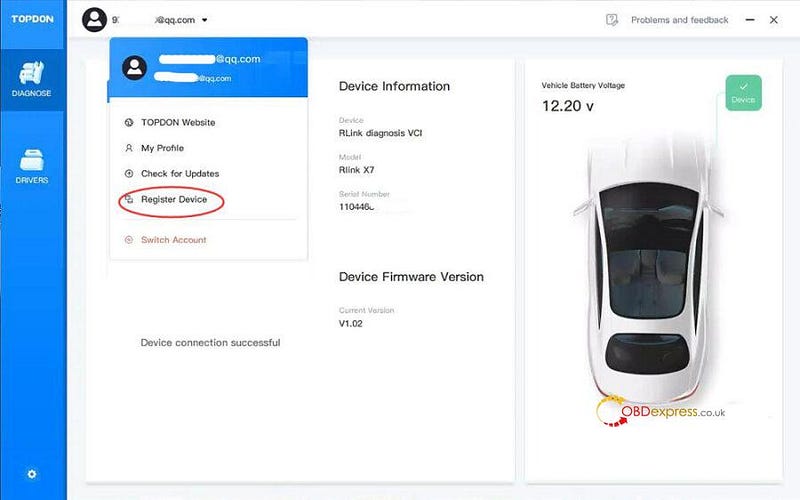

What is Topdon Rlink X7 J2534

4.Download software

Go to Drivers>> Drivers Download
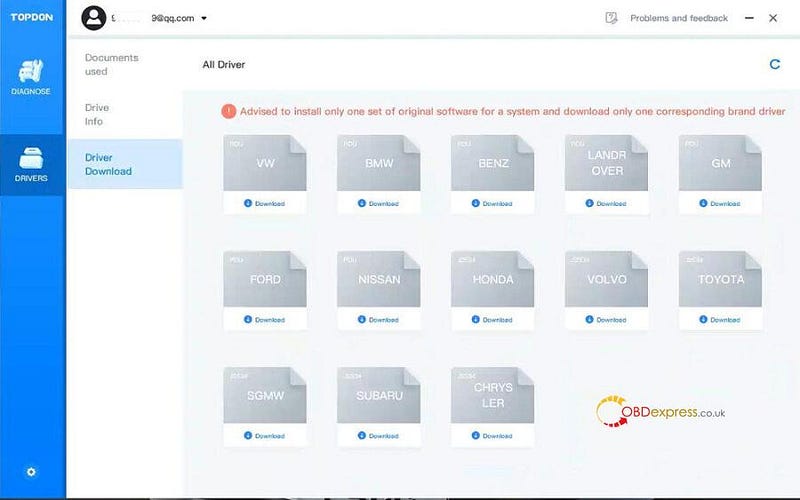

What is Topdon Rlink X7 J2534

Download driver you desire

It is recommended to install only 1 driver only for a system.

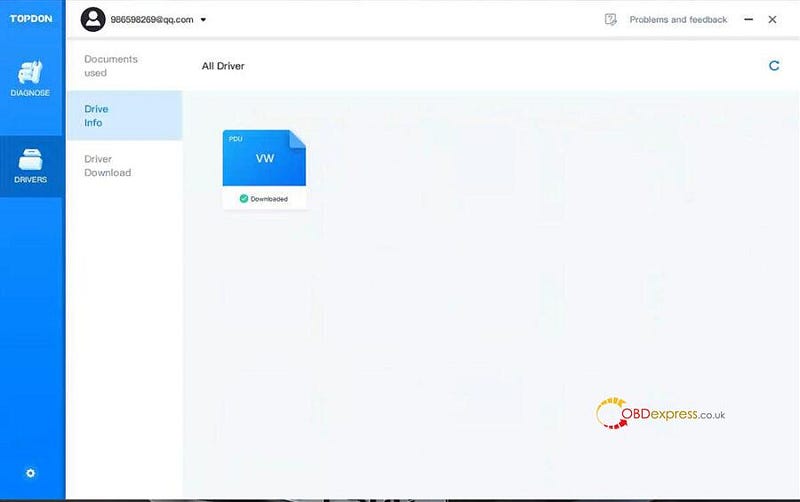
For example, install VW driver

Download VW driver
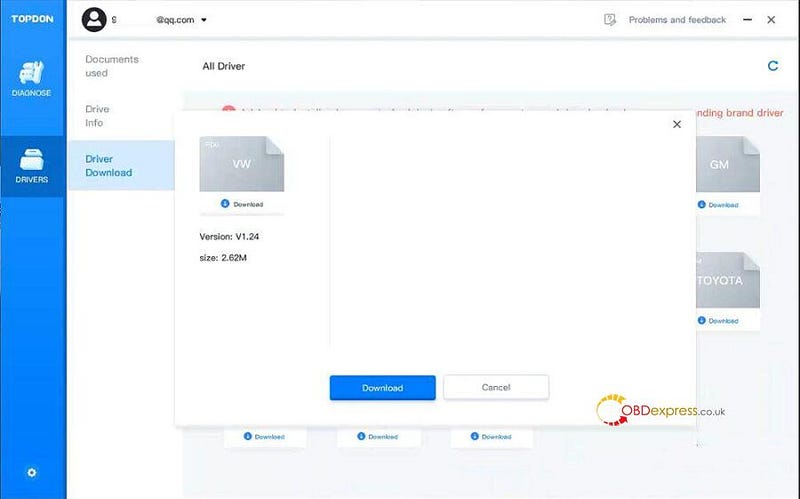

What is Topdon Rlink X7 J2534

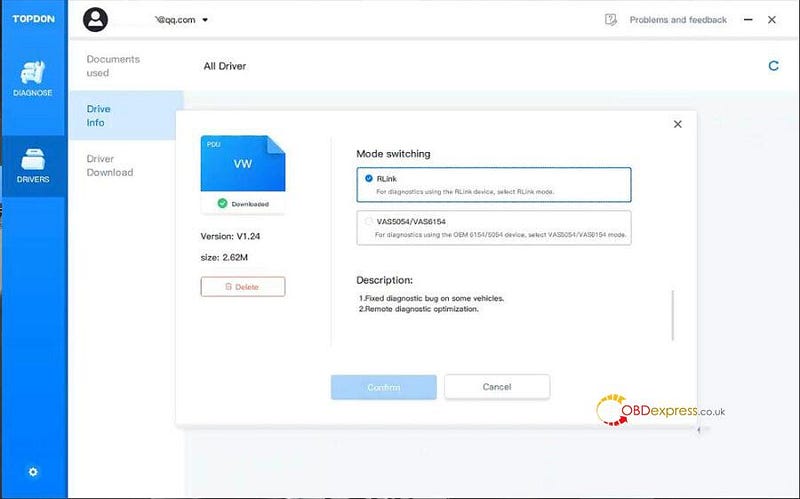
Select Rlink mode


What is Topdon Rlink X7 J2534

After the corresponding software is installed successfully, the Rlink X7 J2534 device is ready to use.

TOPDON Rlink X7 VW is compatible with ODIS-S V23 and ODIS-E V17 software.
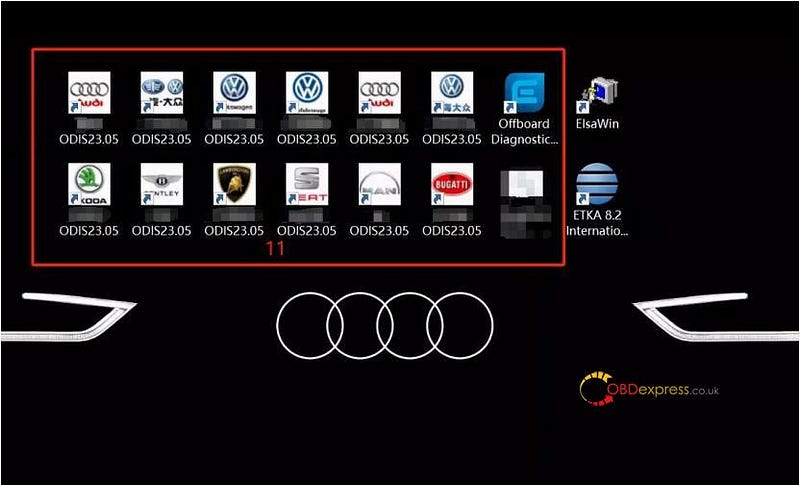

What is Topdon Rlink X7 J2534

Choose RLink driver mode following the order below.
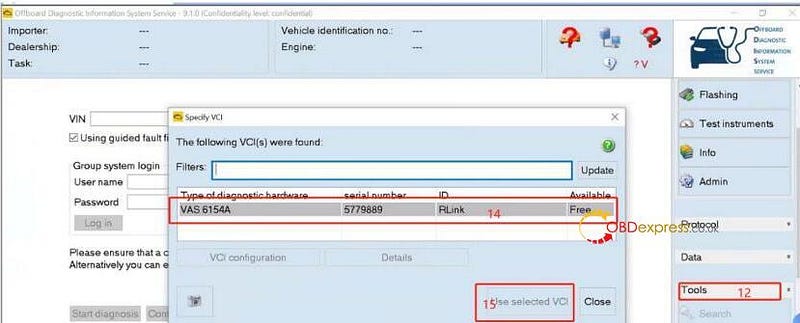

What is Topdon Rlink X7 J2534

The same procedure applies to other brands.

TOPDON Rlink X7 for Volkswagen:

https://www.obdexpress.co.uk/wholesale/topdon-rlink-x7-volkswagen.html

TOPDON RLink X7 for GM:

https://www.obdexpress.co.uk/wholesale/topdon-rlink-x7-gm.html

www.obdexpress.co.uk
Wednesday, 24 July 2024

How to install the Yanhua ACDP Module 34 interface board

 Yanhua ACDP Module 34 interface board is suitable for D70F3423/3426, R7F71401/ 1402/ 1407, R7F71401/ 1402/ 1404/ 1406/ 1407 chips. Below we will introduce how to install these interface boards.

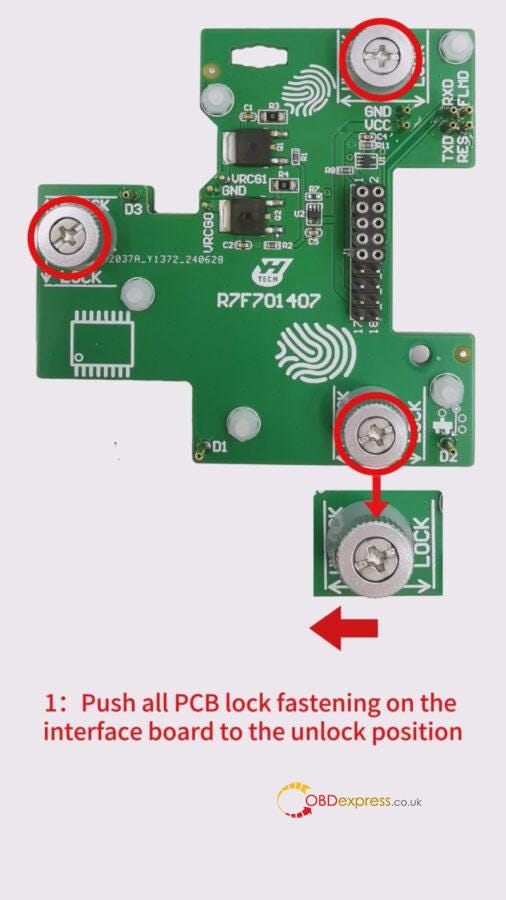
Yanhua Module 34: Lock fastening R7F701407 interface board Installation tutorial:
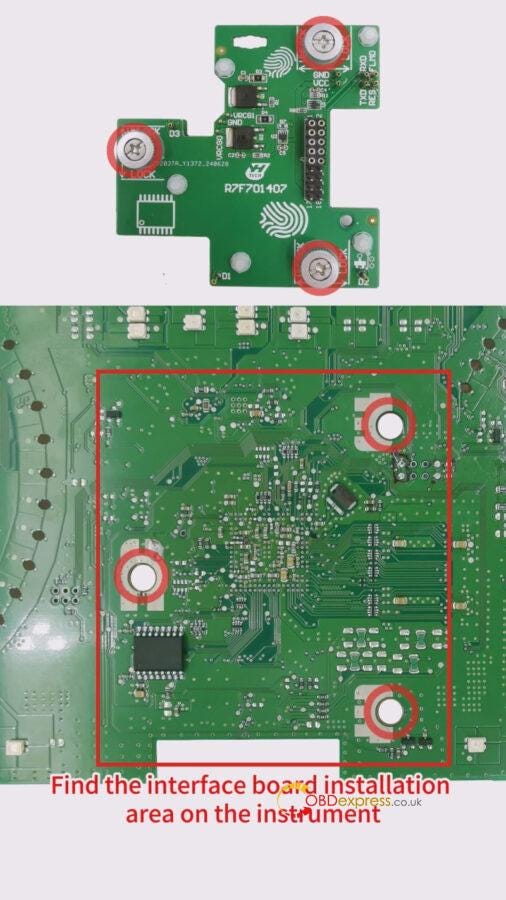
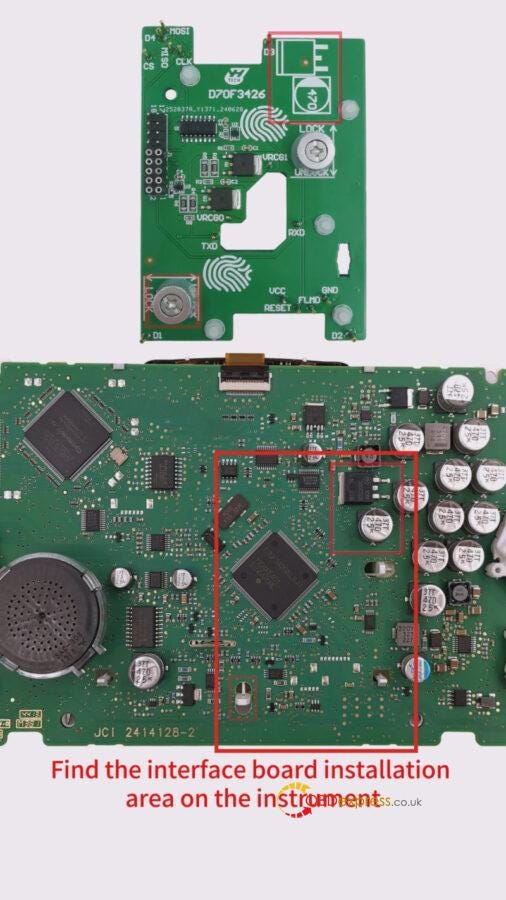
1: Push all PCB lock fastening on theinterface board to the unlock position. Find the interface board installation area on the instrument, according to the visual positioning mark on the interface board.


How to install the Yanhua ACDP Module 34 interface board

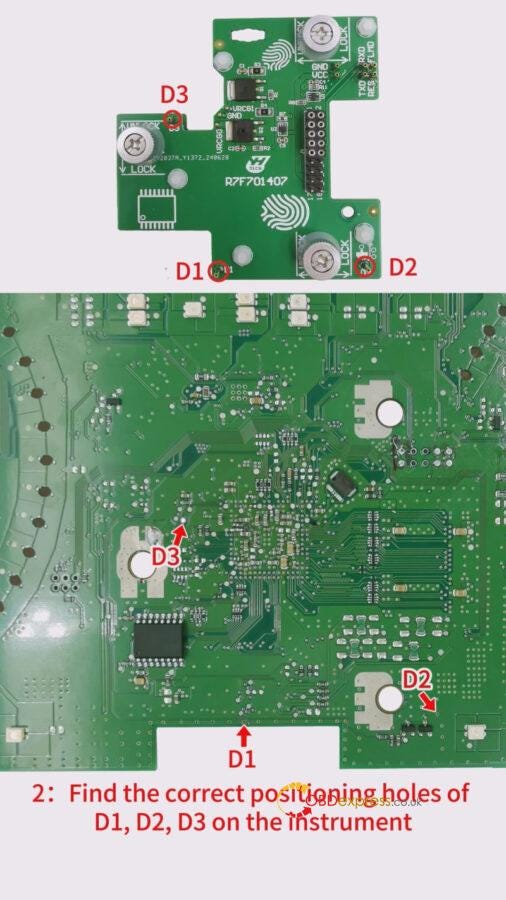
2: Find the correct positioning holes of D1, D2, D3 on the instrument.


How to install the Yanhua ACDP Module 34 interface board

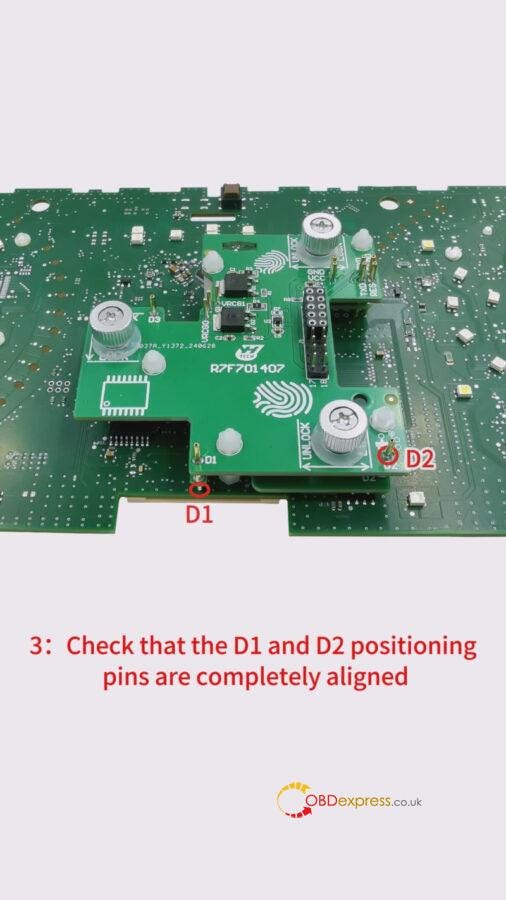
3: Check that the D1 and D2 positioning pins are completely aligned with the D1 and D2 positioning holes of the instrument, and ensure that the PCB lock buckle is completely aligned.


How to install the Yanhua ACDP Module 34 interface board

4: Finger down pressure interface board, push the PCB lock buckle to the Locked position to lock the interface board, installation is done.
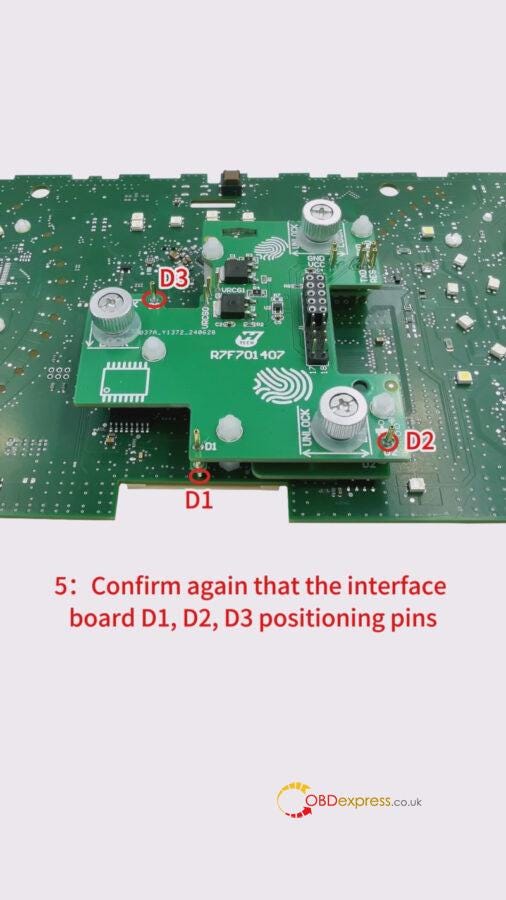
5: Confirm again that the interface board D1, D2, D3 positioning pins are completely aligned with the D1, D2, D3 positioning holes of the instrument


How to install the Yanhua ACDP Module 34 interface board

Reference video:
https://youtu.be/63linnCHTH0

Yanhua Module 34: Lock fastening (D70F3426)interface board Installation tutorial:
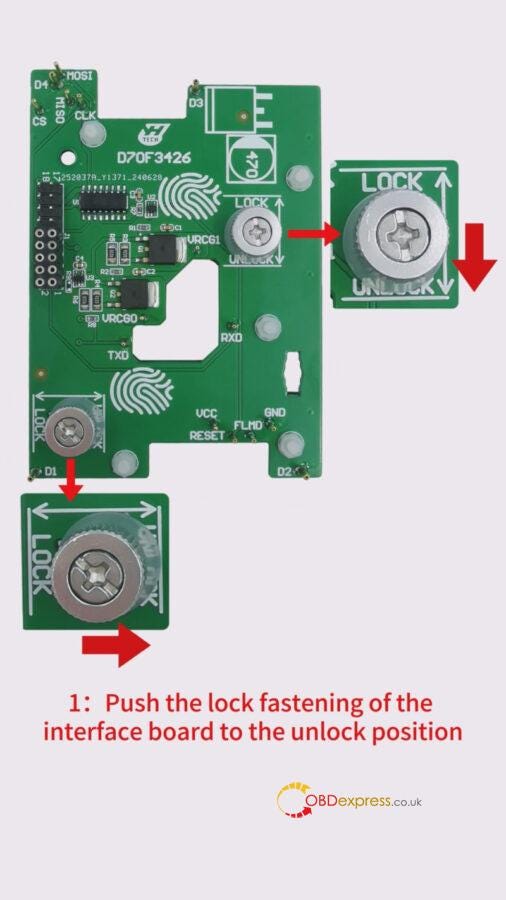
1: Push the lock fastening of the interface board to the unlock position. Find the interface board installation area on the instrument, according to the visual positioning mark on the interface board.


How to install the Yanhua ACDP Module 34 interface board

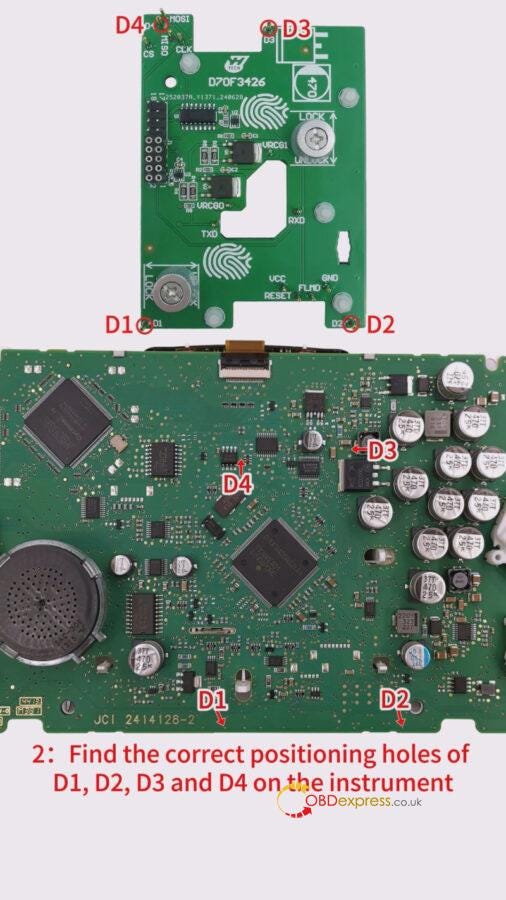
2: Find the correct positioning holes of D1, D2, D3 and D4 on the instrument


How to install the Yanhua ACDP Module 34 interface board

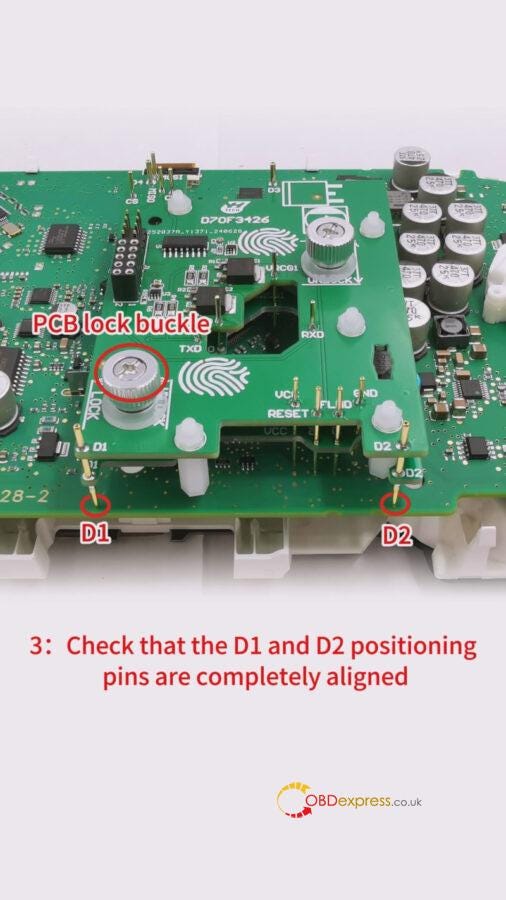
3: Check that the D1 and D2 position pins are completely aligned, with the D1 and D2 positioning holes of the instrument, and ensure that the PCB lock buckle is completely aligned.


How to install the Yanhua ACDP Module 34 interface board

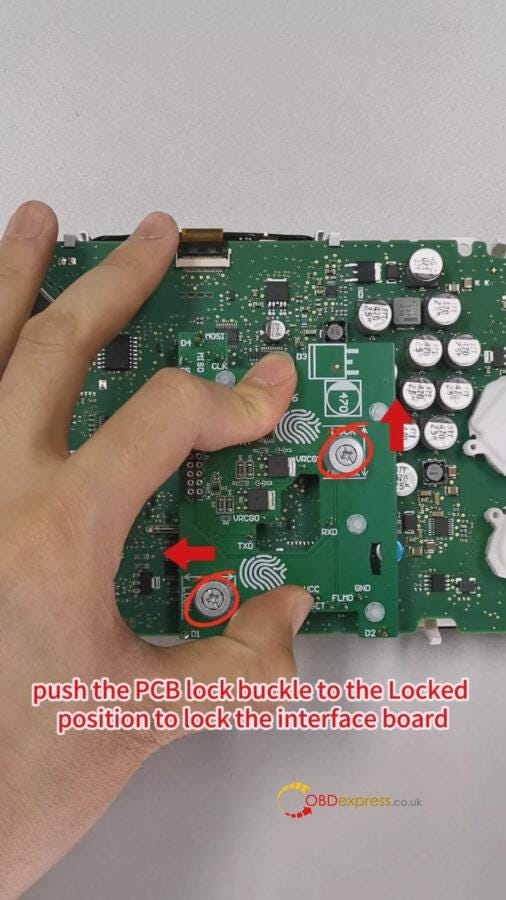
4: Finger down pressure interface board, push the PCB lock buckle to the Locked position to lock the interface board, installation is done.


How to install the Yanhua ACDP Module 34 interface board

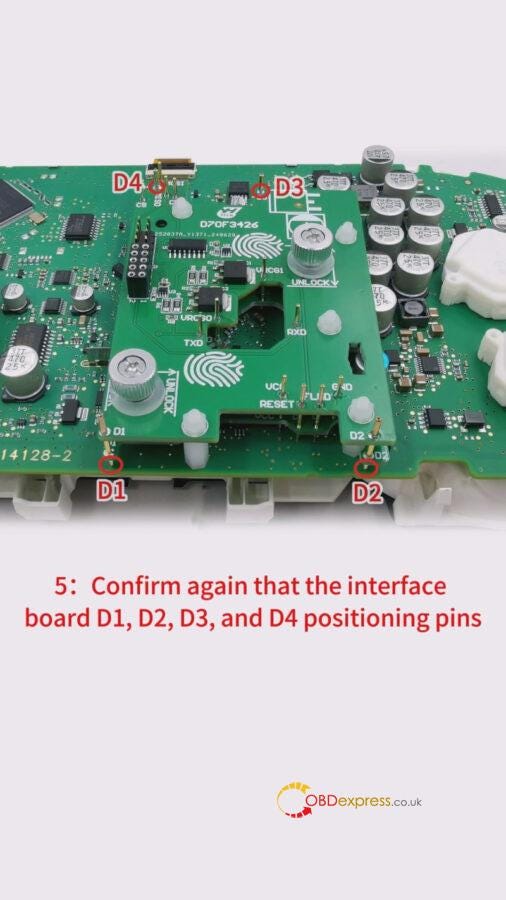
5: Confirm again that the interface board D1, D2, D3, and D4 positioning pins are completely aligned with the D1, D2, D3 and D4 positioning holes of the instrument.


How to install the Yanhua ACDP Module 34 interface board

Reference video:
https://youtu.be/VEwrE88Bdaw

Yanhua Module 34: Thumb screw-fastened R7F701402 interface board Installation tutorial:
1:Find the interface board installation area on the instrument, according to the visual positioning mark on the interface board
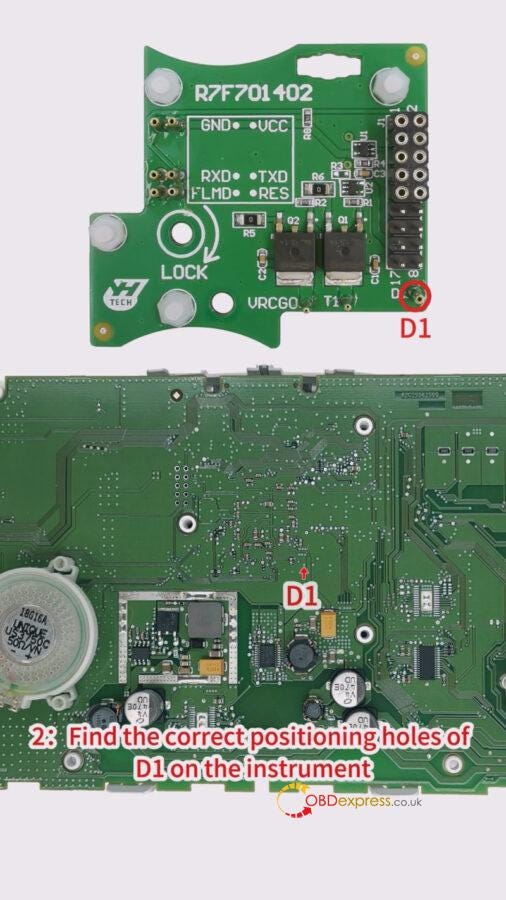
2: Find the correct positioning holes of D1 on the instrument


How to install the Yanhua ACDP Module 34 interface board

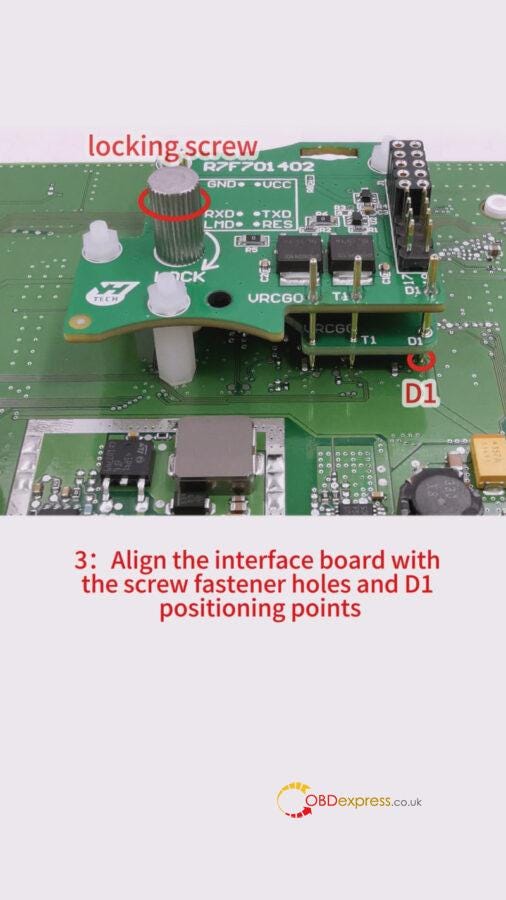
3: Align the interface board with the screw fastener holes and D1 positioning points


How to install the Yanhua ACDP Module 34 interface board

4: Press the interface board down with your left hand. Tighten the locking screw with your right hand.
The installation done
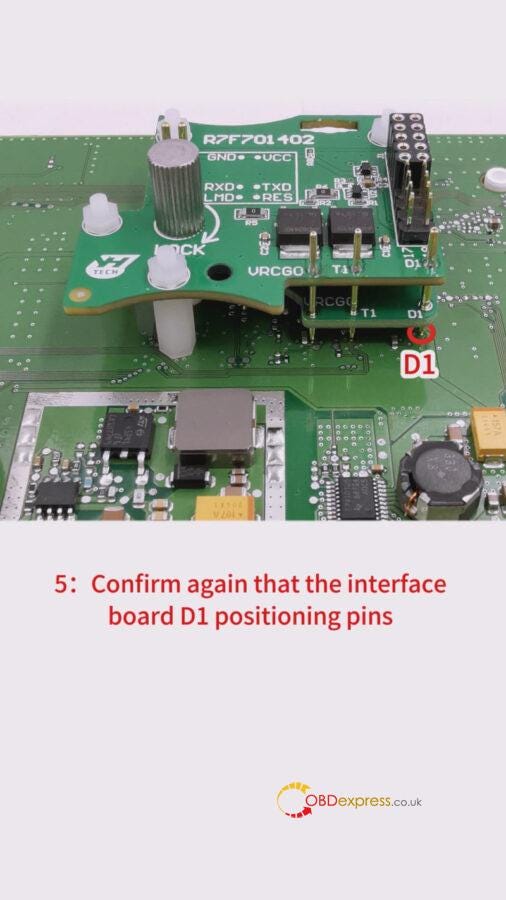
5: Confirm again that the interface board D1 positioning pins are completely aligned with the D1 positioning holes of the instrument


How to install the Yanhua ACDP Module 34 interface board

Reference video:
https://youtube.com/shorts/ZvHsKZP7qdY

CG FC200 V1.2.5.0 Update: Added GM E83 Read and Write via Boot

 The newest software V1.2.5.0 of CG FC200 ECU Programmer was released on Jan.6th, 2025. Check the related updated details and update your...