Friday, 26 May 2023

OBDSTAR MT200 Read and Change Code on Ford TMS470/ NEC70F3357 Radio

 OBDSTAR MT200 Radio Decoding Tool with OBDSTAR APP can read & write EEPROM, and read & change code on Ford Radio by bench/OBD. It has been tested on Ford 6000 CD, SONY TMS470 and SONY NEC70F3357 successfully by the OBDSTAR Official Technical team.

OBDSTAR MT200 Ford supported models (via OBD/ bench):

TMS470AVF689APZA+24C16

TMS470R1VF48BPGEA+24C16

TMS470R1VF288PZA+24C16

NEC70F3357+24C16

Including but not limited to the following models or radio models:

Ford 1500 RDS Medialess, 6C1T-18C838-AH, TMS470AVF689

Ford 5000C Tape — KW2000, 6S61–18K876-AG, TMS470AVF689

Ford 5000C, 6S61–18K876-AF, TMS470AVF689

Ford 6000 CD Single CD — KW2000, 6S61–18C815-AF, TMS470AVF689

Ford 6000 CD Single CD — KW2000, 6S61–18C815-AG, TMS470AVF689

Ford 6000 CD Single CD — KW2000, 6S61–18C815-AH, TMS470AVF689

Ford 6000 CD, 6S61–14C044-AB, TMS470AVF689

Ford 6000 Single CD — GGDS, 6C1T-18C815-AH, TMS470AVF689

Ford 6000 Single CD — GGDS, 6M2T-18C815-AF, TMS470AVF689

Ford 6006 CDC, 6C1T-18C815-BH, TMS470AVF689

1.OBDSTAR MT200 read and change radio code on SONY TMS470- OK

Tools required:

OBDSTAR MT200 main unit

Mini USB upgrade cable

120 ohm resistor

Jumper

Ford VISTEON SONY TMS470 Radio
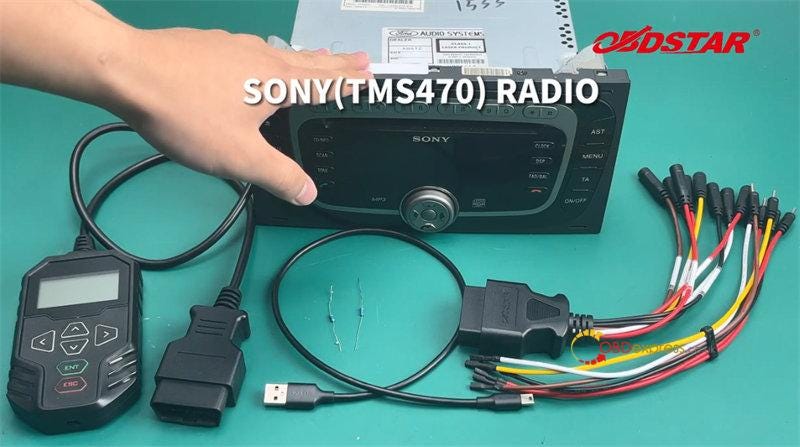
OBDSTAR MT200 Read and Change Code on Ford TMS470 NEC70F3357 Radio

Procedure:

Determine the ford radio model by identifying the appearance and label of the module.

Open OBDSTAR APP, tap Dash/Airbag/ECU/Radio icon, select Radio Pinout (MT200)>> FORD>> Visteon Sony (TMS470)
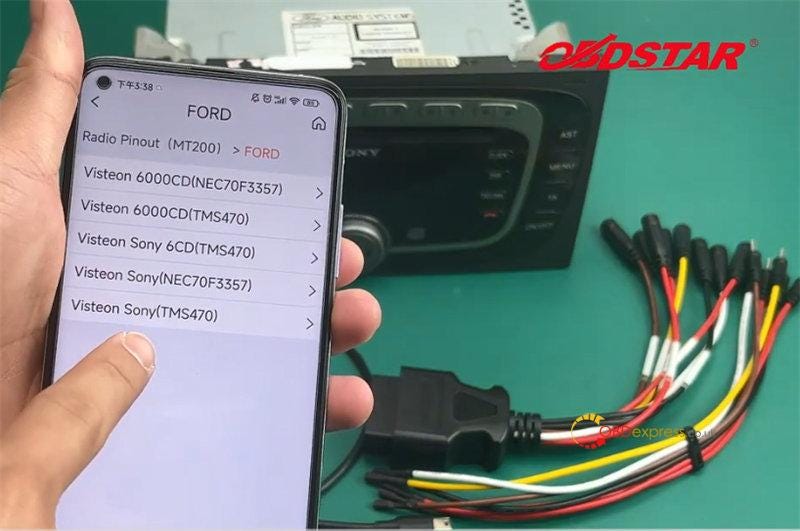
OBDSTAR MT200 Read and Change Code on Ford TMS470 NEC70F3357 Radio

Follow the corresponding pinout to connect OBDSTAR MT200 Handheld Radio Decoding Tool and Sony (TMS470) Radio with jumper, and also connect to a 12V power supply
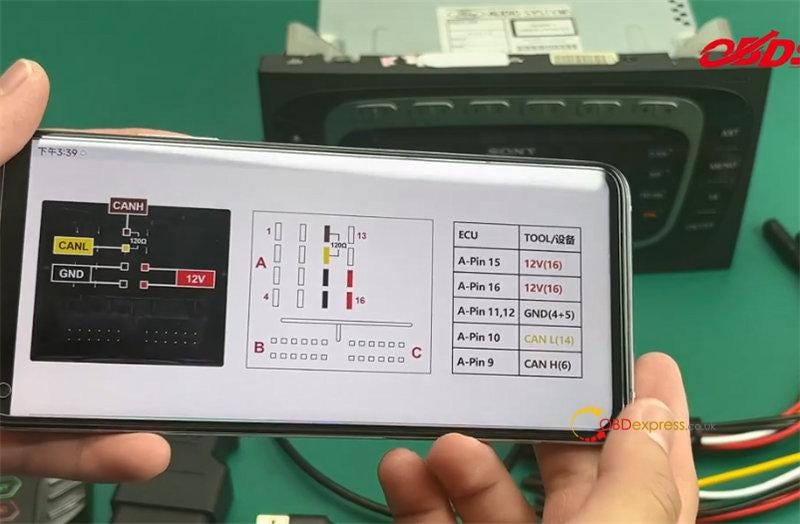
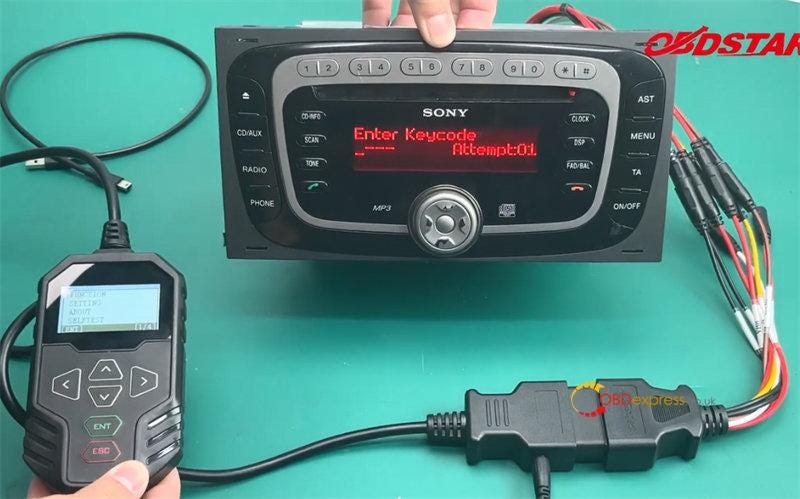
OBDSTAR MT200 Read and Change Code on Ford TMS470 NEC70F3357 Radio

OBDSTAR MT200 Read and Change Code on Ford TMS470 NEC70F3357 Radio

Note: For CANH & CANL, a 120 ohm resistor needed in series.

After connection, select FUNCTION>> OTHER FUNCTION>> Radio Code V30.01>> FORD>> Visteon Sony >> TMS470 >> BENCH
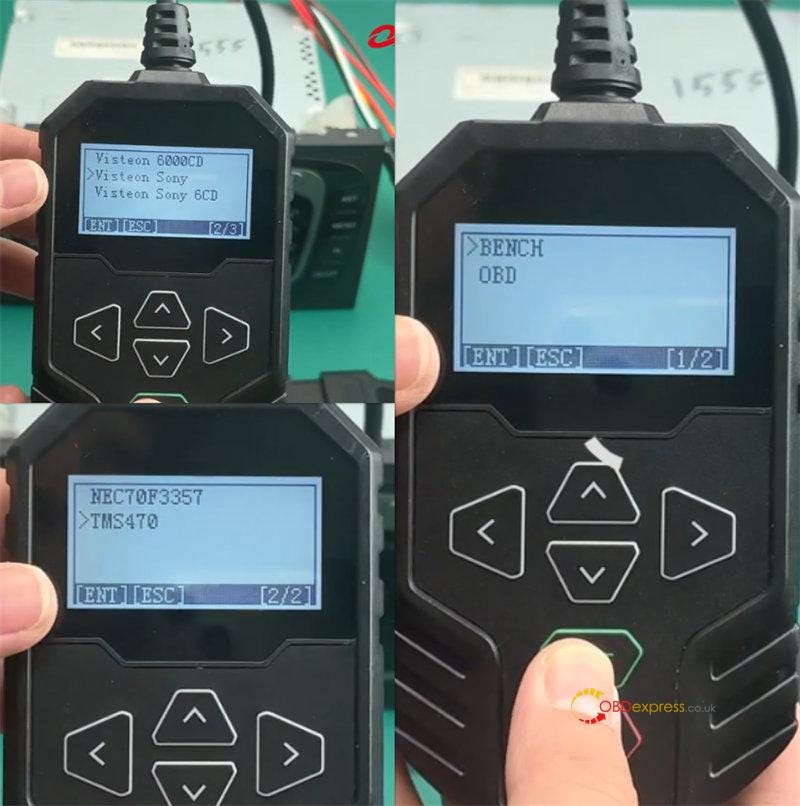
OBDSTAR MT200 Read and Change Code on Ford TMS470 NEC70F3357 Radio

Perform the functions supported in sequence:

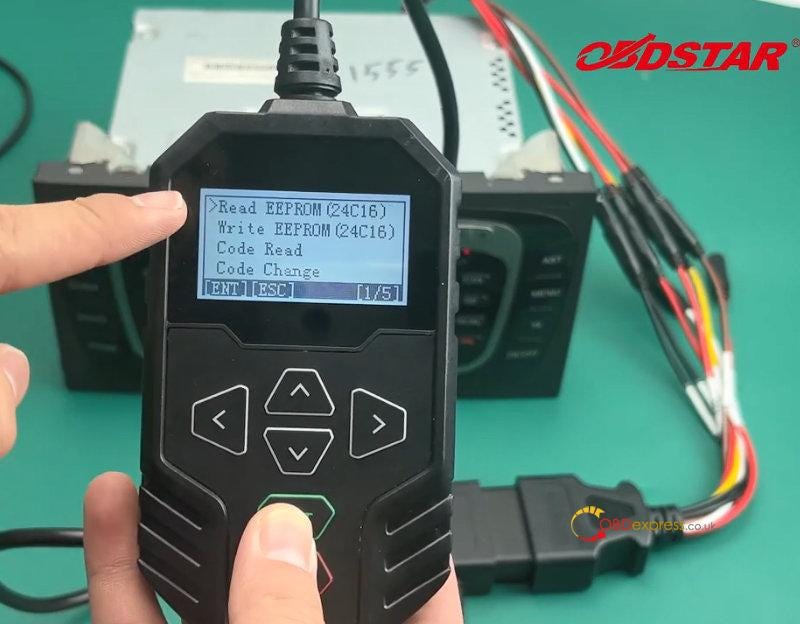
  • Read EEPROM (24C16)
  • Write EEPROM (24C16)
  • Code Read
  • Code Change

OBDSTAR MT200 Read and Change Code on Ford TMS470 NEC70F3357 Radio

1.Read EEPROM (24C16)

Read EEPROM data is 1111 and save it with a file name
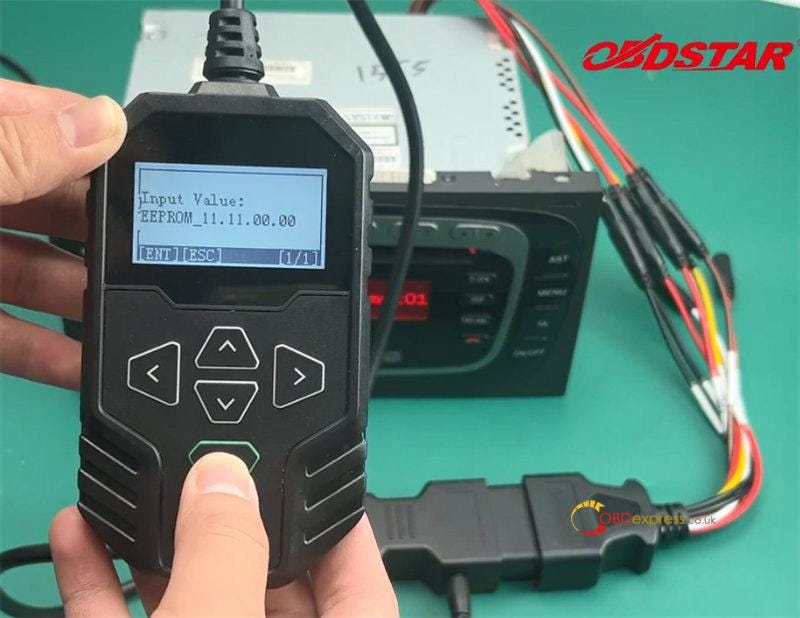
OBDSTAR MT200 Read and Change Code on Ford TMS470 NEC70F3357 Radio

For saving data, the OBDSTAR Mini USB Upgrade Cable can be used to connect to computer for transmission. Other EEPROM data can also be written to device for use.

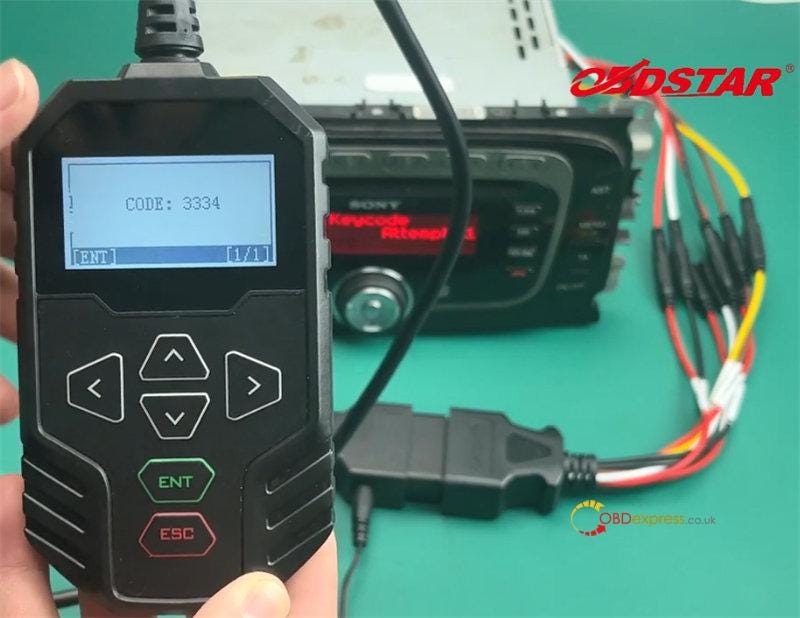
2.Code Read

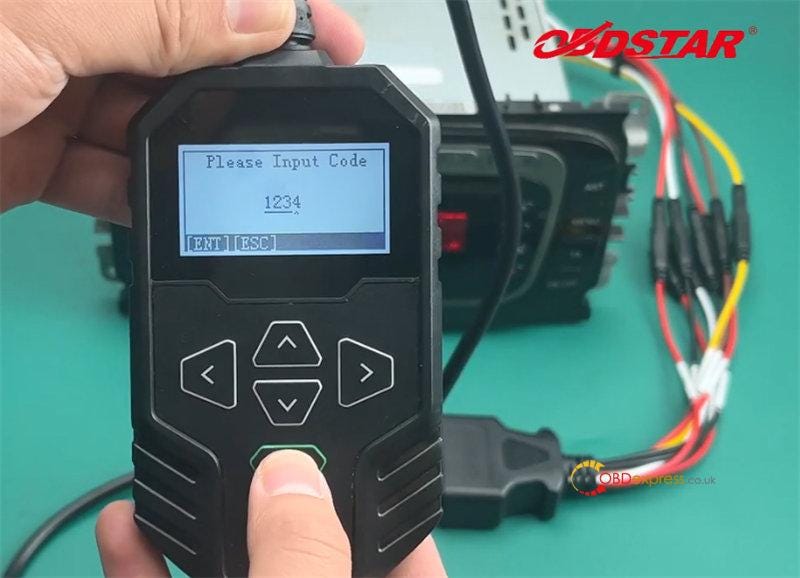
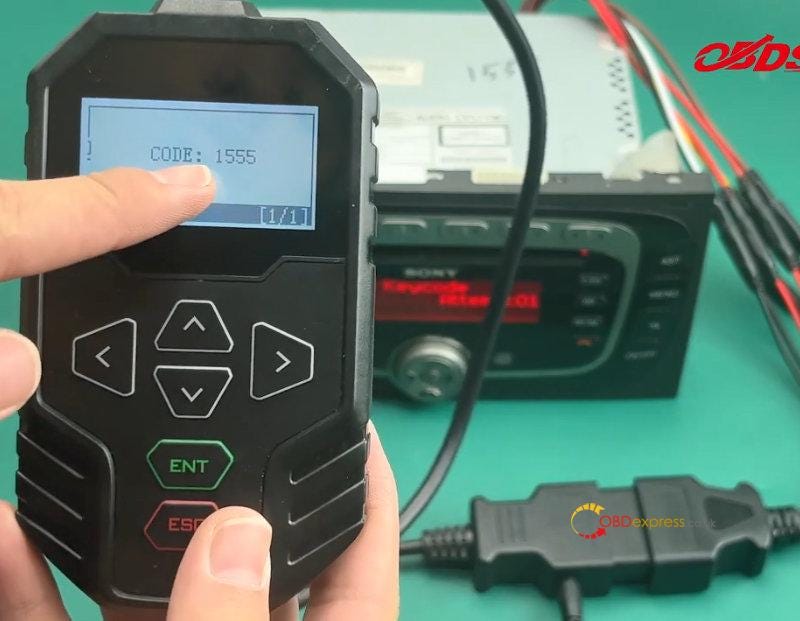
Read the code is 1555
OBDSTAR MT200 Read and Change Code on Ford TMS470 NEC70F3357 Radio

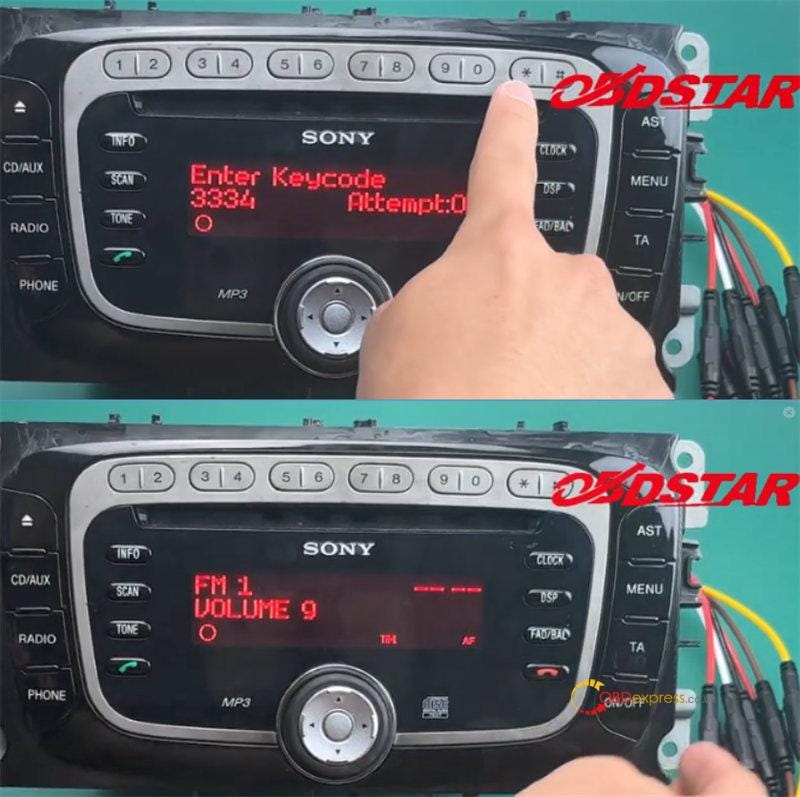
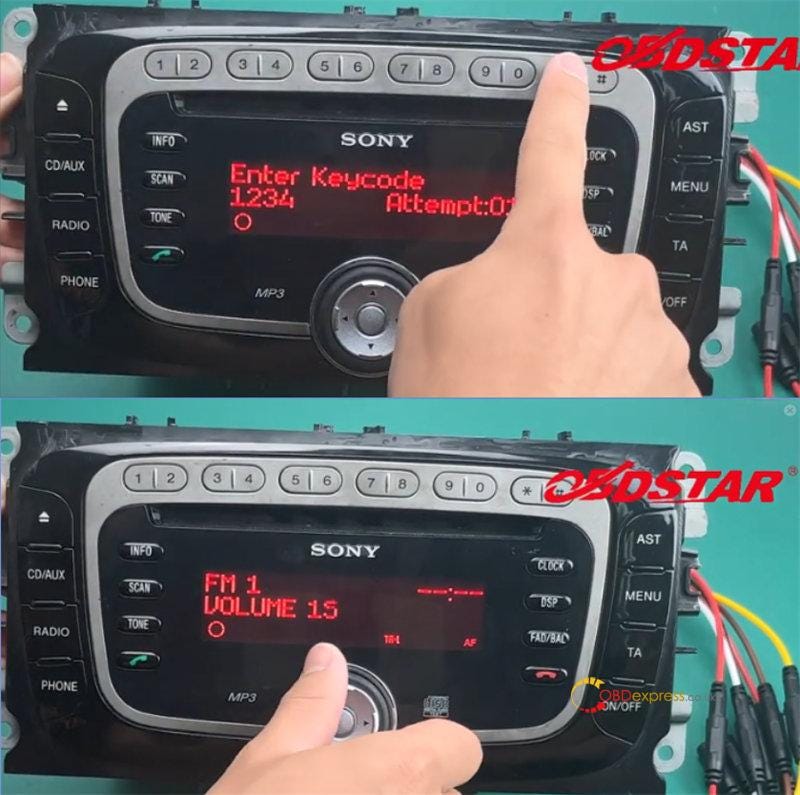
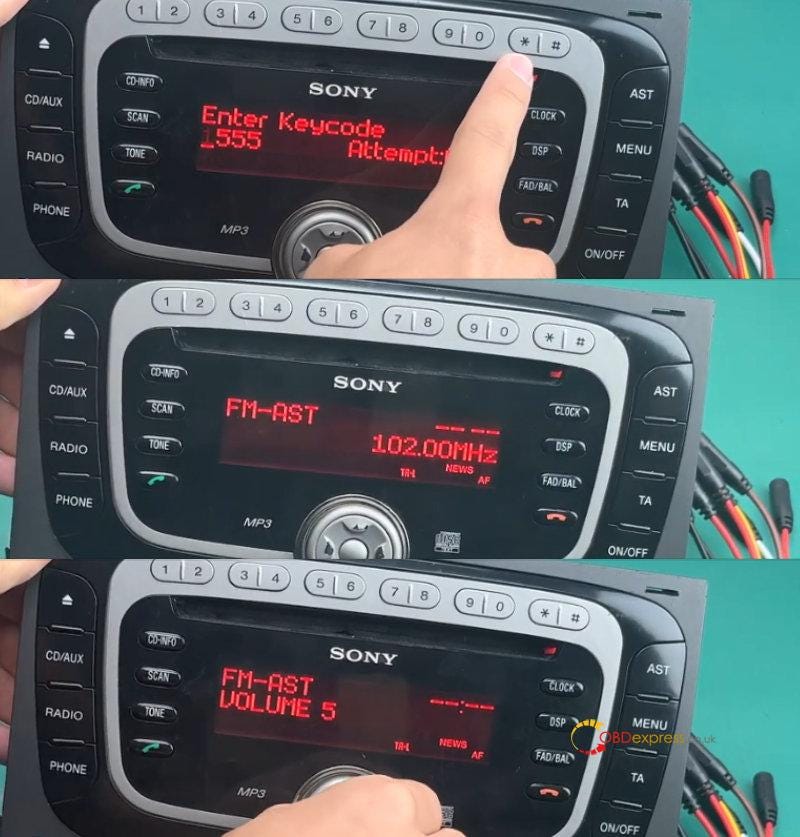
Input the related pincode on Ford radio, and press Key "*" for confirmation

It can be adjusted normally. Pincode verification is successful.
OBDSTAR MT200 Read and Change Code on Ford TMS470 NEC70F3357 Radio

3.Code Change

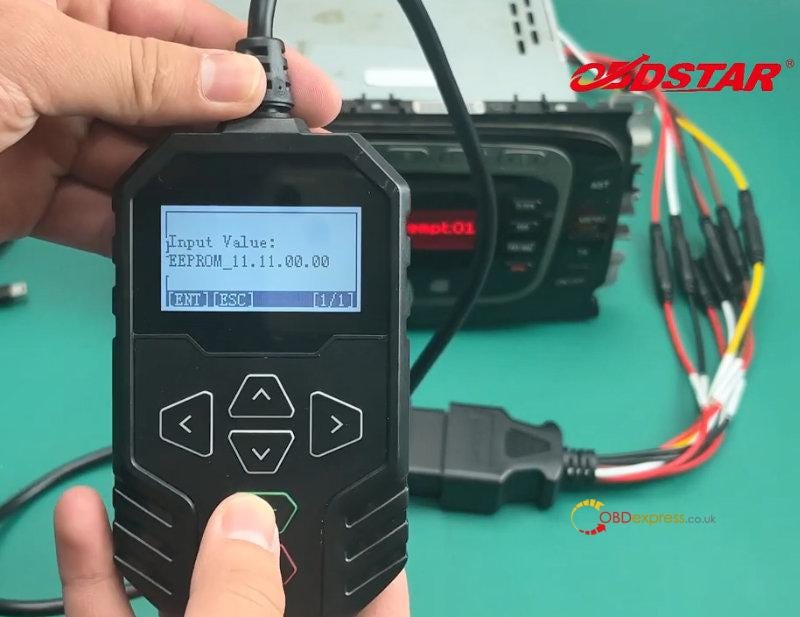
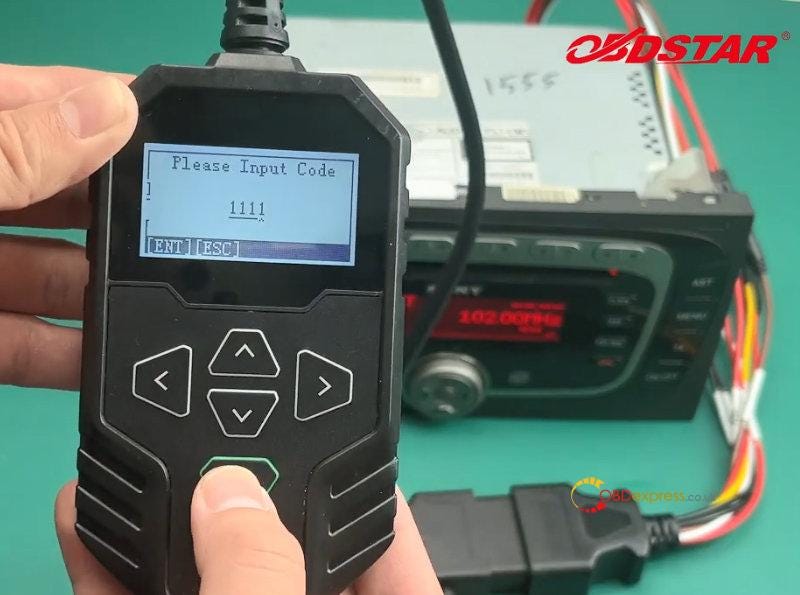
Input a new code 1111 and cofirm the value
OBDSTAR MT200 Read and Change Code on Ford TMS470 NEC70F3357 Radio

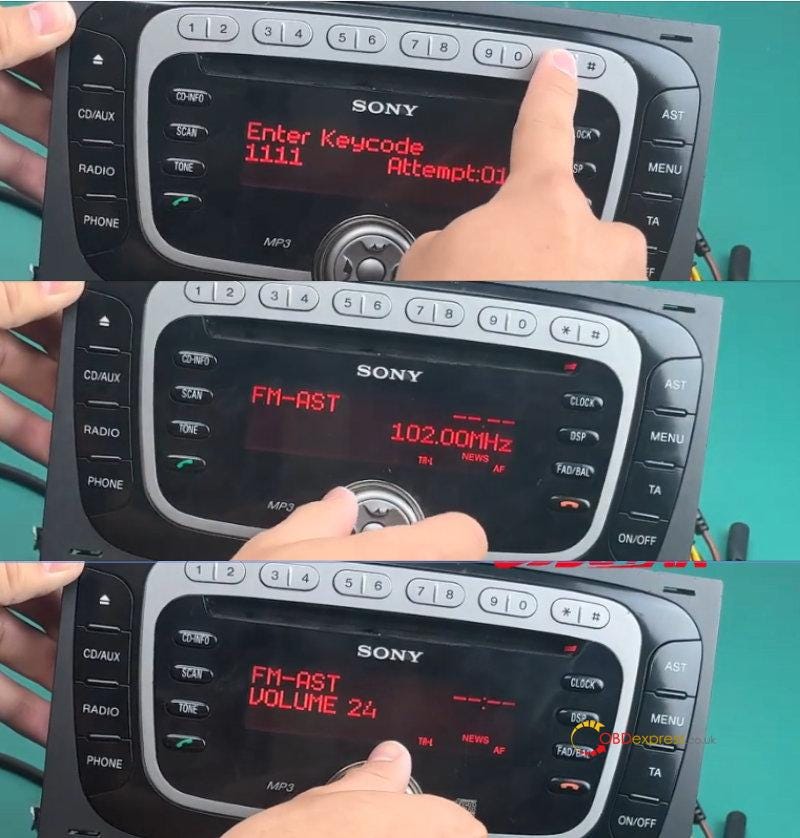
Power off for 10s, then verify that the pincode change was successful.

Input the related pincode on Ford radio

It also can be adjusted normally. Pincode change is successful.
OBDSTAR MT200 Read and Change Code on Ford TMS470 NEC70F3357 Radio

2.OBDSTAR MT200 read and change radio code on SONY NEC70F3357- OK

Tools required:

OBDSTAR MT200 main unit

Mini USB upgrade cable

120 ohm resistor

Jumper

Ford VISTEON SONY NEC70F3357 Radio
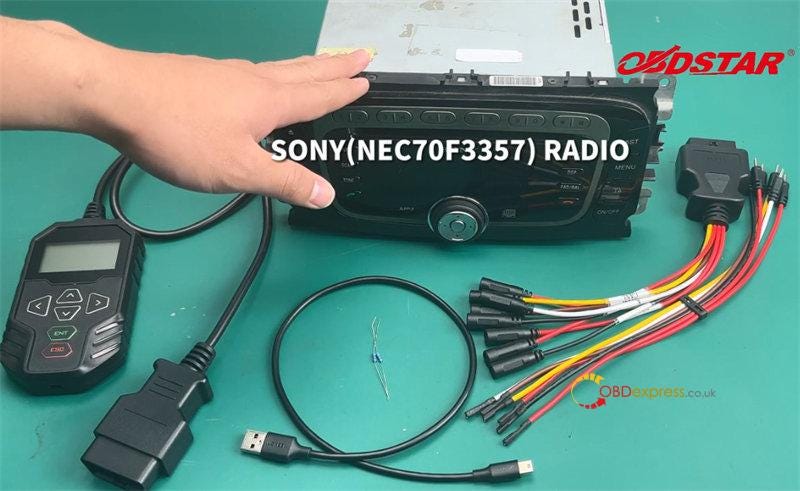
OBDSTAR MT200 Read and Change Code on Ford TMS470 NEC70F3357 Radio

Use the same steps as SONY TMS470 to test

Connect MT200 and Ford radio with the pinout
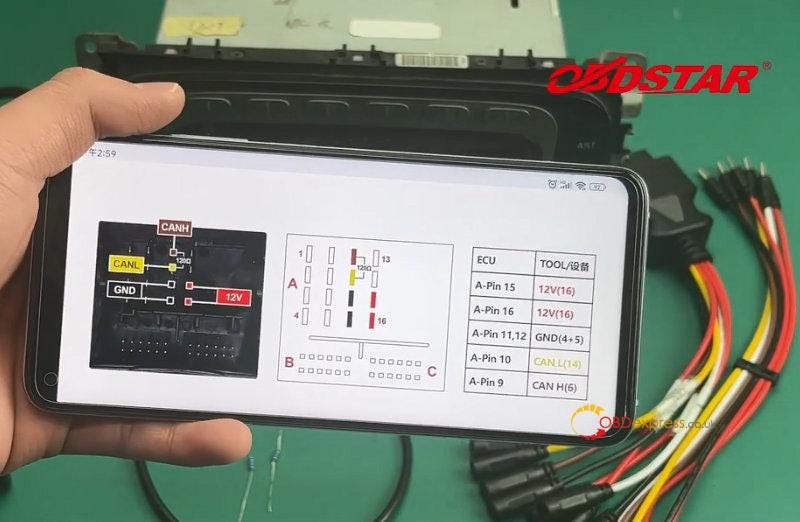
OBDSTAR MT200 Read and Change Code on Ford TMS470 NEC70F3357 Radio

Select FUNCTION>> OTHER FUNCTION>> Radio Code V30.01>> FORD>> Visteon Sony >> NEC70F3357 >> BENCH
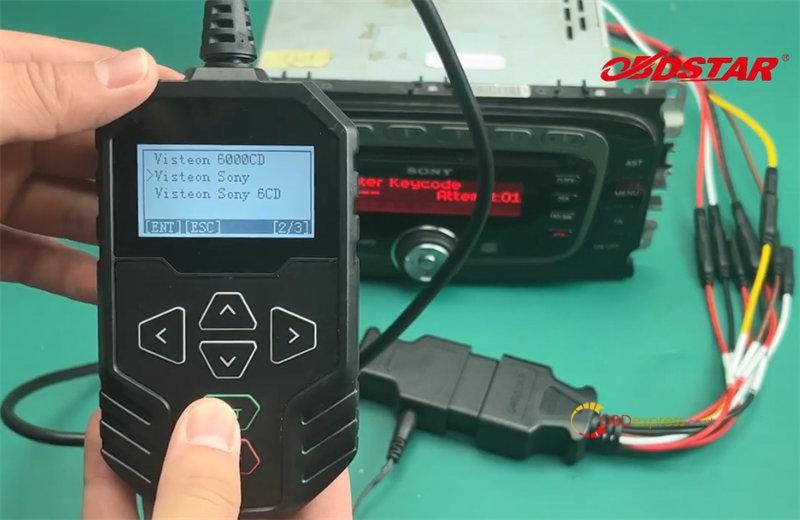
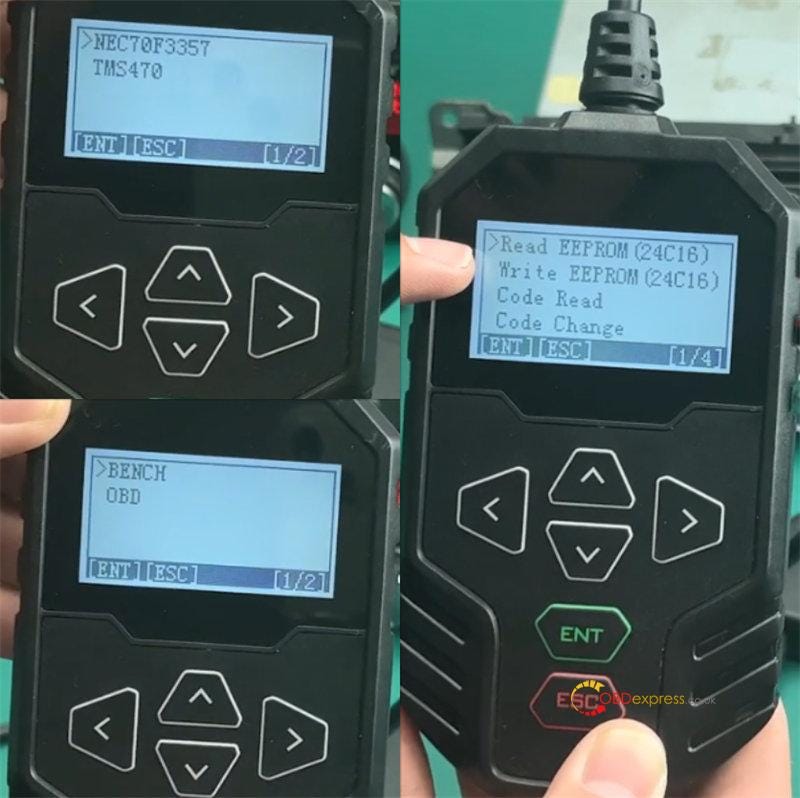
OBDSTAR MT200 Read and Change Code on Ford TMS470 NEC70F3357 Radio

OBDSTAR MT200 Read and Change Code on Ford TMS470 NEC70F3357 Radio

Read EEPROM- success

OBDSTAR MT200 Read and Change Code on Ford TMS470 NEC70F3357 Radio

Read code- success

OBDSTAR MT200 Read and Change Code on Ford TMS470 NEC70F3357 Radio

OBDSTAR MT200 Read and Change Code on Ford TMS470 NEC70F3357 Radio

Change code — success

OBDSTAR MT200 Read and Change Code on Ford TMS470 NEC70F3357 Radio

OBDSTAR MT200 Read and Change Code on Ford TMS470 NEC70F3357 Radio

3.OBDSTAR MT200 read and change radio code on Ford 6000 CD TMS470- OK

http://blog.obdexpress.co.uk/2023/05/04/obdstar-mt200-change-ford-6000cd-radio-code-by-bench/

www.obdexpress.co.uk

Wednesday, 24 May 2023

Yanhua Mini ACDP Refresh BMW E/F Chassis 8HP EGS ISN

 This is a tutorial on how to use Yanhua Mini ACDP + Module 11 to refresh BMW E/F chassis 8HP ISN. Besides, Module 11 can refresh F chassis 6HP data without welding as well.

BMW E Chassis 8HP EGS ISN Refresh

Accessories required:

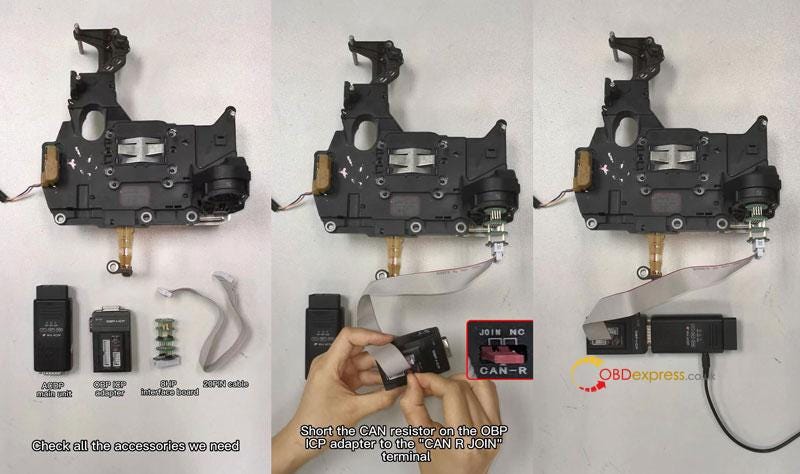
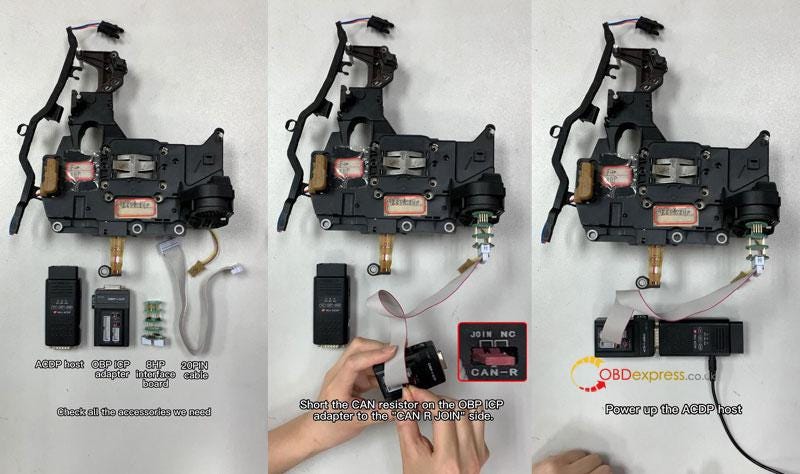
BMW EGS module, ACDP main unit, OBP ICP adapter, 8HP interface board, 20 PIN cable.

Connection:

  • Install the 8HP interface board, connect the OBP ICP adapter.
  • Short the CAN resistor on the OBP ICP adapter to the "CAN R JOIN" terminal.
  • Connect and power up the ACDP host.
    1. Yanhua Mini ACDP Refresh BMW E/F Chassis 8HP EGS ISN

      Operation:

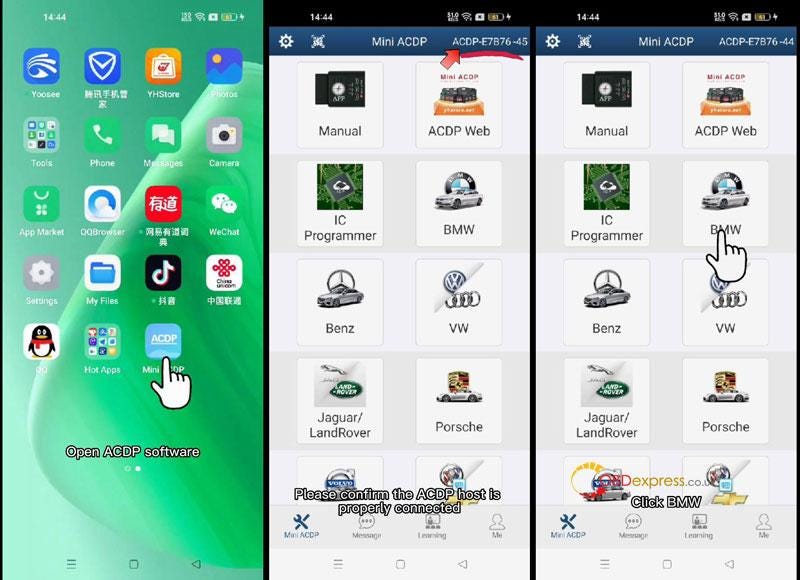
      * Please make sure the ACDP host is properly connected.

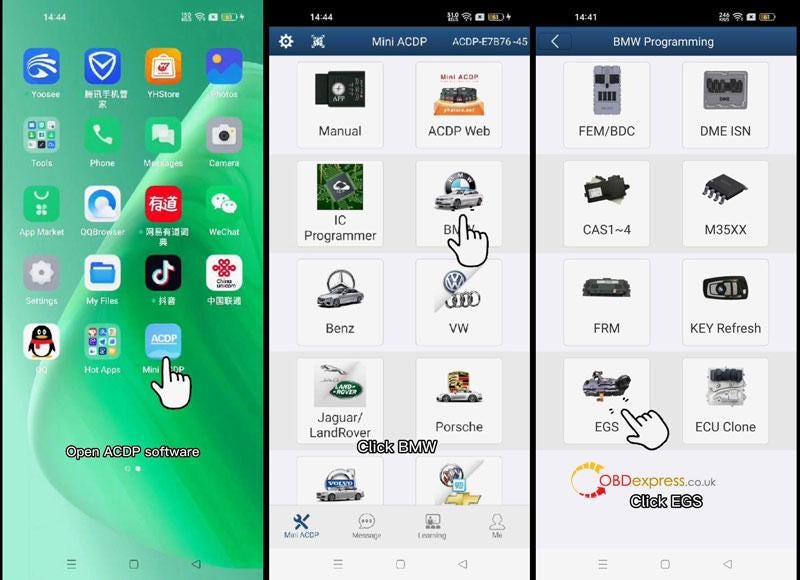
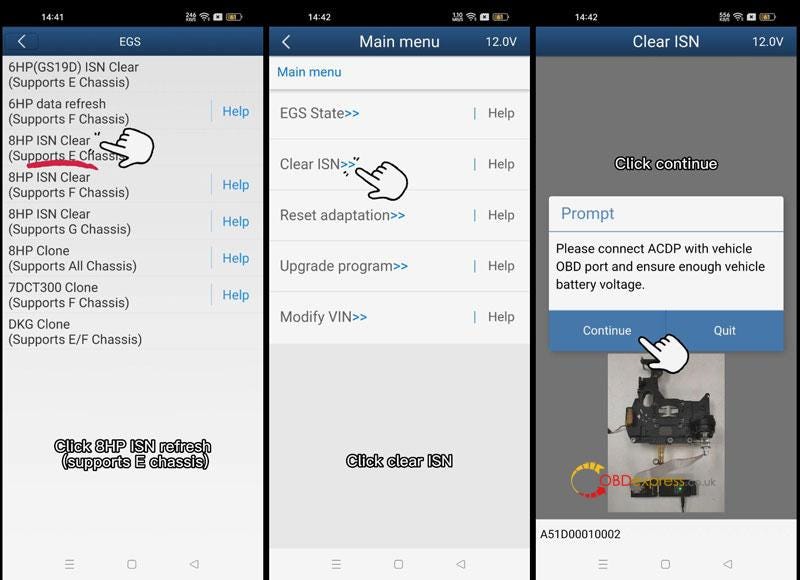
      Mini ACDP APP>> BMW >> EGS >> 8HP ISN Clear(Supports E Chassis) >> Clear ISN

      Please connect ACDP with vehicle OBD port and ensure enough vehicle battery voltage. Click "Continue".

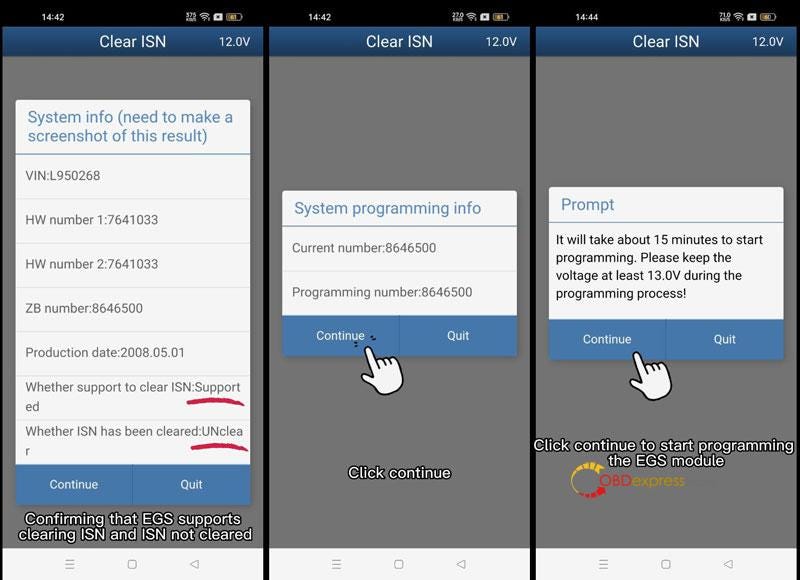
      Confirm the EGS supports clearing ISN and ISN not cleared, click "Continue".

      Confirm the system programming information, click "Continue".

      It will take about 15 minutes to start programming. Please keep the voltage at least 13.0V during the programming process! Click "Continue".

      EGS module is being programmed…

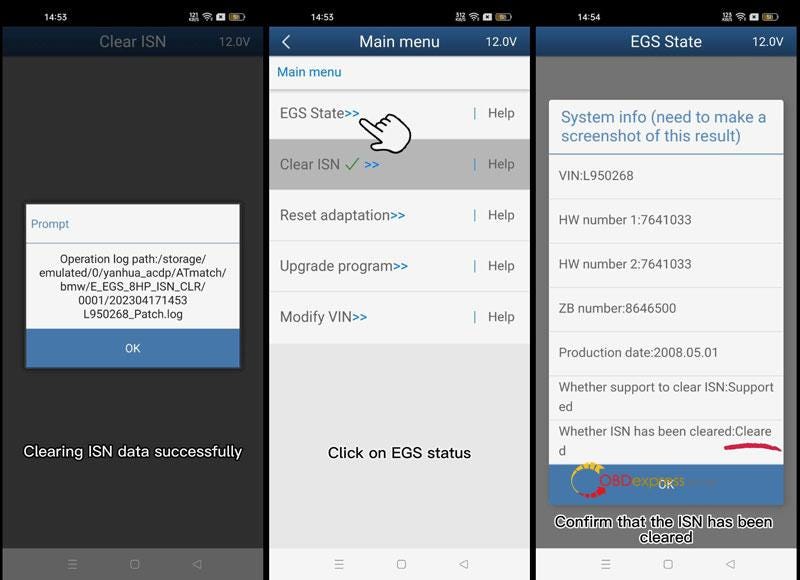
      ISN data has been cleared successfully.

      EGS State >> Continue

      As we can see, the ISN has changed to be cleared.

      Done.

      Yanhua Mini ACDP Refresh BMW E/F Chassis 8HP EGS ISN

      Yanhua Mini ACDP Refresh BMW E/F Chassis 8HP EGS ISN

      Yanhua Mini ACDP Refresh BMW E/F Chassis 8HP EGS ISN

      Yanhua Mini ACDP Refresh BMW E/F Chassis 8HP EGS ISN

      BMW F Chassis 8HP EGS ISN Refresh

      Accessories required:

      BMW EGS module, ACDP host, OBP ICP adapter, 8HP interface board, 20 PIN cable.

      Connection:

    2. Installing the 8HP interface board and connect OBP ICP adapter.
    3. Short the CAN resistor on the OBP ICP adapter to the "CAN R JOIN" side.
    4. Connect and power up the the ACDP host.
      1. Yanhua Mini ACDP Refresh BMW E/F Chassis 8HP EGS ISN

        Operation:

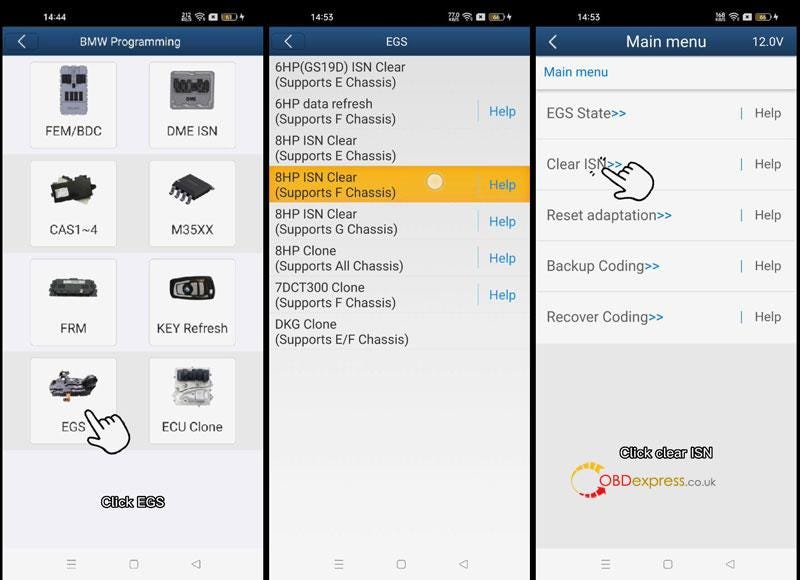
        * Ensure the ACDP host is properly connected.

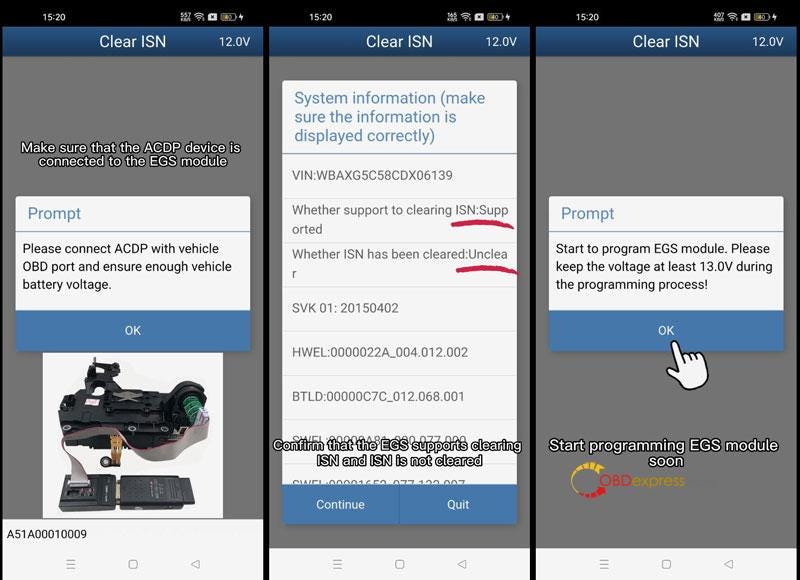
        Mini ACDP Software >> BMW >> EGS >> 8HP ISN Clear(Supports F Chassis) >> Clear ISN >> OK

        Confirm the EGS supports clearing ISN and ISN is not cleared. Click "Continue".

        Click "OK" to start programming EGS module.

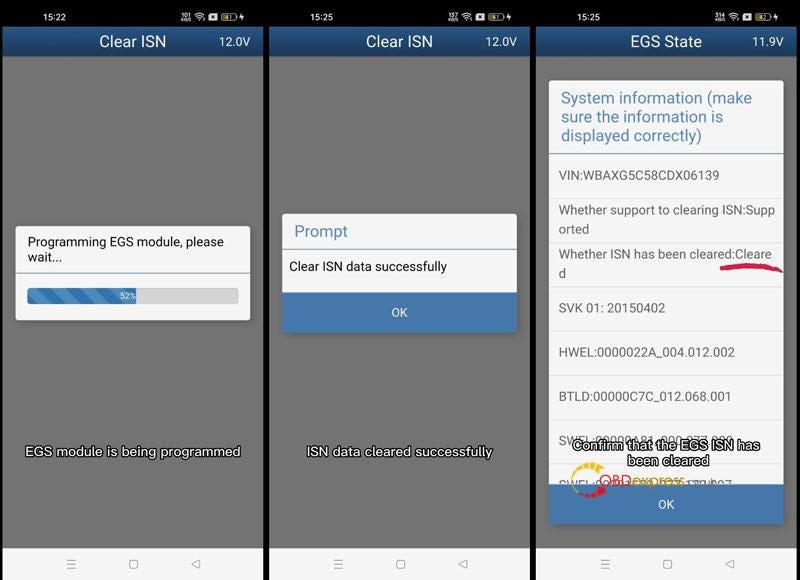
        Programming EGS module, please wait…

        Clear ISN data successfully.

        EGS State >> OK

        The EGS ISN has been cleared.

        Done.

        Yanhua Mini ACDP Refresh BMW E/F Chassis 8HP EGS ISN

        Yanhua Mini ACDP Refresh BMW E/F Chassis 8HP EGS ISN

        Yanhua Mini ACDP Refresh BMW E/F Chassis 8HP EGS ISN

        Yanhua Mini ACDP Refresh BMW E/F Chassis 8HP EGS ISN

        www.obdexpress.co.uk

        Xhorse MVCI Pro J2534 Cable User Manual

        What is Xhorse MVCI Pro J2534 Cable?

        Xhorse MVCI Pro J2534 Passthru Cable is the upgraded version of Xhorse MVCI 3 in 1. It's all in one with high quality, and compatible with D-PDU protocols, J2534 protocols and more diagnostic software, including VAG ODIS, TOYOTA Techstream, Honda HDS, Subaru SSM4, Ford IDS, Mazda IDS. The signal light of the cable can prompt the status of the device and help efficient work.

        Xhorse MVCI Pro J2534 vs. Xhorse MVCI:

        Differences:

        • The hardware and PCB are different.
        • Use different drivers.
        • MVCI Pro can support D-PDU Protocols and work with Subaru SSM4, Ford IDS, Mazda IDS, VAG ODIS diagnostic software while the old MVCI cannot.

        Check more details from the comparison table below:

        How to use Xhorse MVCI Pro Cable and compatible software?

        1.Download and install the compatible original J2534 diagnostic software

        Note: Xhorse does not provide software download, please download software from 3rd party or original manufacturer's website.

        2.Download and install Xhorse MVCI Pro J2534 driver software

        Free download MVCI Pro J2534 driver software

        Size: 52.2MB

        No password

        Software version: 1.0.3

        Language: English & Chinese

        Operating system Win7, Win10

        Follow the on-screen prompt to install driver easily.

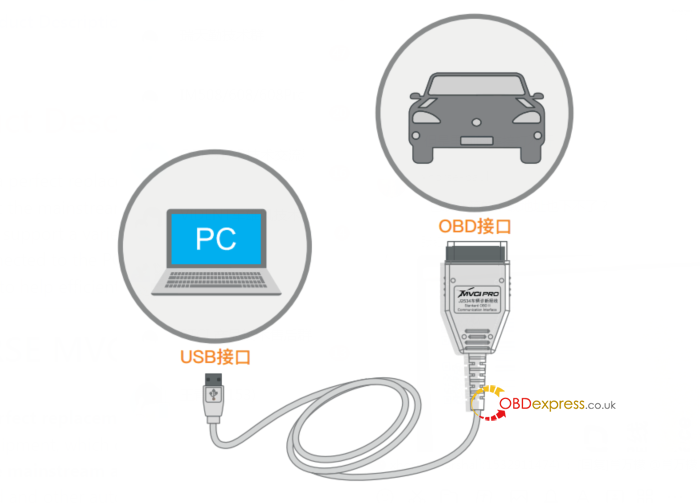
        3.Connect MVCI Pro cable with laptop and vehicle

        Xhorse MVCI Pro J2534 Cable User Manual

        4.Run MVCI Pro driver

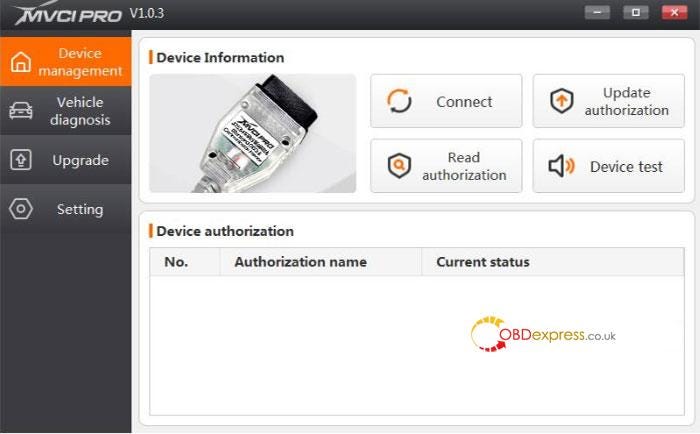
        In the Device Management

        Click "Connect" to connect MVCI Pro J2534 Cable

        After connection, you can see the related device info, firmware version and SN, etc.

        Click "Read authorization" can check the current authorization status and available times.

        Note: If the number of available times is 0, the most functions will be limited.

        Click "Update authorization" can update the newest authorization status and reset available times.

        Xhorse MVCI Pro J2534 Cable User Manual

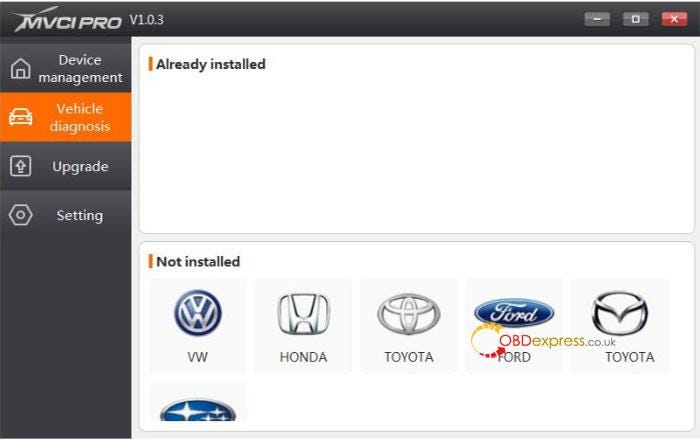
        5.Click "Vehicle diagnosis", and you can install the corresponding driver. After installation, the cable can be used with the original diagnostic software.

        Xhorse MVCI Pro J2534 Cable User Manual

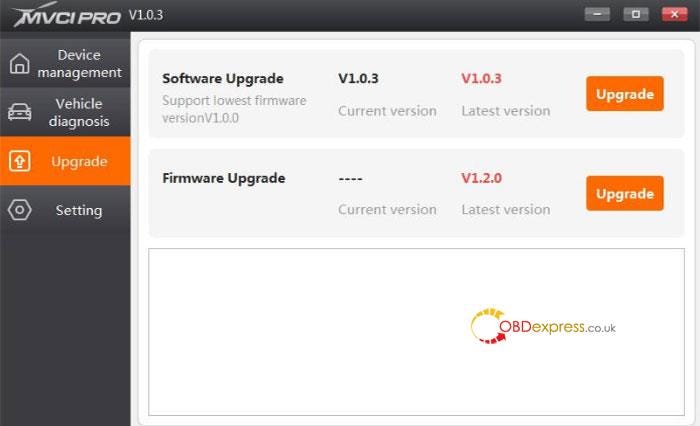
        6.Click "Upgrade" , and you can check the current mvci pro software and firmware version

        • Current software version V1.0.3
        • Current firmware version V1.2.0

        Both software and firmware version can be updated online.

        Xhorse MVCI Pro J2534 Cable User Manual

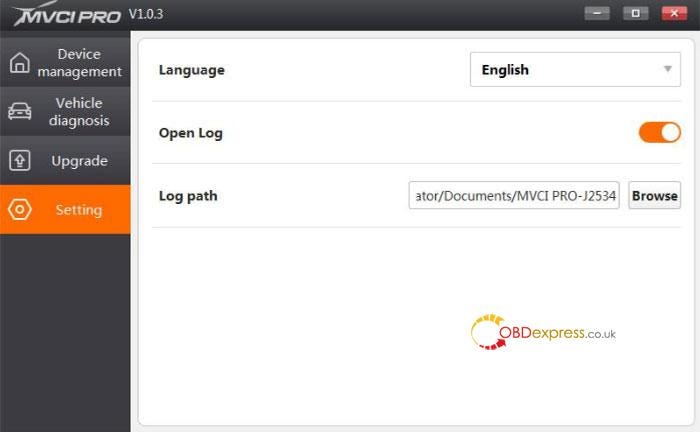
        7.Click "Setting", and you can switch the software language, open operation logs and save logs.

        Xhorse MVCI Pro J2534 Cable User Manual

        XHORSE MVCI PRO J2534 Vehicle Diagnostic Programming Cable:

        https://www.obdexpress.co.uk/wholesale/xhorse-mvci-pro-j2534-cable.html

        www.obdexpress.co.uk

        Tips to Export Data from OBDSTAR P50 to PC

         Customer problem:

        I have a file that is read and saved on OBDSTAR P50. I want to use this file on my computer. How can i do?

        obdexpress.co.uk engineer replied:

        You can use a USB drive to export the data file from OBDSTAR P50 tablet to PC.

        In general, the backup data is stored in My Data under Data Management.

        Please follow the guide to do:

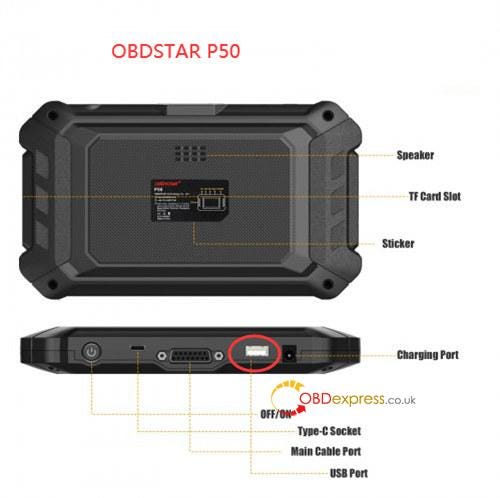
        1. Insert the USB drive into the USB port on the top side of P50 device

        Tips to Export Data from OBDSTAR P50 to PC

        2. Turn on OBDSTAR tablet

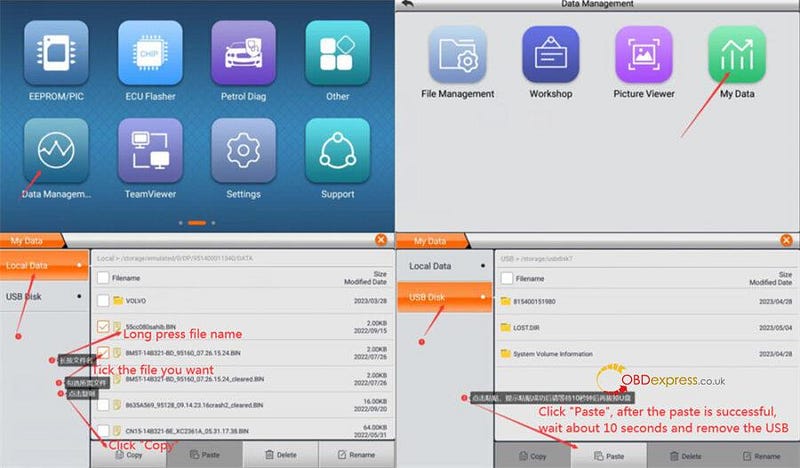
        3. Select Data Management>> My Data>> Local Data

        4. Find the data file you need

        5. Long press the file name and the file will be ticked

        6. If you want to copy multiple files at the same time, tick the corresponding files.

        7. Then click "Copy" at the bottom of the tablet screen

        8. After copying, go to USB Disk, click "Paste" at the bottom and wait for the paste is successful.

        Tips to Export Data from OBDSTAR P50 to PC

        9. Wait about 10 seconds before removing the USB drive

        10. The data file is successfully exported from OBDSTAR P50 Airbag Reset Tool, and it can be used on computer by plugging the USB drive.

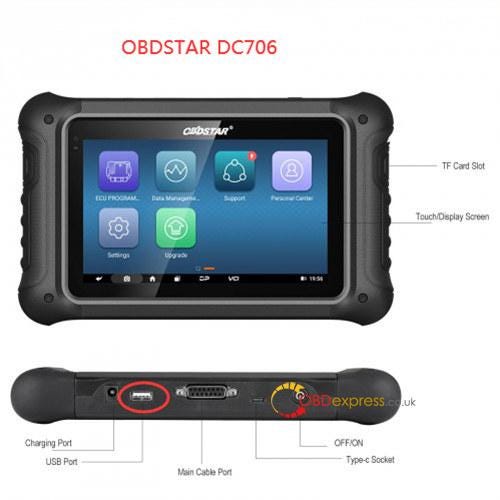
        This method applies to OBDSTAR DC706 ECU Tool as well.

        The USB port is shown in the following figure.

        Tips to Export Data from OBDSTAR P50 to PC

        Tech support:

        • Email: sales@OBDexpress.co.uk
        • Skype: obd2express.co.uk
        • WhatsApp: +86 18750906257
        • WeChat(微信): 15705931767
        • Online Customer Service

        Working Time: 9:00am — 18:00 pm (UTC+08:00), Monday to Friday.

        www.obdexpress.co.uk


        Wednesday, 17 May 2023

        OBDSTAR MT200 Change Ford 6000CD Radio Code by Bench

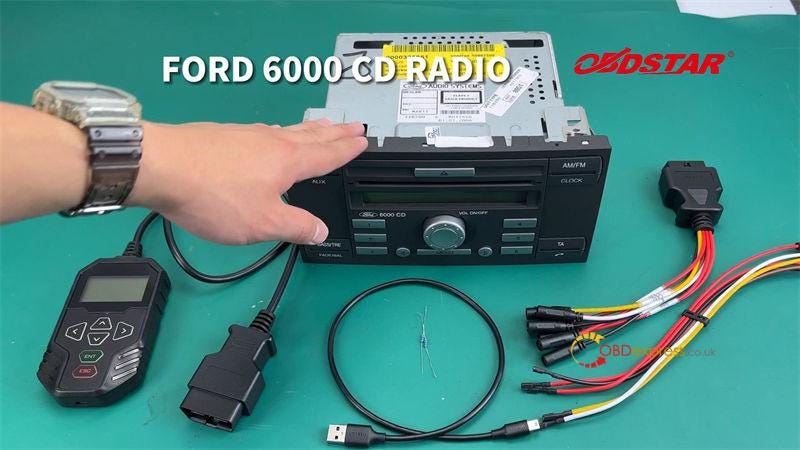
         OBDSTAR MT200 is the latest handheld radio decoding tool to support read & write EEPROM, code read/change/off and other functions for Ford, VW, etc. This is a demo on how to read & change Ford Visteon 6000CD radio code by bench.

        Tools Required

        OBDSTAR Radio Decoding Tool MT200

        Ford 6000CD Radio

        Mini USB Upgrade Cable

        120 OHM Resistor

        Jumper

        (The brand and model can be determined by identifying the appearance and label of the module.)

        OBDSTAR MT200 Change Ford 6000CD Radio Code by Bench

        Connection

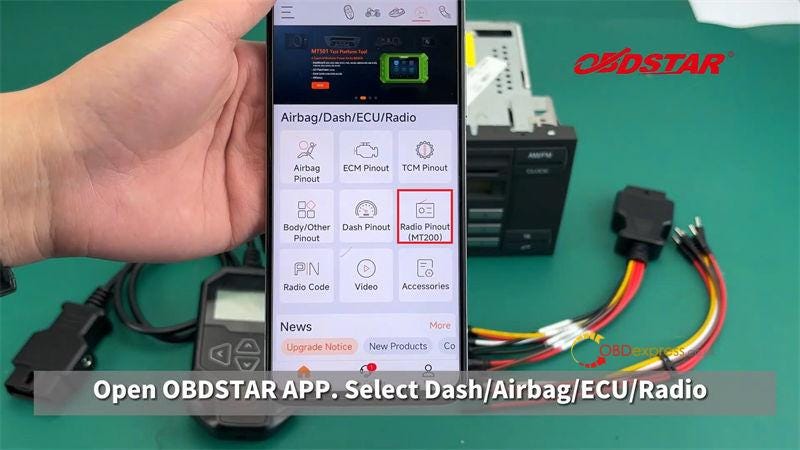
        Open OBDSTAR APP, select:

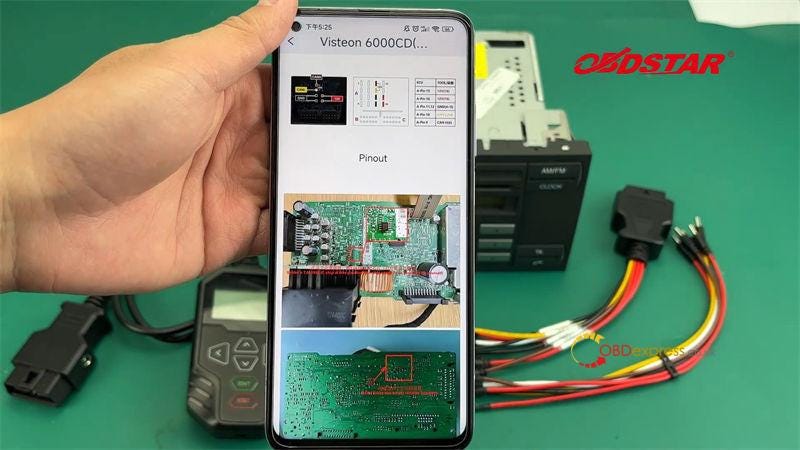
        Dash/Airbag/ECU/Radio >> Radio Pinout(MT200) >> FORD >> Visteon 6000CD(TMS470)

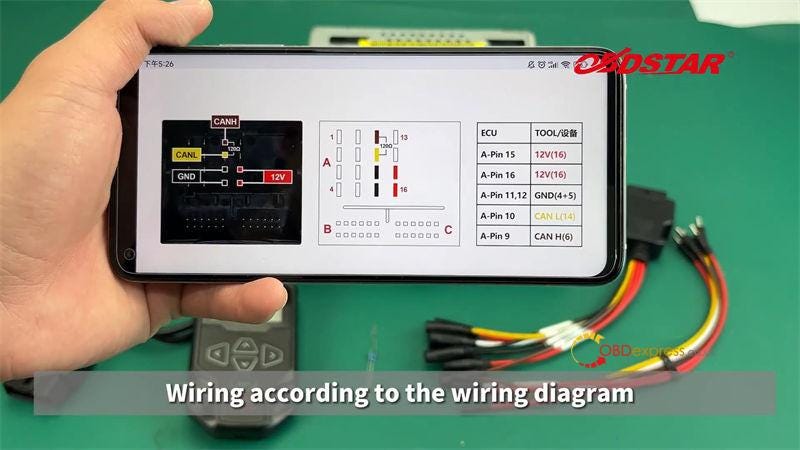
        Here we can check the wiring diagram.

        The specific model can be identified by the appearance of the product.

        OBDSTAR MT200 Change Ford 6000CD Radio Code by Bench

        OBDSTAR MT200 Change Ford 6000CD Radio Code by Bench

        OBDSTAR MT200 Change Ford 6000CD Radio Code by Bench

        Procedure

        After successful connection, plug OBDSTAR MT200 to a 12V power supply.

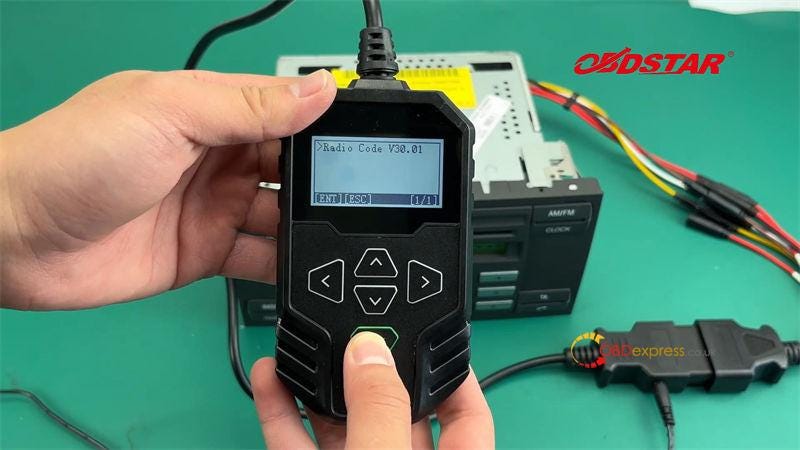
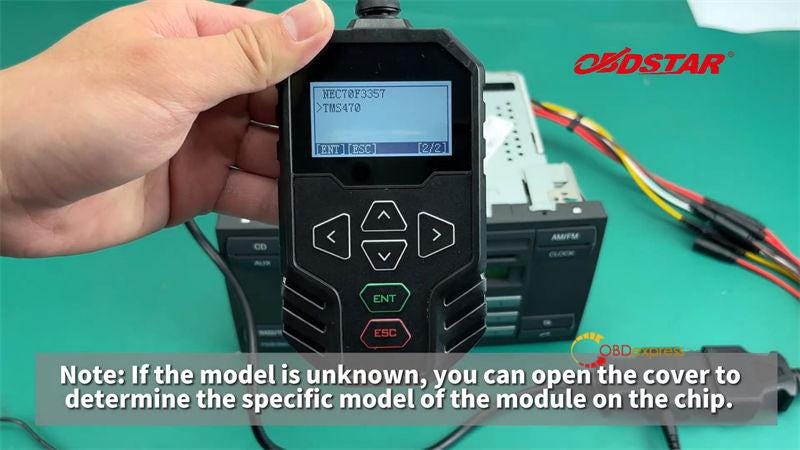
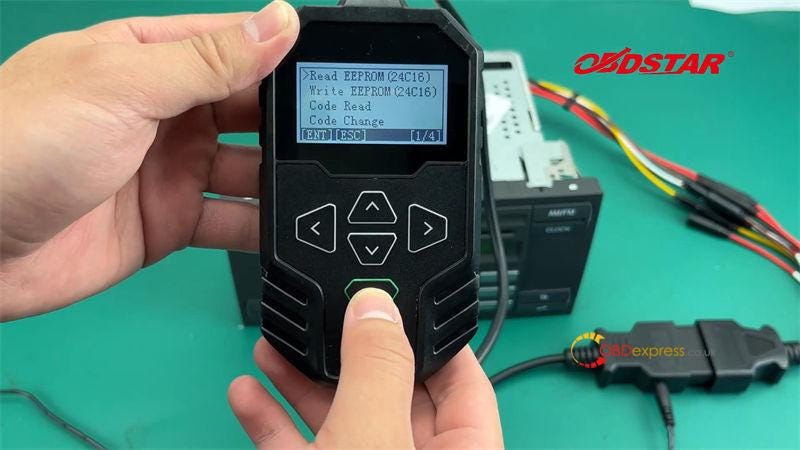
        Function >> Other function >> Radio Code V30.01 >> Ford >> Visteon 6000CD >> TMS470 >> BENCH >> Read EEPROM(24C16)

        *Note: If the model is unknown, you can open the cover to determine the specific model of the module on the chip.

        Reading data…

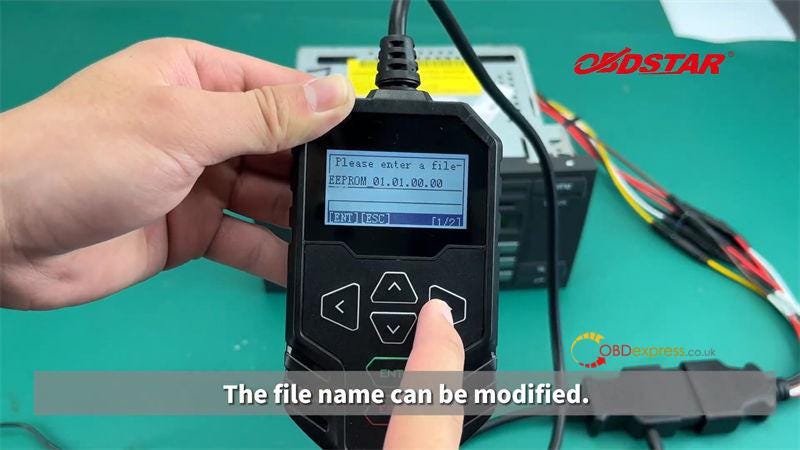
        As we can see, the file name can be modified.

        OBDSTAR MT200 Change Ford 6000CD Radio Code by Bench

        OBDSTAR MT200 Change Ford 6000CD Radio Code by Bench

        OBDSTAR MT200 Change Ford 6000CD Radio Code by Bench

        OBDSTAR MT200 Change Ford 6000CD Radio Code by Bench

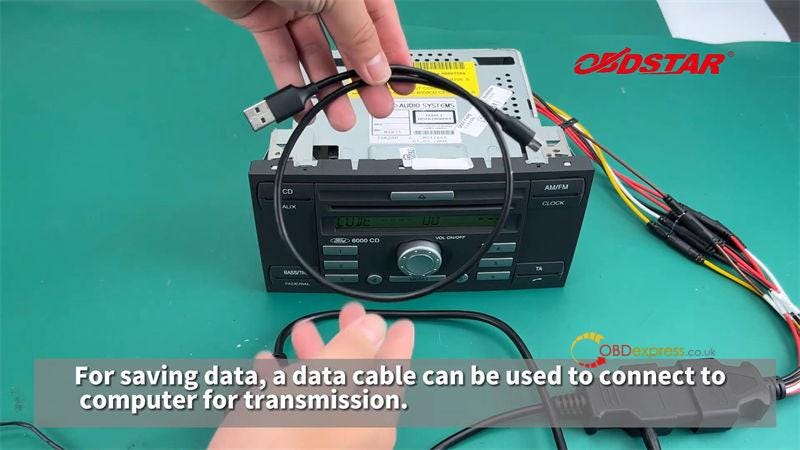
        For saving data, a data cable can be used to connect to computer for transmission.

        Click "Code Read".

        Communicating…

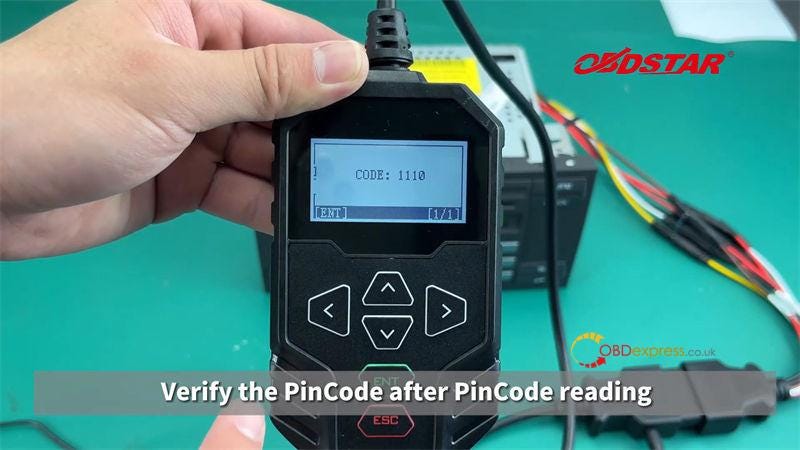
        Code: 1110

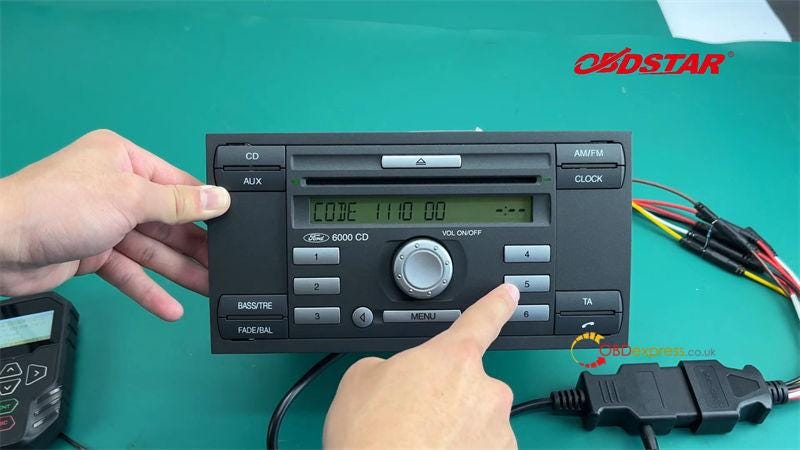
        Verify the pincode after pincode reading.

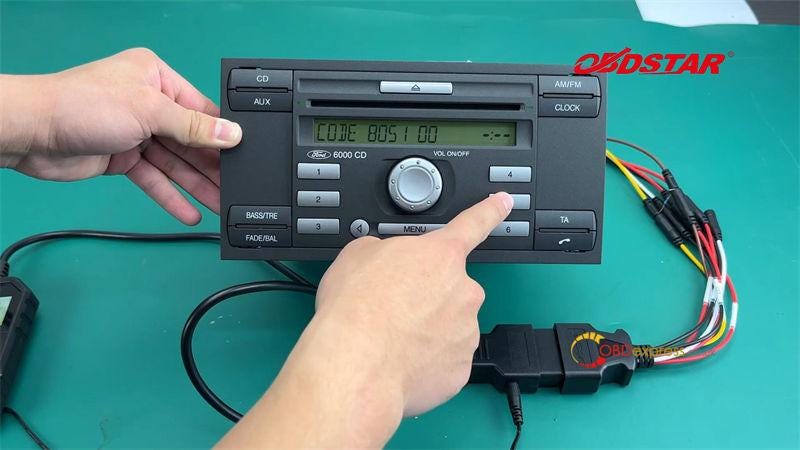
        Press key1 for the 1st digit of the pincode, key2 for the 2nd, key3 for the 3rd, Key4 for the 4th, key5 for confirmation.

        It can be adjusted normally. Pincode verification is successful.

        OBDSTAR MT200 Change Ford 6000CD Radio Code by Bench

        OBDSTAR MT200 Change Ford 6000CD Radio Code by Bench

        OBDSTAR MT200 Change Ford 6000CD Radio Code by Bench

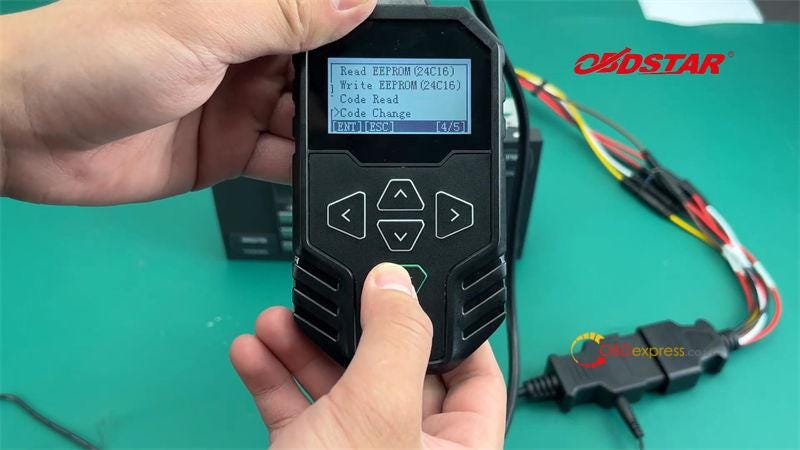
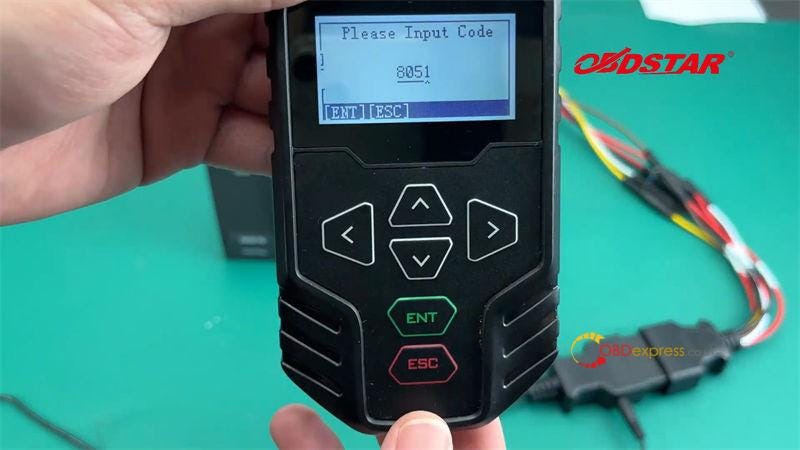
        Code Change >> Input Code:8051

        Operation success.

        Power off for 10s, then verify that the pincode change was successful.

        Go back to read pincode again. It has been: 8051

        Enter a new pincode. It can be adjusted normally.

        Pincode change verification is successful.

        OBDSTAR MT200 Change Ford 6000CD Radio Code by Bench

        OBDSTAR MT200 Change Ford 6000CD Radio Code by Bench

        OBDSTAR MT200 Change Ford 6000CD Radio Code by Bench

        www.obdexpress.co.uk

        KEYDIY New KD-Moto Adapter Adds Honda, Yamaha & Ducati

          Motorcycle key programming is now coming to the KEYDIY KD-X4 . The new KEYDIY KD-Moto Adapter adds dedicated motorcycle coverage for a w...