Tuesday, 26 March 2019

How to setup wiTECH MicroPod II 2 setup

f your dealership purchased a new microPOD and you would like to convert your existing microPOD for using with wiTECH 2.0 System, you need to download and install the microPOD Setup Utility to configure/setup your microPOD for wiTECH 2.0.

NOTE: microPODs with a serial number beginning with “WFP” should NOT be used with this utility.

PROCEDURE
If you have a restricted network, you must first make sure that all sites listed below are enabled to be able to successfully use microPOD Setup Utility and the wiTECH 2.0 System.
mixpanel.com
bugsnag.com
fcawitech.com
chrysler.com
dealerconnect.com
jeep.com
witechsystem.com
http://fonts.googleapis.com/css?family=Roboto:400,300

Note: Please disable any Anti-Virus software that you have on your computer in order to allow the microPOD Setup Utility to install and run properly.

How to download and install the microPOD Setup Utility

IMPORTANT: Once the microPOD is configured using the microPOD Setup Utility, all the microPOD Wireless Settings will be deleted. You will be required to follow the instructions from the KB link titled “How to configure a Wireless Profile on a microPOD II”.

To download the application, please login to DealerCONNECT > Service > wiTECH Information > microPod Setup Utility

Step 1
Click on “Run” to begin the downloading process of microPOD Setup Utility.
witech-micropod-ii-setup-instruction-01


Step 2
The install wizard will appear to install the wiTECH Driver x64 onto your computer if your PC has not been installed with wiTECH 1.0 application.

If the PC has been installed with wiTECH 1.0 App, you will not see the screen below and proceed to Step 6. Otherwise, click “Next” to proceed.
witech-micropod-ii-setup-instruction-02


Step 3
Read the License Agreement carefully, and accept the terms in the license agreement. Then, click “Next” to continue.
witech-micropod-ii-setup-instruction-03

Step 4
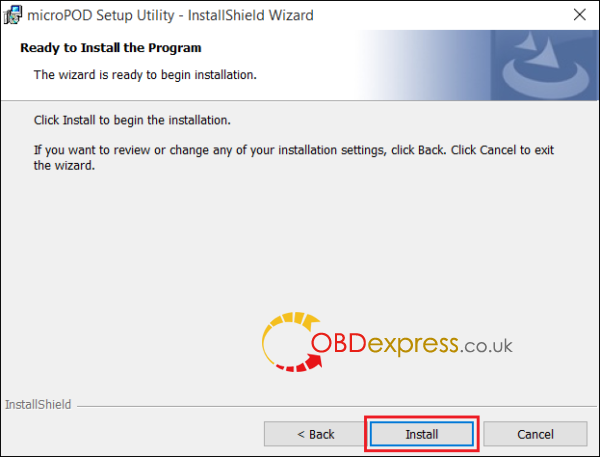
You are now ready to start the actual installation of the driver. You now need to click on “Install” for it to start.
witech-micropod-ii-setup-instruction-04


Step 5
This will now install the wiTECH Driver x64. Once complete, the program will automatically proceed to the next step.
witech-micropod-ii-setup-instruction-04


Step 6
Once the installation has completed, click “Finish”. Proceed to the following section, “Using the microPOD Setup Utility”.
witech-micropod-ii-setup-instruction-06


Using the microPOD Setup Utility

NOTE: Please make sure that your computer is connected to the internet and the microPOD is connected to the computer via USB before starting this process. This application will help you configure your microPOD for wiTECH 2.0.

Step 1
Start microPOD Setup Utility by clicking the icon on the desktop:
witech-micropod-ii-setup-instruction-7

If the microPOD Setup Utility that is installed is out of date, you will be forced to update to the newer version of the application.

Step 2
Please make sure your microPOD is connected to the PC via USB.
witech-micropod-ii-setup-instruction-08


Step 2a
If you see the following screen you may not be connected to the internet, or have a firewall that blocks 1 or more of these websites.
witech-micropod-ii-setup-instruction-09


Select “Continue” on the next screen for wiTECH 2.0 Device Setup and Configuration.
witech-micropod-ii-setup-instruction-010


NOTE: If you only want to configure the wireless setting on a microPod device to use with wiTECH 2.0, click “Wireless Configuration” and follow instructions.

Select “Continue” on the next screen to begin attempting to connect to the microPOD device.
witech-micropod-ii-setup-instruction-011


Step 3
Once your microPOD II is recognized by the utility, select “Continue” to proceed with the configuration.
witech-micropod-ii-setup-instruction-012


NOTE: microPODs with a serial number beginning with “WFP” should NOT be used with this utility.

Step 3a
If the utility does not find the microPOD device, please assure that the microPOD is connected via USB and click “Refresh”.
witech-micropod-ii-setup-instruction-013


Step 5
The following screen will appear for up to 15 minutes while the microPOD device is being configured.
witech-micropod-ii-setup-instruction-014


Step 6
The following screen will appear when the utility completed the configuration of microPOD for wiTECH 2.0 Application.

Note: After microPOD Setup Utility is ran, all existing wireless networks will be removed from the microPOD.

Important! Leave the microPod Setup Utility window running as you will be required to complete software updates to the microPod device before configuring the wireless.

Step 6a
Login into wiTECH 2.0. The microPOD II that was just configured using the microPOD Setup Utility should appear in the wiTECH 2.0 discovery. You will need to update the operating system of your microPOD II before it can be used with wiTECH 2.0. Click “Continue”, and your web browser will redirect you to the page to download and install the operating system update as seen in the following step.
witech-micropod-ii-setup-instruction-015


*NOTE: If microPOD II does not show up in discovery after a couple of minutes please power cycle your microPOD II by unplugging it and plugging it back in.

Step 7
Click “Update Now” and your microPOD II should continue to the update screen. Once updating, do not interrupt your microPOD II at any point until the update is complete.
witech-micropod-ii-setup-instruction-016


*NOTE: This can take upwards of 9 minutes. It is normal activity for the microPOD II to reboot.
witech-micropod-ii-setup-instruction-017


Step 8
Click “OK” and you will be navigated back to the wiTECH 2.0 discovery page. Your microPOD II should appear updated and ready for use.
witech-micropod-ii-setup-instruction-016

witech-micropod-ii-setup-instruction-018


Step 9
With the microPod Setup Utility still running, configure wireless on the wiTECH microPod 2 device.

Enjoy!
BIG THANKS to the one who shares the wiTECH microPod 2 setup manual!!!

Monday, 25 March 2019

How to change Mercedes remote frequency from 315mhz to 433mhz?

How to change Mercedes remote frequency from 315mhz to 433mhz, and the opposite… the machine to use is VVDI MB and Keydiy.
vvdi-mb-keydiy-change-mercedes-remote-315mhz-and-433mhz-01

vvdi-mb-keydiy-change-mercedes-remote-315mhz-and-433mhz-02

Press the Mercedes remote key upper button and Keydiy display the frequency 314.99(mhz)
Put this remote key into the slot of VVDI MB.
Click on VVDI tool “Other Function”, then “Set key remote frequency”.
Select “433MHz” and then “Set Frequency”.
Set Frequency successfully.
Press “Unlock / lock” button of Mercedes key, then Keydiy display 433(mhz).
vvdi-mb-keydiy-change-mercedes-remote-315mhz-and-433mhz-03

vvdi-mb-keydiy-change-mercedes-remote-315mhz-and-433mhz-04

vvdi-mb-keydiy-change-mercedes-remote-315mhz-and-433mhz-05

vvdi-mb-keydiy-change-mercedes-remote-315mhz-and-433mhz-06

vvdi-mb-keydiy-change-mercedes-remote-315mhz-and-433mhz-08


In the same way, change 433mhz to 355mhz.

That’s all.

Thanks

Thursday, 21 March 2019

2019 JMD Super-remote questions and answers


JMD Super-remote, available in mid-March 2019, comes with three types of remote control: DS, Ford and Buick Oncora. Super remote control is a combination of chip and remote control, including chip and remote control functions. Super-remote control generate electronic sub computers in Handy-baby II.
So, what questions do you have about this Super-remote? this post answers 10 questions that customers may ask.

Question 1: When does Super-remote come on the market?
Answer: Super-Remote control will be available at the end of March 2019 and can be purchased by contacting agents.

Question 2: How much is the Super-remote pricing?
Answer: No pricing.

Question 3:How many models and functions of remote control are there?
Answer: Now there are three types of remote control: DS, Ford and Buick Encore.
The three styles have different shapes and the same functions.
jmd-super-remote

Question 4:What are the Super-remote supported Vehicles?
The type of chip supported by Super remote is the same as that of Super chip.
Including 4D/46/47/48/T5 chip types.

Specific support for remote control models can be seen in mobile phone APP 【Remote】-【JMD Remote】【JMD ELE-Remote】
jmd-super-remote jmd-super-remote jmd-super-remote jmd-super-remote jmd-super-remote-06

Question 5:Does the Super-remote control contain chips?
Answer: Super remote control is a combination of chip and remote control, including chip and remote control functions.

Question 6: How does Super-remote control generate electronic subcomputers?

Answer: Electronic subcomputers can be directly generated in Handy-baby Ⅱ.
——Handybaby Ⅱ【chip-fun】
——【Remote Transfer】
——Choosing the Corresponding Vehicle Type
——Analog key for Handy-Baby Ⅱ antenna
——Matching with equipment on board
——When the matching is successful, the super remote control is put into the coil to generate the remote control.

Question 7: Is Super-remote control wired or wireless?
Answer: Super-remote supports both wired and wireless burning.
After selecting the corresponding model, APP will prompt you to choose the burning mode.
(Some models only support wired connections.)

Question 8: How does the Super-remote control generate the corresponding remote ?
Answer: Cooperate with Handy-baby II and APP to generate remote control.
——APP【Remote】
——【JMD Remote】
——Choosing the Corresponding Vehicle Type
——Choose the generation mode
——1. Connect Handy-baby II generation (wired)
jmd-super-remote-07 jmd-super-remote-08

——2.Remote Placement in Handy-baby II Recognition Coil Generation (Wireless)
jmd-super-remote-10

Question 9: How to match the Super-remote copy to get on the car?
Answer: Super remote control matching methods include manual matching and equipment matching.
jmd-super-remote-11
Matching remote control or all loss with JMD OBD.

Question 10 : Does JMD have ordinary remote control?
Answer: Super-remote control can be used as ordinary remote control. Ordinary remote control is planned.


Suggested feedback

Suggestions and Suggestions in the Use of Super Remote Control. Please give positive and timely feedback.
jmd-super-remote-12
www.obdexpress.co.uk

Tuesday, 19 March 2019

How to use Iprog+ clone dashboard + IMMO + SRS reset?

Iprog+ clone software download, installation, operation for Adapter test,airbag reset, DPF OFF, EEPROM, IMMO, Key programmer, MCU, Mileage modification, PIN ABS, software interface.

Look at Iprog+ clone full package:
iprog-plus-01

iProg+ v43 and iProg pro v55 free download:
https://mega.nz/#!7LxjCRqD!53iXL6K3Ku_3SAzSN0-3po885aFJYLPSrnTyTYhr1Vg
OS: Windows xp, Windows vista, Windows 7, Windows 8

How to Install iProg Pro:

The program is designed for use with the iProgPro programmer.

Installation instructions.

1.Create a new folder in any convenient place on the disk. For example [iProgProSoftware]

2.Unpack the archive into the created folder.

3.Run the program.

4.Select the menu item Help -> Check for Updates. Follow instructions.

5.Copy into your Scrips and Calculators folders your scripts and calculators, respectively.

Test ok to perform the following functions:
✔Working with odometers on OBDII connector
✔Working with odometers on the table through adapters
✔Work with multimedia unlocking the tape recorder
✔Work with keys (IMMO, Transponders), copying, preparation, unlocking
✔Work with IMMO-Key Auto dumps
✔Working with the airbag computer, deleting crash data
✔Transfer readings from miles to km
✔Read and write processors and its used in cars
✔ Removing the particulate filter in the dump
✔Working with keys to the intercom
✔Realign Pin cod from dump (some brands)
Control board number, + scripts full Base number. Ability to update!
All adapters are tested for performance!

Images mean a lot:

  1. Adapter test
iprog-plus-02
iprog-plus-2

  1. airbag reset
iprog-plus-3 iprog-plus-4 iprog-plus-5 iprog-plus-6 iprog-plus-7 iprog-plus-8 iprog-plus-9 iprog-plus-10 iprog-plus-11 iprog-plus-12 iprog-plus-13iprog-plus-14 iprog-plus-15 iprog-plus-16

3.DPF OFF
iprog-plus-17

4.EEPROM
iprog-plus-18

5.IMMO
iprog-plus-19

6.Key programmer
iprog-plus-20 iprog-plus-21

7.MCU
iprog-plus-22

  1. Mileage modification
iprog-plus-23

9.PIN ABS
iprog-plus-24

  1. software interface
iprog-plus-25 iprog-plus-26

That's all
Thanks

Source:http://www.obdexpress.co.uk/wholesale/iprog-pro-programmer-tool.html

Which Tool Can Correct Mileage for VW MQB R7F7014xx 5D Cluster?

 Currently, Yanhua Mini ACDP 2 and CGDI CG100X Programmer at OBDexpress.co.uk can support mileage correction for VW MQB R7F7014xx 5D Clu...